World of Level Design™
Tutorials to Becoming the Best Level Designer and Game Environment Artist (since 2008)
How to Create Video Trailers in Source Engine - L4D1/2: Making of Left2Party
Category: Source: L4D 1 & 2
August 22, 2011

In the following very long tutorial we are going to cover how to create video trailer using Source Engine; record video gameplay to make a trailer/music video and/or a fly-through the environment for a portfolio. Making of Left2Party and Raye Street House Fly-Through.
The tutorial is focused on:
- Recording gameplay video in a (custom) map
- Console commands to get smooth movements using survivor and spectator modes
- Spawning and controlling infected
- Using the captured video to edit in order to create a short feature film
- Creating a fly-through the environment
Over the last year I've had many questions asking how I created Hotel Swiss trailer.
Instead of going back I decided to create a new video.
I am going to cover how the videos were created and what it took to get all the shots.
We are going to start with Making of Left2Party. The tutorial includes a video tutorial and written tutorial.
Video tutorial and written tutorial were created to re-enforce each other. To receive the full benefit of the tutorial, I would recommend watching the video first and then going through the written part.
Results:
"Left2Party"
"Raye Street House Flythrough"
The video was done with many console commands that required spawning infected, controlling camera speed to capture smooth movement and being in spectator mode to record the action.
So lets begin.
Software used:
- Fraps®: to record the gameplay
- Adobe® Premiere® CS3: to edit the recorded videos
- L4D2 Custom Map: custom map was used to create the video in. I created the map as an architectural study in Source Engine. The house was inspired by a real place called Raye Street House. I used photos found on the web to construct the house in L4D2 Authoring Tools.
FRAPS
I have found Fraps to be the simplest and easiest way to record gameplay videos. The file size tends to be very large and I have an external hard-drive to capture everything on, so I can keep it separate from my internal hard-drive. The quality is great and there is no slow-down during gameplay. Which is what I needed. Link to Fraps
PREMIERE CS3
Premiere CS3 is what I use to edit the captured videos. This is a personal preference. You can use any other video-editing software that you are comfortable with. I've been using Premiere for a while and is what I feel the most comfortable with at the moment.
L4D2 AUTHORING TOOLS
I used L4D2 Authoring Tools to create the house and the map. Everything is stock asset that comes with the game. If you are interested in how to get L4D1/2 Authoring tools, check out this tutorial.
The console commands I used, work in L4D2. I don't know if the same commands can be used in other Source based games, but you can do the same thing in any Source based engine. The commands may differ in naming but the capability is the same across all Source based engine.
If you are interested in working with a different game that uses Source Engine, there are many you can try.
The environment has no gameplay elements. No survival, versus, scavenge or campaign entities. The only thing it does have is navigation and player starts. The navigation allowed me to spawn infected and have them wander around.
If you are only interested in a flythrough then you do not need navigation system set up. I will cover how to create a simple fly-through in the next tutorial.
Ok, so now we have all the software covered, next are the idea and the music.
IDEA AND STORY
The idea for the music video is zombies love to party. I wanted to capture an escalation of infected running to the house to have a good time.
The idea was broken down into four story elements.
Introduction or the setup is the first part of the video. Gives the viewer an overview of what is going on in the environment.

Second part is the rising. In this part the infected are slowly waking up and beginning to rise as the song picks up in tempo.

Third part is party explosion. This is where all hell breaks loose and infected begin to party. Third part is the height of the video.

Last part is the resolution or cool down. The party is over and we fade out.

Idea was heavily driven by the music. The video wouldn't have been created if I didn't hear the song, which inspired the idea and I wouldn't have thought of the idea if it weren't for the music.
MUSIC
I often work with music playing in the background. As I was working on the environment, the song came on. The track inspired an idea to create the music video. Music I used was "Apollo Road" by ATB and Dash Berlin.
Once I had the song and the idea, I began listening to the song over and over. I listened to the track so many times that I literally saw exactly what I wanted to see in the final video. I could close my eyes and while listening to the song and I new exactly how the final video was going to look like.
The song and the idea have to match. Listen to the song as much as you can. Get the feeling of the track. See the video come to life as you close your eyes when you listen to it. Pay attention to the rising and falling moments within the song.
Treat the song as a movie. Think of an introduction, rising action, reaching climax and resolution.
At this stage my next step was to begin recording.
CAPTURING VIDEO
I started to capture video shots; the individual clips using Fraps.
I set the video capture to 30 fps. Resolution I used to record in was 1024x768. High frame rate and larger resolutions will produce bigger file size of the video.
In the end I ended up with 43.8 gigs and 153 video files.
Launch Fraps and set a hotkey to record. I set the hotkey to F9.
I spent few days recording all the shots I needed. During this step I had the song in the background playing on repeat. This helped to set the tempo for the shots.
CONSOLE COMMANDS TO START
During the recording I've used many console commands in game to get what I wanted out of the video capture. To get the console working in L4D1/2 or other Source based games open up Steam.
Go under library and Right Click on the game and go to Properties.


Type in: -console
optional: -sw -w 1024 -h 768 (window game mode)

Once you launch the game you will have access to the console.
Press ` (tilde key). It will be right above Tab key and left of number 1.
Launch your map. In console type in map mapname
I typed in: map RayeStreetHouse

When the map is loaded there are few commands to get things started before you can begin recording.
In console type in the following commands:
sv_cheats 1 - turns on the cheats
sv_lan 1 - puts your game into a lan mode
sb_stop 1 - this will stop bot survivors from moving. This command isn't necessary but if you go into noclip mode and fly around your map, the survivors will run around the map following you. The simple command will stop survivors and any of their actions or movements.
sb_all_bot_game 1 - makes the map to support all bot play. When you go into spectator mode without enabling this command, it will make you a spectator as if your character is dead and waiting for a round to start. This will change the look of the environment, using a different post process.
cl_drawhud 0 - turns off the hud
hidehud 4 - turns off everything else that cl_drawhud wasn't able to
r_drawviewmodel 0 - this will allow you to hide the weapon from view when you are a survivor
noclip - will allow you to fly through walls and go anywhere in your map
god 1 - turns on the god mode. Nothing will hurt you.
cl_glow_brightness 0 - will turn off the glow on the survivors, when you are a survivor as well
Ok, so far we have turned off the hud, got rid of our weapon, made sure that it is all bot game. We also made ourselves into a god and turned on noclip.
If you don't like the survivor character you are, or you want to record some shots of a specific survivor use the following command to take control.
sb_takecontrol <name> - will force you to take over a survivor. Replace <name> with Ellis, Nick, Rochelle or Coach.
Right now we are able to fly around and record our shots. But you will notice that the movement with the keyboard and mouse is a bit erratic. We need to turn down the speed of the noclip speed movement.
There are two extra commands. They will allow you to have smoother movement when you are recording. These command are only when you are using noclip cheat.
sv_noclipspeed .5 - gives you smoother movement when you want to get pan, zoom, dolly and tracking shots. Change the number to something smaller. I use values between .2 and .8
sv_noclipaccelerate 0 - noclip accelerate allows the camera to accelerate from the initial movement. It gives the ability to ease into camera movements. I usually turn this off and set it to 0. But there maybe instances where you want this on.
You may also want to go into options and set the mouse movement to a very low value.

We now have the ability to record smooth moving shots and have everything turned off in the hud. But we are still in survivor's mode. If we any infected in our map, they will react to the player. This is good when you want to capture shots of infected going after you or chasing shots.
If you want to have more items for yourself there are a lot of commands to do so.
Just type in give and you can scroll through the list of everything you can give your character to have.
If we want to become spectators there are a few extra commands to know.
SPECTATOR
Now lets go into spectator mode and become a viewer instead of being survivor. In spectator mode we can capture video of the infected, but they will not react to us. With sb_all_bot_game 1, we can capture gameplay with survivors being controlled by AI. This is very useful when you want to record videos and get survivor fighting the infected.
If you have seen Hotel Swiss trailer, I became a spectator and began recording gameplay as the bot survivors did the job of activating the survival game mode and fighting the horde themselves. I just had to be there at the right time to get some interesting gameplay videos.
To go into spectator mode, make sure you have the following commands activated before joining spectator.
sv_cheats 1
sv_lan 1
sb_stop 1
sb_all_bot_game 1
spec_keep_team_glows 0
cl_drawhud 0
hidehud 4
To become a spectator, in console type:
jointeam spectator - this will put you into spectator mode. Make sure you had sb_all_bot_game set to 1, otherwise the game will count you as dead and change the post processing of the map.
jointeam survivor - puts you back into survivor team and in control of a character
spec_keep_team_glows 0 - this is optional, it turns off glows in spectator mode. If you are going to stay as a character and not as a spectator, you can ignore this.
You may notice that the keyboard camera and mouse movements are a bit too much, just as we were in noclip mode. We need to change the spectator camera speed and acceleration.
To get smooth camera movements as you are flying around capturing shots you have to set two commands
sv_specspeed .5 - set this to anywhere between .2 and .8. This will give you smoother movement for flying around.
sv_specaccelerate 0 - I tend to set this to 0, I don't want any acceleration during my camera shots. If you set this to any other value such as 5, this will ease into and out of shots as you move the camera. This may or may not be what you need.
You may also want to go into options and set the mouse movement to a very low value.
You now should have all the commands set up to begin capturing smooth camera movement in your shots. This is exactly what I used in Hotel Swiss trailer and Left2Party video.
If you still have survivors in your map and you haven't deleted them, you can jump back into being a survivor again.
jointeam survivor - will make you join survivors
SPECTATOR MODE VS SURVIVOR MODE
Being in survivor mode with god and noclip enabled will make the infected react to you.
In spectator mode, you are just an observer flying around capturing shots. Infected will not react to you.
I used both of these to capture shots in the videos. There were many times when I needed infected to react and run towards the camera.
Other times I wanted to capture infected without them being aware of any survivors, that is when I used spectator mode.
SPAWNING INFECTED
Now we are going to cover how to place infected into your map and make them behave a certain way. We won't have full control of what they can do, but we do have some control.
Here are few important console commands to use:
nb_delete_all - deletes all infected and survivors from your map. Useful command when you want to start over with a clean map and begin to place infected yourself.
z_common_limit 500 - this allows you to increase the amount of common infected in your map. For Left2Party I turned this way up to about 800. I don't know how many of infected I actually had, but large enough number allowed me to get really crazy shots.
z_spawn common - will spawn one common infected. I bind this command to a mouse key so I can spawn and populate an area with infected really quick.
You can spawn any other infected by changing common to other type.
z_spawn tank/witch/smoker/boomer/hunter
Very useful command that I used to make the infected stay in one spot until I needed them to move was z_must_wander command.
z_must_wander -1/0/1:
-1 will make them sit in one spot or lay down.
0 is the default, it will cycle between making them sit and wander.
1 is always wander.
For some of the shots where every single infected stands up all at once, I used the -1 while spawning common infected, then when I was ready to record I set it to 1 and all infected would stand up. I had to bind this command to a key so the console wasn't visible during recording.
To bind a key, type in the following:
bind <key> "z_spawn"
example: bind MOUSE3 "z_spawn"
Few other useful commands I used were:
director_panic_forever 1 - will make the panic events last forever
director_force_panic_event 1 - will force a panic event
For more commands and control, check out this link: http://left4dead.wikia.com/wiki/Console_commands
Now with all these commands I began recording the videos. Few of them I needed to be in god mode and noclip to get the infected reacting to me. Other times I was a spectator recording flying shots and infected walking around/partying shots.
The key was the smooth camera movement that I needed to have. Slow tracking and panning shots were the key to the entire shoot. I used a lot of sv_noclipspeed and sv_specspeed while changing these values up and down to get the shot speed I wanted.
In the end I ended up with 45 gigs worth of video, which needed to be edited.
VIDEO EDITING

Once you have your videos recorded, you will need to edit them in your video-editing software of choice. I use Premiere CS3 to edit the entire video. It took me few days to arrange and edit all the shots.
I had to organize all the shots into 4 categories and place them into folders in Premiere. This gave me some organization.
The folders were labeled Setup, Rising, PartyClimax, Cooldown. This was the idea for the entire project, a rising action arc.
MAKING OF RAYE STREET HOUSE FLYTHROUGH
For flythrough video I used exact same commands to capture the shots. It was shot in spectator mode and I used nb_delete_all to remove all the survivors and infected.
Also the purpose of the video is different, to showcase the environment. The song was the driving force for camera angles and movement. The song tempo helped to set up the shots.
What we have covered so far you should be able to simply go into spectator mode and control spectator camera speeds to record the needed shots.
FINAL
The key to both projects were the initial idea, the vision and tempo/rhythm used in the song. I did my best to keep true to original vision and it helped me to capture the shots I wanted. I didn't stray away from the idea, which helped me to narrow the focus of the project during recording and editing. I knew exactly what I wanted to capture and what the final video will look like.
I hope this tutorial and making of helped you to understand the process and workflow of how to capture shots for two different videos and their intended purpose. Good luck in creating your own kick-ass videos in Source Engine.

SUBSCRIBE & GET FREE UE5 PDF GUIDE
Subscribe to receive NEW/UPDATED and FREE "UE5 Beginner's Quick Start Guide" PDF (90 pages).

Visit this page for more info about the guide...
TOP 5 TUTORIALS TO LEARN UE5
 UE5: How to Download and Install Unreal Engine 5 in 5 Minutes
 UE5: 11 Principles to Learning and Using UE5 as a Complete Beginner
 UE5: Crash Course Quick-Start Guide to Begin Using UE5 - TODAY
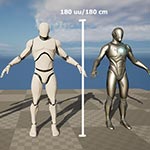 UE5: Complete Guide to Player Scale, Dimensions and Proportions
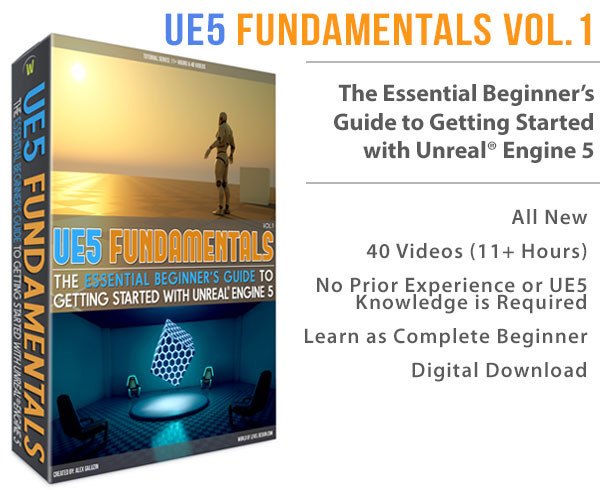
 UE5: Fundamentals Vol.1 - Essential Beginner's Guide to Getting Started
TUTORIAL CATEGORIES
UE5 FUNDAMENTALS VOL.1 COURSE
UE5: RETRO OFFICE PROJECT

MAYA FOUNDATION COURSE

LEARN THE PREPRODUCTION PROCESS

ABOUT WoLD & ALEXG

My name is AlexG. I am self-taught level designer, game environment artist and the creator of World of Level Design.com. I've learned everything I know from personal experimentation and decades of being around various online communities of fellow environment artist and level designers. On World of Level Design you will find tutorials to make you become the best level designer and game environment artist.
Home Terms of Use/Trademarks/Disclaimers Privacy Policy Donate About Contact
All content on this website is copyrighted ©2008-2024 World of Level Design LLC. All rights reserved.
Duplication and distribution is illegal and strictly prohibited.
World of Level Design LLC is an independent company. World of Level Design website, its tutorials and products are not endorsed, sponsored or approved by any mentioned companies on this website in any way. All content is based on my own personal experimentation, experience and opinion. World of Level Design™ and 11 Day Level Design™ are trademarks of AlexG.
Template powered by w3.css