World of Level Design™
Tutorials to Becoming the Best Level Designer and Game Environment Artist (since 2008)

The following quick tips series is created for beginners and experts using Maya.
These are quick useful tips to help improve and show techniques you may have not known or forgotten about.
All videos are very short, between 1-5 minutes.
The following Part 2 includes 10 quick tips:
- Tip #11: How to Duplicate Objects and Keep History Input to Edit
- Tip #12: How to Fix Accidental Edge Bevels and Rebuild Corners
- Tip #13: How to Circularize Single Quads/Flat Plane Geometry
- Tip #14: How to Display Percentage Stat of Used UV Space Inside UV Editor
- Tip #15: Fix Gradient Display Issue on Faces by Controlling Hard/Soft Edges
- Tip #16: What Does Height Baseline Do in Inputs Menu?
- Tip #17: Make Bevel Amount/Distance the Same Across Any Mesh/Edge
- Tip #18: Fix Low-Poly Cage Displayed on Smooth All Subdiv Preview
- Tip #19: Unfold Tool When UVs Won't Unwrap Properly
- Tip #20: Problem/Solution to Extruding Faces and Maintain Same Thickness
Maya: Quick Tip Series:
- Part 1 (Tips #1-10)
- Part 2 (Tips #11-20) - current
- Part 3 (Tips #21-30)
Maya Tip #11: How to Duplicate Objects and Keep History Input to Edit
Ctrl + D shortcut will duplicate an object but will NOT keep Input History data along with it.
Input History stores ability to edit the object's size, rotation and scale. As well as any modeling operations and changes you apply to the object.
If you need to keep Input History data for duplicated objects, go to Edit > Duplicate Special (Options) and enable Duplicate Input Graph:

Once you have it enabled, you can use the new shortcut key anytime you need to duplicate an object and also keep the Input History data.
- Ctrl + Shift + D = Duplicate Special
Maya Tip #12: How to Fix Accidental Edge Bevels and Rebuild Corners
Applying a bevel on an edge you didn't want is common during modeling. Something you may not see right away and you've already done a lot of modeling so undo can't be used.
The fix is all about snapping and merging vertices.
Here is how to rebuild your geometry:
- Delete extra faces created by the bevel.
- Snap vertices to other edges or other vertices to reconstruct straight lines
- Merge any overlapping vertices
Shortcuts used for Snapping:
- Hold C and Middle Mouse Click = Snap to Curve/Edge
- Hold V and Middle Mouse Click = Snap to Vertex
Maya Tip #13: How to Circularize Single Quads/Flat Plane Geometry for Complex Cylindrical Shapes
Here is how to take a flat plane and a single quad then have a cylindrical shape being extruded from it.
- Select the face to Circularize
- Ctrl + E to Extrude that single face; this will help to contain the Circularize within that quad
- Apply Edit Mesh > Circularize to that face
- Add Divisions to make it a circle
- Change Radial Offset to adjust the size of the circle
- Change any other option you need
- Extrude again
- Fix the n-gons using Multi-Cut

I cover Circularize and Multi-Cut modeling methods in more detail in Maya Foundation: Home-Study Course.
Maya Tip #14: How to Display Percentage Stat of Used UV Space Inside the UV Editor
Inside the UV Editor you can display % of UV Space used.
Go to View > Heads Up Display > UV Statistics Options:

Percentage of used UV space is already enabled but doesn't show. Likely a bug and been like this for many years. Just hit Apply.

Now on bottom of UV Editor you'll have % Used UV Space:

Maya Tip #15: Fix Gradient Display Issue on Faces by Controlling Hard/Soft Edges of Your Mesh
Soft/Hard edges control the shading display of your models. This applies to how your meshes are viewed in Maya and inside any game engine.
Whenever you are working on your models you will be extruding, beveling, merging vertices and more. Sometimes Maya will set your edges to appear hard when they should be soft and vice versa.
You will need to control and set some edges to be hard edge and some to soft edge. Anything that needs to be 90 corners will require a hard edge. Anything that is curved and soft, smooth transition will need to be set to a soft edge.
Enable display of Soft/Hard Edges:
Display > Polygons > Custom Polygon Display Options and enable Edges: Soft/Hard for All Objects Effected:

You will then see the following edge being displayed on your models:
- Dashed Edges = Soft Edge
- Solid Edges = Hard Edge
To Set Edges:
Select the edges you want to change and to go Mesh Display and choose Soften Edge or Harden Edge.

Maya Tip #16: What Does Height Baseline Do in Inputs Menu?
Anytime you create a polygon primitive it will be positioned at its pivot point in the center of the world.
In 2023 and later, you can modify to have objects be created at top of the grid with pivot point at World Origin, automatically.
Inside the Inputs menu, you will see Height Baseline:

You can change this anywhere between -1 to 1.
- -1 = Object will be placed at the top of the ground plane with pivot moved to World Origin
- 0 = Default
- 1 = Object will be placed at the bottom of the ground plane with pivot moved to World Origin
Maya Tip #17: Make Bevel Amount/Distance the Same Across Any Mesh/Edge
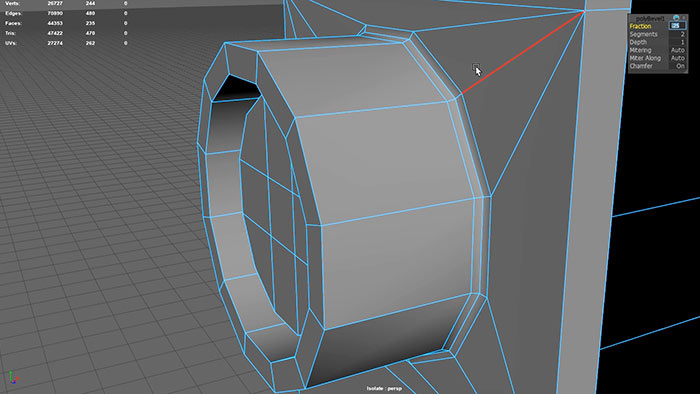
In Maya when you bevel edges, the distance will always be relevant to the size of the object and edges being beveled. This is controlled by Fraction value which uses cm as it's size:

Larger objects will need to have larger Fraction and smaller objects will need to have smaller Fraction.
However, if you want the same distance Bevel to be applied regardless the size of the mesh then you'll have to turn off Offset as Fraction option.
Same Bevel: to get the same bevel amount on edges, turn off Offset as Fraction inside the Channel Box right after you apply Bevel:
- Offset as Fraction: Off (0)
- Then use Offset not Fraction and use same number on both

Maya Tip #18: Fix Low-Poly Cage Displayed on Smooth All Subdiv Preview When Pressing 3
Using modeling with Subdivision method, you will be pressing 3 to preview how your model will Subdivide.
3 enables Smooth All or Subdiv preview.

There are times when you will see a low-poly cage on your mesh when pressing 3 but you shouldn't.

This is due to pressing Alt+3 by accident and enabling Displacement Preview. However Alt+3 isn't a toggle.
To get your mesh to display correctly when pressing 3 for Subdiv Smooth Mesh preview and remove low-poly cage go to Attribute Editor and open Smooth Mesh and make sure Displacement Preview is disabled and then under Subdivision Method enable Use Global (OpenSubdiv Catmull-Clark):

Maya Tip #19: Unfold Tool to the Rescue When UVs Won't Unwrap Properly
Unfold works really well for most of the UVs that need to be unwrapped. You'll find this under Modify > Unfold:

However, sometimes it does a horrible job of Unfolding:

In these cases there is another Unfold you can use. You'll find it under Tools > Unfold:

This gives you a brush based Unfold Tool where you can paint to Unfold a set of selected UVs.
If you go to Unfold Tool options, you'll find settings for Brush Size and Brush Strength:

- Hold B and Left Click Hold and Drag = Change Brush Size
Select the UVs you want to use Unfold Tool on and paint to Unfold:

Maya Tip #20: Problem/Solution to Extruding Faces & Maintain Same Thickness (Component Scaling)
Common issue is extruding a set of faces and wanting to maintain the same thickness and length but that's not happening due to the shape of the object.
In such cases you need to scale based on Components and not based on Object or World.
Double-Click on Scale icon to open up Tool Settings and change Axis Orientation to Component:


Extrude the faces first then to scale them on Component level:

More Maya Quick Tips
Maya: Quick Tip Series Part 1 (Tips #1-10) can be found here.
Home Terms of Use/Trademarks/Disclaimers Privacy Policy Donate About Contact
All content on this website is copyrighted ©2008-2024 World of Level Design LLC. All rights reserved.
Duplication and distribution is illegal and strictly prohibited.
World of Level Design LLC is an independent company. World of Level Design website, its tutorials and products are not endorsed, sponsored or approved by any mentioned companies on this website in any way. All content is based on my own personal experimentation, experience and opinion. World of Level Design™ and 11 Day Level Design™ are trademarks of AlexG.
Template powered by w3.css


 Modular Environment Design Masterclass Tutorial Course
 Maya Foundation: Home-Study Course - Model and UV Environments
 Substance 3D Painter Essentials - Master Texturing
 UE5: Fundamentals Vol.1 - Create with Unreal Engine 5
 UE5: Retro Office Project - Create Beautiful Interior Env
 UE5: Master Material Creation - Create Master Materials in UE5
 Preproduction Blueprint: Plan Environments and Level Designs


