World of Level Design™
Tutorials to Becoming the Best Level Designer and Game Environment Artist (since 2008)
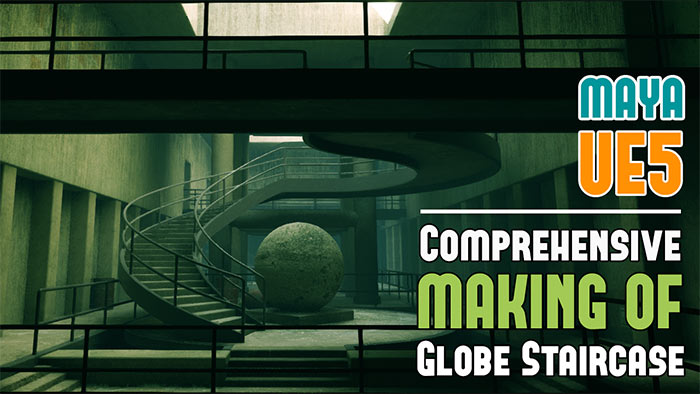
Making Of Globe Staircase - Comprehensive Process for Creating Environments Faster (Maya, UE5, Megascans)
Category: Maya, Environment Art, UE5
March 07, 2024
You have to allow yourself to experiment with different workflows to create environments faster.
Many projects can be done quicker if you let yourself try things out more while not having to create the "perfect environment" using "perfect workflow".
I often pass up on some projects because I know the time sink it would be. But it doesn't have to be. There are many tools, techniques and workflows you can try to create environments quicker.
I put off working on "Globe Staircase" project because I didn't want to work on another modular environment right after finishing "UE5 Retro Office".
So I decided to try something new.
Instead of creating a modular asset pack then having to texture and construct the environment in UE5. What if I modeled everything in Maya and completed the entire environment? Then exported everything out of Maya into UE5 without having to reconstruct it?
Here is the full comprehensive breakdown on Making of The Globe Staircase...
Video Tutorial
Software Used
- Maya
- UE5
- Quixel Bridge
Inspiration and Photo Reference
Idea came from a single image. I found this Globe statue with spiral staircase.

This is a real place in Embarcadero Center, San Francisco.
I didn't want to create the environment by making a copy of the photo reference. So I generated a few ideas of what the environment could be but didn't find any I liked.
Then I used Photoshop Generative Fill to provide me with ideas.
Generative Fill is the AI image creation tool in PS that can put to great use for ideas. It can create additional visual information inside or outside the image.
- Open an image
- Expand your Canvas so you have more space (Image > Canvas)
- Using Rectangular Marquee Tool, make a selection around the image
- Invert the selection (Ctrl+Shift+I)
- Click Generative Fill and Generate
This was the image I chose for the idea:

Modeling Process (Export/Import)
Always make sure you create your environments and assets to scale.
I've covered scale and dimensions in-depth before. So make sure you check out these 2 tutorials to get started:
- Maya/UE5: How to Match Grid Size and Dimensions in Maya to UE5 - EXPLAINED
- UE5: Complete Guide to Player Scale, Environment Dimensions and Creating to Proportions
Blockout is always the first step to any environment and here was the first pass on it. This set the scale, dimensions and proportions.

As soon as I had the blockout done in Maya, I exported it to UE5.

Process I used for Exporting from Maya:
- Select everything in Maya I want to export
- File > Export Selection as FBX (all meshes will be saved inside single FBX file)
- Options: Smoothing Groups and Smooth Mesh enabled

Process I used for Importing into UE5:
- Import the single FBX you exported
- Disable: Combine Meshes
- Enabled: Build Nanites, Generate Missing Collisions, Create Material

For complete case-study on Exporting/Importing from Maya into UE5 see this in-depth tutorial.
Once the blockout had the right scale and proportion, it becomes my template to start modeling the entire scene.
For this process I stay entirely in Maya to model and construct the environment. I re-use many of the meshes by duplicating them and placing them to create the scene with. I also continue to exporting different versions of the modeled scene for testing in UE5.

Every time I exported and imported into UE5, I didn't save the Static Meshes or the level. It was only to continue testing to see the environment in UE5.

Once I was done modeling, I named all the meshes in Maya. These same names were going to be used in UE5 for all the objects.
Final export for testing:

I don't save the scene or the assets in UE5 just yet. I need to do my UVs next before I do final export/import and work the rest of the time in UE5.
UVing Breakdown
UVs have to be done after you are finished modeling. This step is what will make your textures appear on your geometry correctly.
I will be using Megascans material assets to texture this environment with. This will greatly speed up the environment completion. Otherwise I'd have to create the textures myself in Substance Painter or use some public domain tiling textures.
Using Megascans assets to create with may not be an option in many cases (especially for unique assets) but when available, it can speed up your environment creation.
For many of the assets I used Automatic Unwrap then Move/Sew certain UV shells together.
Since I was going to use tiling textures, my UVs can overlap:

I also used specific Texel Density for all the assets to ensure they will look good placed next to each other. No texture on any given asset would look too high res or too low res.
I decided to use 512px = 1 meter for texture resolution.
You could use 1024 or 2048 for every 1 meter of geometry. The number you decide is up to you. The higher you go the more texture resolution (detail) you can have within 1 square meter of world geometry.
Most games use anywhere between 512-2048px. With some going as high as 4096 but that's usually for characters, vehicles, weapons or hero assets.
This means for every 1 meter of world geometry, it should have 512px of texture space. So if a wall was 4 meters in height and width, my texture resolution had to be 2048x2048 or it could be 512px but that texture would need to tile 4x to retain the same Texel Density.
The Texel Density in Maya for nearly all UV shells was set to 5.1200:

The way I got that number was:
- Create 100x100cm plane (1 meter by 1 meter)
- Select the UV shell in UV Editor
- Under Texel Density, set map size to 512
- Why 512? Because I chose to have 512px for every 1 meter of world geometry
- Click Get to receive the Texel Density number
For many Static Meshes I wanted to have multiple Material IDs in UE5:

This means I can assign different Materials onto certain parts of geometry on one single Static Mesh.
To have this option in UE5, you need to set this up in Maya.
Any geometry in Maya already has Lambert1 assigned onto it. You need to create a second material to assign to specific faces. So the object will have multiple materials on it.
- Create a new Lambert material (or any other material such as Blinn or Phong)
- Select the faces you want to assign the new material onto
- Right-Click and choose Assign Existing Material
- Choose the new material
Upon export then import into UE5, this object will have multiple Material ID slots.
Once everything has been UVed, export it all as final FBX.
Make sure you name all the meshes so you can find them easier in UE5 if needed.
Collisions
Collisions are only required if you will spawn into your environment to play or walk around to explore.
Otherwise you can ignore setting up collisions.
4 ways to setup collisions for UE5:
- Custom collisions in Maya to be exported with geometry
- Using Static Mesh Editor and Collisions Tool presets in UE5
- Convex Decomposition in Static Mesh Editor
- Using Complex Collision as Simple
On import into UE5, I had set to Generate Missing Collisions. This creates simple primitive hulls based on imported geometry. For most simple box like shapes this worked great. But for more complex, curved geometry it did not.
This environment will not be a playable but I still wanted to walk inside it and explore it. So I had to update some Static Meshes to have better collisions.
I changed Collision Complexity to Use Complex Collision as Simple on any Static Mesh where default collisions weren't doing their job. This was mostly done on curved staircase and curved railing.

This option should not be used for playable environments as it's not efficient. But for anything that needs to have accurate collisions quickly, this is a great solution.
Texturing with Quixel Bridge
Large environment assets such as walls, floors, ceilings, pillars are perfect for tiling textures.
Texturing and Material creation is often a time consuming process. I wanted to speed this step up by using Megascans Materials.
You have access to Quixel Bridge right inside UE5 to get thousands of different Megascans assets.
See this Definitive Guide to Using Quixel Bridge.
I started downloading different concrete and metal surfaces.
The best thing about using Quixel Bridge in UE5 is ability to download and add the assets right into your project with couple of clicks.
Once you download something from Bridge, it gets placed into Megascans folder in Content browser, ready to be used. No setup required.

Once I had a set of Materials downloaded, I began applying them to the Static Meshes.

Because UVs were setup with specific Texel Density, I didn't need to change any tiling for any Material.
I also downloaded all the textures to be at Medium Quality which are 2048x2048 texture resolution.

For some Static Meshes I had 2 or 3 Material ID slots. This gave me the ability to apply multiple Materials onto one Static Meshes for variety.
Remember I set this up in Maya by applying multiple Materials onto the faces where I wanted to have multiple Material ID slots.
Each Megascans Surface downloaded, you'll have a Material Instance with a set of properties to adjust for how you want that texture to look inside your level.

This is very important because not all Materials across your environment will match in brightness, color or saturation. You need to have the visual harmony of all surfaces look like they belong together in the environment. Adjusting each Material Instance for all used surfaces will help with that.
You can see how all Albedo colors look together by switching to Unlit Mode (Alt+3) and then back to Lit Mode (Alt+4). If anything stands out like it doesn't belong, change that surface's Saturation, Brightness, Contrast and Color.

The texturing process was quick due to everything already created for me. I didn't have to set anything up. It will speed up your environment creation.
This process will not work for every project but use it when you can. It worked in this case because the assets were UVed to use tiling textures.
Decals
Decals are Materials with Opacity that can be projected to display on top of other Materials. Allowing for unique detail to appear without adding that detail into the main texture. This helps to add story to the scene and break up any tiling repetition you may see.
Decals were a major part of this project.
Before and after Decals:


All Decals I downloaded were also at Medium Quality (2048x2048 textures).
Drag and drop the Material Instance Decal actor into the scene to see it project onto your environment surfaces:

You will need to scale the Decal inside your scene to make it work. It usually comes in very large. Just enable scale tool and make it smaller.
There will be a blue arrow pointing down to show you the projection direction of the decal:

Rotate the decal if you want to project on walls or ceiling.
Note the green bounding box of the decal. You want to make this box as small as you can to only affect the surface onto which you want to project the decal:

If you don't want certain Static Meshes to receive Decals, go to Details Panel for that Mesh and disable Receive Decals:

Decals come setup as a Material Instance for you to change the visual properties. I changed the following to help blend the Decal into the scene better:
- Overlay Intensity
- Color Overlay
- Opacity Intensity

If some decals show up as black, then you need to check the scale values so they are not negative:


Lighting
The environment is lit with indirect lighting and only using 4 lights.
- Directional Light
- Sky Light
- 2 Rectangular Lights
The initial setup requires the following:
- Directional Light
- Sky Light
- Sky Atmosphere
Use File > New Level: Basic Template to get all the lighting actors already inserted for you.

Before you start lighting, make sure you have Post Process Volume and you control Auto-Exposure. Otherwise you'll get constant light exposure adjustments as you work on your scene.
- Infinite Extent: Unbound
- Metering Mode: manual
- Apply Physical Camera Exposure: on
- Adjust Exposure Compensation, I set mine at 14

First two lighting actors you need to work with is the Directional Light and Sky Light. Get these two to do the most work first.
I changed the Directional Light intensity and temperature:

And I pointed the angle to hit interior of the upper hole to allow more light into the underground environment:

Sky Light will introduce more bounced light into indirectly lit areas. I didn't change any properties for this but you could adjust Indirect Lighting Intensity to allow more indirect light.
Instead of changing the Sky Light Indirect Lighting Intensity, I adjusted another value to allow more indirect light.
In Post Process Volume, I increased Diffuse Color Boost to 1.5. This increases the light bounced from the color textures more.

You may also come back to Post Process Volume to adjust Exposure Compensation to get more or less light inside your scene.
Tips on getting more bounced light into indirectly lit areas with Lumen:
- Increase Directional Light intensity
- Increase Directional Light Indirect Lighting Intensity
- Increase Sky Light Indirect Lighting Intensity
- Increase Post Process Volume: Diffuse Color Boost
You can infuse more direct light with faked artificial light by using Point Lights, Spot Lights or Rectangular Lights. I used 2 Rectangular Lights positioned above the openings. This can help to eliminate noise flickering caused by Lumen from not having enough light in the scene. Make sure you get everything you can from Directional Light, Sky Light and Post Process Volume before adding these artificial lights.

I adjusted the Intensity of these Rectangular Lights and matched the Temperature Color to the Directional Light. Here are all modified properties:

Final lit scene up to this point:

Adding Fog
Without fog the scene looks bland.
I used Exponential Height Fog and Local Height Fog to add atmosphere into the environment.
Exponential Height Fog is a standard actor you should already have inside your level if you are using Basic Template. This gives you fog inside your environment. I tweaked few properties for this to have some fog appear in the distance of the tunnel:
- Fog Density
- Fog Height Falloff
- Fog Inscattering Color

Below into the underground Exponential Height Fog becomes emissive.

This doesn't create any problems when using Exponential Height Fog in exteriors, but for dark interiors it doesn't look good.
I needed to add more local area fog just into below ground of the environment without adding more fog to the main scene.
For this you can use a new actor in 5.3 Local Height Fog. You can find it under Visual Effects > Local Height Fog actor:

Drag it into your scene and begin to adjust properties. I changed the following:
- Fog Density
- Fog Height Falloff
- Fog Height Offset
- Scattering Distribution
- Fog Albedo
Before and after Local Height Fog:


Color Grading
Color Grading or Color Correction is a post-process effect that gets applied to the entire scene.
You could apply this to certain parts of the environment with multiple post-process volumes or have one universal applied to the entire environment.
Make sure before you do any Color Grading, the environment is completed. It is textured and lit.
You have 2 options for Color Grading:
- Color Grading with LUTs
- Color Grading Tools
For this project I went with using LUTs to make this process faster.
LUT is an image that contains Color Grading information of your scene.
You simply take a screenshot of your environment then use Adjustment Layers in Photoshop to change the image. You then save a small 256x16 png image file that holds color information of your scene to use in UE5.
Learn more about creating and using LUTs in this tutorial.
With LUTs, I was able to create multiple visual looks to change quickly.
Here are 4 different LUT color adjustments of the final scene.


What I Learned
- You have to allow yourself to experiment with different workflows to create environments faster. Many projects can be done quicker if you let yourself try things out more while not having to create the "perfect environment" using "perfect workflow".
- This process will not work for all projects but it's great for environments that you aren't going to expand on and ones that use tiling textures.
- Instead of having to worry about creating modular pieces, testing them, exporting them, texturing them and having to reconstruct the environment. By focusing on modeling the entire environment scene in Maya then exporting everything as one single FBX file into UE5.
- Decals will help to speed up the process by adding detail without having to model, sculpt or vertex paint that detail into the meshes.
- The downside of this workflow is I can't expand on the environment because everything is its own unique static mesh, so what you see is what you get.
- Using Megascans Assets is another quick way to texture and detail your environments. But this only works if you find the assets that fit your idea. It worked for this environment because there are a lot of concrete textures available.
Become the Best Environment Artist with These Tutorials
Learn how to create your own custom game environments, how to model, UV and light your own worlds using Maya and UE5. Take a look at these in-depth premium tutorial courses. Learn to put your ideas into worlds.
Home Terms of Use/Trademarks/Disclaimers Privacy Policy Donate About Contact
All content on this website is copyrighted ©2008-2024 World of Level Design LLC. All rights reserved.
Duplication and distribution is illegal and strictly prohibited.
World of Level Design LLC is an independent company. World of Level Design website, its tutorials and products are not endorsed, sponsored or approved by any mentioned companies on this website in any way. All content is based on my own personal experimentation, experience and opinion. World of Level Design™ and 11 Day Level Design™ are trademarks of AlexG.
Template powered by w3.css


 Modular Environment Design Masterclass Tutorial Course
 Maya Foundation: Home-Study Course - Model and UV Environments
 Substance 3D Painter Essentials - Master Texturing
 UE5: Fundamentals Vol.1 - Create with Unreal Engine 5
 UE5: Retro Office Project - Create Beautiful Interior Env
 UE5: Master Material Creation - Create Master Materials in UE5
 Preproduction Blueprint: Plan Environments and Level Designs
