World of Level Design™
Tutorials to Becoming the Best Level Designer and Game Environment Artist (since 2008)
Substance Painter: Create Custom Masks from Roughness Textures and Use it to Improve Your Materials
Category: Substance Painter
February 11, 2025

I will show you how to create a mask from Roughness texture to use in Substance Painter.
Doing this will help you adjust parts of the texture or material without affecting another part of a texture or material. This is especially important when you can't generate a mask from your existing setup yourself and have to create one manually.
You'll find yourself constantly in need of generating masks to control texturing your environments and props.
Video Tutorial
Exporting the Roughness Texture
I have a ceramic tile texture that's been created from Base Material and one problem with it is Roughness grout.
It is very shiny and uses same Roughness as the ceramic tile.

Grout is concrete and is not supposed to be shiny. However, I have no controls within the Base Material settings to adjust these two properties individually.
So I will need to do this manually using a Mask.
There are no Masks available that will do this for me so I have to create one myself.
To create this Mask, I need a black and white texture that separates the ceramic tile and the concrete grout. And current Roughness texture from the Base Material is perfect for this.
However, current Roughness texture is has too many grayscale values.

For Masks you need clear Black and White separation.
- White = Shows (Reveals)
- Black = Hides (Conceals)
You can export the current Roughness texture and then make adjustments using Photoshop Levels to turn it into clear Black and White values.
Export the textures and only export the Roughness. You can use ANY Export Preset as long as it can generate a Roughness texture. In my case I will use UE4 Packed preset.

With packed textures, Roughness will be placed into the Green Channel. This is not a problem as I can copy this Green Channel Roughness information and place it into its own canvas for editing.
What Will Not Work
Using a Roughness texture to create a Black/White Mask may not work in every situation.
You need to have a good starting point to make adjustments so the Roughness can be changed to a Mask.
Not every Roughness texture will allow you to do this. All depends on the original Roughness you are using.
For additional ways of creating Masks from Base Color or Normal Map, take a look at this tutorial: Substance Sampler: Convert/Create Masks from Existing Textures (Base Color and Normal Maps).
Adjusting Roughness Texture
Open the Roughness texture in Photoshop.
If you have a packed texture that has Ambient Occlusion, Roughness and Metallic packed into a individual channels (such is the case with some Presets) then you'll need to extract the Green Channel onto its own canvas.
Show visibility for only the Green Channel:

Select All by pressing Ctrl + A and then copy the selection with Ctrl + C:

Go to File > New to create a new document with the same dimensions as the original Roughness texture. In my case it is 2048x2048. Document can be either RGB 8bit or Grayscale (both will work).

Press Ctrl + V to paste the copied Green Channel information into this new document.
Press Ctrl + L for Levels and adjust the 3 sliders:

To make sure you have Black and White separation, use the Color Picker and sample the White values (RGB: 255,255,255) and Black values (RGB: 0,0,0).
Remember: White = Reveals and Black = Conceals.
If you need to invert your black and white values, press Ctrl + I = Invert. In my case I did invert the mask.
The result you are looking for is a clean Black and White image to be used as a Mask:

Saving the Mask
Save the Mask by going to File > Export > Export As (Alt + Shift+Ctrl+W) and save as: .PNG with no transparency.

Using Masks in Substance Painter
Import the Mask into Substance Painter by going to File > Import Resources:

Add Resources and choose the saved PNG Mask and define it as a Texture then click Import:

Let's use this Mask to help hide the Grout Concrete Roughness.
Create a new Fill Layer and disable everything except for Roughness Channel:

Since we are working to hide parts of the Roughness texture, this is why I created a Fill Layer that will ONLY control the Roughness property. But this Mask can be used for any other Channel information.
Create a Black Mask for this Fill Layer and add a Fill Effect for the Black Mask. Drag the imported Mask into the Grayscale property of the Fill Effect within the Black Mask you just created.

Go back to the Fill Layer icon and begin to adjust the Roughness value to see the Mask take effect. In my case I want to increase the Roughness value to make the Grout Concrete rough.


You can switch to Roughness Channel View and you can see you have now successfully controlled the Grout Concrete to be less shiny and made it rougher.
Adding Roughness Variation into the Stack
You can do more with this and take the material further.
I took care of the shiny grout concrete using the Mask but the tile is too shiny. It needs a bit of Roughness Variation to make it more believable.
Add a new Fill Effect into the Roughness Fill Layer where you have the Mask:

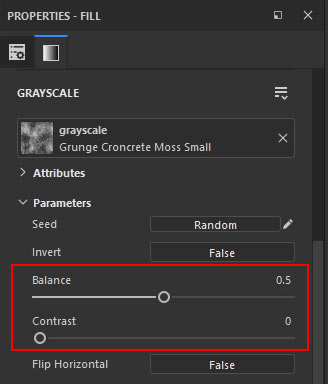
Use a Grunge texture from the Library and drag it into the Grayscale input box for this new Fill Effect (I renamed the Fill Effect to Roughness Variation):

We have a problem with the current Fill Effect hiding the Mask for the grout concrete, making it shiny again.
To fix this, change the Blend Mode for this new Fill Effect you created for Roughness Variation to either: Lighten Max or Screen.


You can then go to the Fill Effect properties and adjust Roughness Variation effect by changing Balance or Contrast values:
If you want to learn more about adding Roughness Variation into your Material, see this tutorial: Substance Painter: How to Add Roughness Variation to a Material/Textures (3 Options).
Using Custom Mask for Color Controls
You now have a Mask you can use to control which parts will be adjusted and which will not be.
For example: you can set up to change Base Color only for the tile and not for the grout or vice versa.
Create new Fill Layer and disable everything except for Color Channel:

For tis Fill Layer, create a Black Mask and then a Fill Effect for the Black Mask. Drag and drop the Mask into the Grayscale input box to start using the Mask:

Go back to the Fill Layer icon and adjust the Base Color:


If you are adjusting the wrong parts of the texture, you can invert the Mask. Right Click on the Black Mask icon you created for the Fill Layer and choose Invert Mask:

You can now re-use this Mask for different effects to control parts of your texture.
Substance Painter Essentials Tutorial Course
Now that you've modeled and UVed your 3d assets, it is time to texture them. Substance 3D Painter is the BEST and the STANDARD texturing software to use. In this complete tutorial course I will show you how to texture with Substance 3D Painter completely from scratch in ONLY 6 hours.

SUBSCRIBE & GET FREE, UPDATED PDF GUIDE
Subscribe to receive FREE & Updated "Maya 3D Primer" PDF Guide (200+ pages).

See more about this Free PDF Guides and what you are subscribing to.
TOP 7 TUTORIAL COURSES FOR 2026
 Modular Environment Design Masterclass Tutorial Course
 Maya Foundation: Home-Study Course - Model and UV Environments
 Substance 3D Painter Essentials - Master Texturing
 UE5: Fundamentals Vol.1 - Create with Unreal Engine 5
 UE5: Retro Office Project - Create Beautiful Interior Env
 UE5: Master Material Creation - Create Master Materials in UE5
 Preproduction Blueprint: Plan Environments and Level Designs
TUTORIAL CATEGORIES
SUBSTANCE PAINTER ESSENTIALS

MAYA FOUNDATION COURSE

MODULAR ENVIRONMENTS MASTERCLASS

ABOUT WoLD & ALEXG

My name is AlexG. I am self-taught level designer, game environment artist and the creator of World of Level Design.com. I've learned everything I know from personal experimentation and decades of being around various online communities of fellow environment artist and level designers. On World of Level Design you will find tutorials to make you become the best level designer and game environment artist.
Home Terms of Use/Trademarks/Disclaimers Privacy Policy Donate About Contact
All content on this website is copyrighted ©2008-2024 World of Level Design LLC. All rights reserved.
Duplication and distribution is illegal and strictly prohibited.
World of Level Design LLC is an independent company. World of Level Design website, its tutorials and products are not endorsed, sponsored or approved by any mentioned companies on this website in any way. All content is based on my own personal experimentation, experience and opinion. World of Level Design™ and 11 Day Level Design™ are trademarks of AlexG.
Template powered by w3.css