World of Level Design™
Tutorials to Becoming the Best Level Designer and Game Environment Artist (since 2008)
Substance Painter: Making a Simple Trim Texture for Props (Maya/UE5)
Category: Substance Painter
August 03, 2023
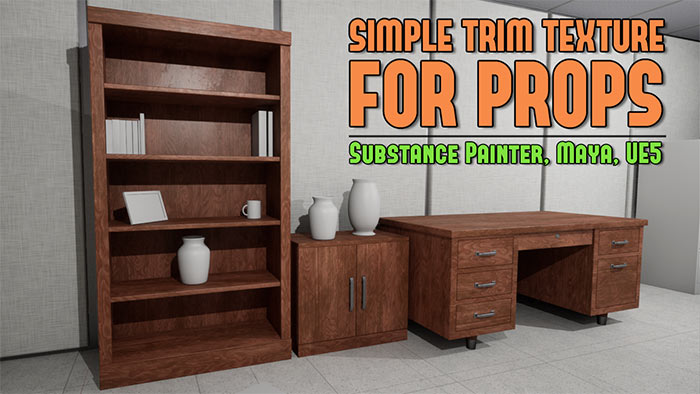
Trim sheets are one of the best ways to texture multiple props and environment assets.
In this tutorial I will show you how to create a simple trim texture for props that contains wood and metal using Maya, Substance Painter and UE5.
You can use this method to create any other trim sheet that contains 2 different surface types.
Video Tutorial
The Props
The three props used in this tutorial are a wooden shelf, wooden desk, wooden cabinet. Wood takes up the majority of the texture with only small portions for metal.

Maya
Create a flat plane (300x300cm) in Maya and insert an extra edge at the bottom of the plane.

The additional edge will allow you to separate the texture surface types and assign wood and metal to those polygons.
Export the plane as FBX. It will be used in Substance Painter.

Instead of using the prop models and importing them into Substance Painter, you will be using this flat plane to texture. Then once you have the textures, you'll Unwrap the props, placing the UVs into the appropriate space in the texture.
Substance Painter
Create a new project and import the exported plane. I used UE4 Project preset since I'll be using it in Unreal Engine. UE4 preset will work for UE5.

Assign wood and metal materials onto the plane.

Then for Metal use Black Mask to hide the part of Metal material to expose wood.

Use Polygon Fill within the Black Mask to do this.

Make any additional adjustments to each part of the Material to get the visual result you want.
Export textures using UE4 Preset, since this will be used in Unreal Engine.

You now have your trim textured completed.
UVing the Props
UV the props. Place the UVs of each prop that will be wood onto the wooden part of UV Layout and metal into the metal part of UV Layout.

All prop UVs will overlap and that is the point. Reusing the trim sheet for multiple props and their UVs.
To make the placement easier, you could setup a Material in Maya to use the Albedo texture so you can see the results.
Make sure UV Texel Density matches between all 3 props and for each UV Shell:

Final Result
Import the textures into UE5 and create a Material. Assign this Material onto all the props that will use this trim sheet.
Here is the final result in UE5 of all 3 props: wooden shelf, wooden desk and wooden cabinet.

Home Terms of Use/Trademarks/Disclaimers Privacy Policy Donate About Contact
All content on this website is copyrighted ©2008-2024 World of Level Design LLC. All rights reserved.
Duplication and distribution is illegal and strictly prohibited.
World of Level Design LLC is an independent company. World of Level Design website, its tutorials and products are not endorsed, sponsored or approved by any mentioned companies on this website in any way. All content is based on my own personal experimentation, experience and opinion. World of Level Design™ and 11 Day Level Design™ are trademarks of AlexG.
Template powered by w3.css

 Modular Environment Design Masterclass Tutorial Course
 Maya Foundation: Home-Study Course - Model and UV Environments
 Substance 3D Painter Essentials - Master Texturing
 UE5: Fundamentals Vol.1 - Create with Unreal Engine 5
 UE5: Retro Office Project - Create Beautiful Interior Env
 UE5: Master Material Creation - Create Master Materials in UE5
 Preproduction Blueprint: Plan Environments and Level Designs

