World of Level Design™
Tutorials to Becoming the Best Level Designer and Game Environment Artist (since 2008)
UE4: Making Water Material in "Starter Content" Work Without Stretching or Distortions
Category: UE4
January 16, 2018

UE4 "Starter Content" has 2 water materials - ocean and lake.
These two materials are great to use in your environments and to study how water is created.
But there is a problem with these materials.
If you apply ocean or lake water material onto any large Static Mesh plane, the texture will be stretched out, distorted and unusable.
Here is the default Ocean material applied to a Static Mesh plane scaled 1,000x:

The material works if you apply it to a small enough surface:
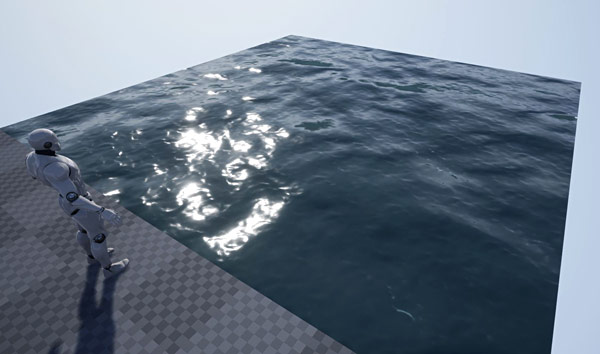
But for a large body of water such as an ocean - you run into a problem.
Ideally, the water material should tile automatically no matter how large you scale your Static Mesh. But this isn't the case with "Starter Content" water materials.
I encountered this issue when I wanted to add water into a prototype scene I was working on. I didn't want to create a water material from scratch; I just needed to see how the scene would look with water.
The purpose of prototyping is to get something going quickly, without having to spend unnecessary time creating extra content when you don't need to. If you like how the prototype looks, then you can spend the time creating custom content later.
So after I applied the ocean water material onto the plane, it was stretched out and unusable. I could have ignored it and just created my own material. But I had to solve this.
In the process I learned a lot about how Epic Games created their water material and how I would begin approaching to create my own in the future.
How did I solve it?
I solved it by adding parameters to the existing water material and then creating a Material Instance to control the scale and speed of large/small waves to make it work for any size surface.
In this tutorial you will learn:
This tutorial covers a lot of things that'll help you understand how water is created, how to add controllable parameters and how to change them via Material Instance.
- How to make "Starter Content" water examples work on any scaled Static Mesh plane
- How to duplicate original materials to revert back to if you mess up
- How to create a Material Instance
- How to add controllable parameters to be adjusted in Material Instance
- How to add parameters for "Texture Coordinate" nodes to be changed in Material Instance
- How to control large and small waves in "M_Water_Ocean" material to tile properly
- How to fix dark gradient spots on sides of the screen when looking at the water
4 Ways to Make "Starter Content" Water Work
Before we get into the solution, let's run through possible ideas that "could" make the "Starter Content" water work.
You "could":
- Create a custom Static Mesh plane and make the UVs repeat in a way that the water material would tile correctly - this will work but seems cumbersome because you will be locked into a specific UV scale and won't be able to modify it in UE4
- Use BSP brush - will work but large BSP brushes are not the best option to use as they aren't meant to be used for shipped levels - BSP brushes aren't as optimized as Static Meshes. Also large BSP surfaces can cause issues in your level, and there is no way to disable player collision with BSP
- Some have suggested that you could use Landscape then apply Ocean Material to the Landscape - this will work, but this option is overkill. Landscapes shouldn't be used for water.
- Best Option: use a simple, flat Static Mesh plane and apply your water material onto it; most common way to have water in your scene (flat plane with water material applied)
I will use a simple, flat plane and scale the plane to a large value - to cover the area where I want water to be. In this case, "Starter Content" ocean and lake materials will be stretched and distorted.
So then, I can either:
- Create a new material that has the functionality built into it to tile automatically no matter the scale of the Static Mesh plane
- Add the functionality into "Starter Content" water to control the wave scale and wave speed
We'll be adding this functionality into the material to change via Material Instance.
Start a Default Level
I will be using a default level which already contains 4 important actors that makes exterior water surfaces work:
- Sky Sphere
- Directional Light
- Sky Light
- Sphere Reflection Capture

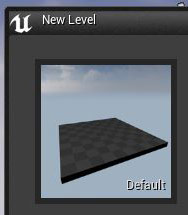
Go to "File > New Level" and choose "Default":
Flat Static Mesh Plane
Insert a flat plane into your level. This will be the surface of the water - the Static Mesh you will apply water material onto.

I used "Plane_Shape" Static Mesh from "Starter Content". You will find this inside "Starter Content/Shapes" folder:

Scale the plane to cover the area where you want the water to be in. I scaled mine to:
- X = 1000
- Y = 1000
- Z = 1

The scale of the plane doesn't matter but values you end up using in water Material Instance will be different based on the size of the plane.
If you are following along, use the same values until you understand the process.
Select the "Shape_Plane" and disable "Collision Presets: NoCollision":

Duplicate "M_Water_Ocean" Material
Inside "Starter Content/Materials" folder there are two water material examples:
- M_Water_Ocean
- M_Water_Lake
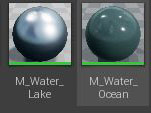
We'll only work with "M_Water_Ocean" material. After going through this tutorial you can repeat the same steps for "M_Water_Lake".
Select "M_Water_Ocean" and press "Ctrl+W" to duplicate the material. I kept the duplicated name, "M_Water_Ocean1":
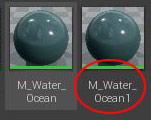
Reason I duplicated it, is because I don't want to change anything in the original material.
Inside this duplicated "M_Water_Ocean1" material is where we'll be making all the changes.
Create Material Instance
Inside "Content Browser", right-click on "M_Water_Ocean1" material and choose "Create Material Instance":
![]()
I named mine "M_Water_Ocean1_Inst":

Material Instance is a great and inexpensive way to edit the look of your material in real-time without having to recompile after every change.
Right now, the only parameters that are set up by default in the Material Instance are "Water Base Color", "Wave Crest Color" and "Noise Speed":

Apply Material Instance Onto The Plane
Apply the "M_Water_Ocean1_Inst" onto the plane. The water texture will be stretched and distorted:

Make sure you apply the Material Instance to the Static Mesh plane and not the Material.
Adding Parameters to Water Material
We are now ready to add parameters into the material to make the water tile properly.
Double-click on the duplicated "M_Water_Ocean1" material to open "Material Editor".
There are 3 sections that we can break water material down into:
- Large (distant) waves; waves that are far away from the player
- Small (nearby) waves; waves that are close to the player
- Gradient distance or the transition between small waves merging into large waves
Large Waves Scale, Speed and Noise
Large waves are visible in the distance, far away from the player.
Let's add controls for large waves scale, speed and noise speed. After we are done we'll have the following parameters inside the "Material Instance":
- Large Wave Tiling
- Large Wave Speed
- Large Wave Noise Speed
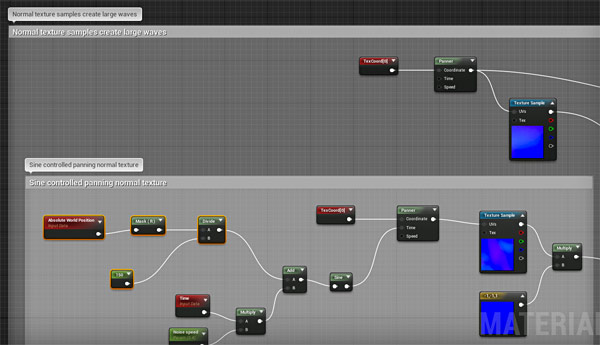
In "Normal Texture Samples Create Large Waves" section:
click on image to view full size
We need to make a parameter for "TexCoord" and for "Panner", which control scale and speed of Normal Map texture that creates large distant waves:
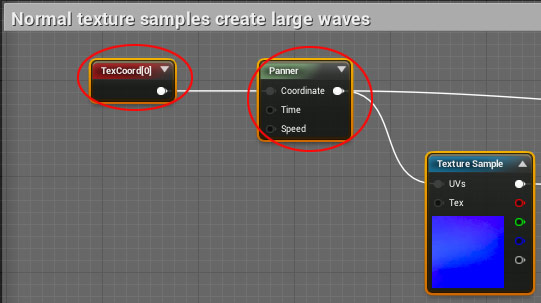
Select "TextCoord" node and take a look at Details panel, you will see that U and V Tiling are set to specific values, "UTiling: .05" and "VTiling: .08":

Same for "Panner", which has "Speed X: -.03" and "Speed Y: -.02":

These are the values we want to change through the Material Instance.
"Texture Coordinate" nodes can be made into parameters by using "Multiply" and "Scalar Parameter" nodes:
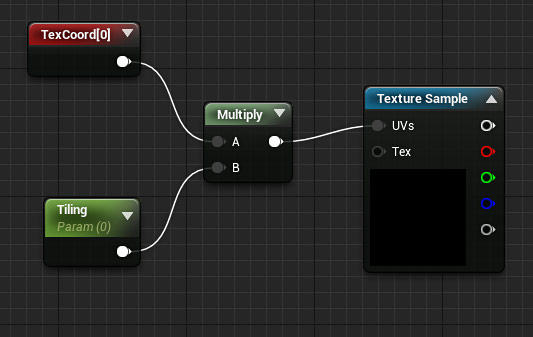
"Scalar Parameter" node is the same node as a "Constant" node that has been converted into a parameter.
If you want to control U and V tiling separately then you need to use 2 "Scalar Parameters" connected into "Append", then "Multiply" with "TexCoord" nodes:

Shortcut: Hold S and Right-Click = insert a "Scalar Parameter" node
I will keep mine as a single value. You can break them up into 2 controllable parameters if you want to.
Rename your "Scalar Parameter" node to "Large Wave Tiling":
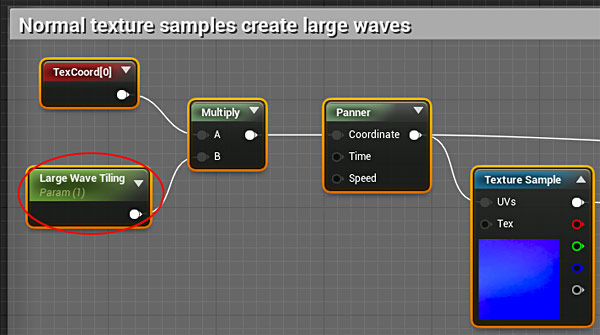
Set "Large Wave Tiling" node "Default Value: 1":

Do the same thing for "Panner" by creating a "Scalar Parameter". Rename it to "Large Wave Speed" and connect it into "Speed" of the "Panner":

Set "Large Wave Speed" node "Default Value: -.03":

Last is "Noise Speed" (default: .4) which can be found under "Sine Controlled Panning Normal Texture". This controls the back/forth water movement speed. This is already a parameter:

All we need to give it a better name, such as "Large Wave Noise Speed":

Large Wave Movement and Break Up Tiling
We'll now add the following parameters:
- Large Wave Movement Tiling
- Large Wave World Position Tiling
In "Sine Controlled Panning Normal Texture" section we'll need to add 2 parameters.
First is for controlling the movement tiling for large waves, this is a "TexCoord" hooked up to "Panner" Coordinate input:
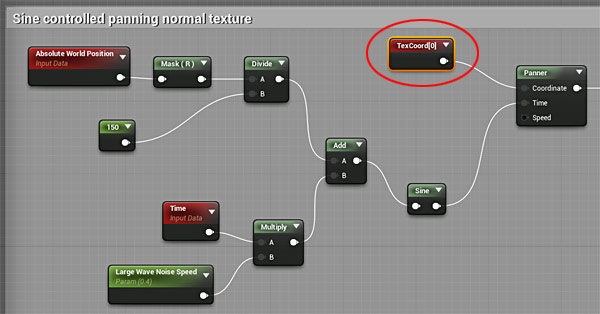
Default value of this "TexCoord" are "UTiling: .18" and "VTiling: .15".
Let's add "Scalar Parameter", rename it to "Large Wave Movement Tiling" then use "Multiply" node and plug it into "Coordinate" input of the "Panner" node:
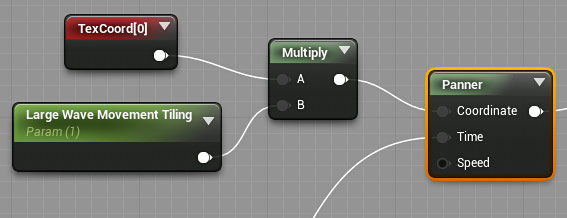
Change "Default Value: 1":

Just as before, I will control both U and V Tiling at the same time, but you can break them up using "Append" node to separate U and V Tiling into their own individual parameters.
Second is the "Absolute World Position" divide mask (Default Value: 150), which helps to breaks up noticeable repetition of the large waves:
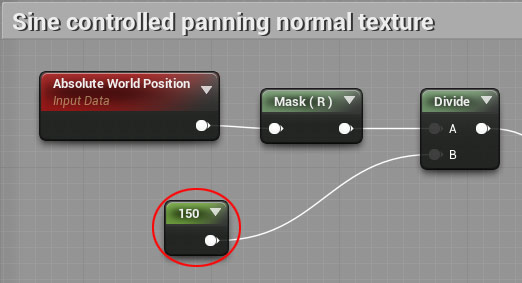
For this all we need to do is right-click on the "Constant (150)" node and choose "Convert to Parameter":

Rename it to "Large Wave World Position Tiling":

Keep the "Default Value: 150":

Small Waves Tiling and Speed
Small waves will be visible up close, near the player.
There are 2 parameters we need to add. Both are inside "Normal Texture Sample Creates Small Waves" section:
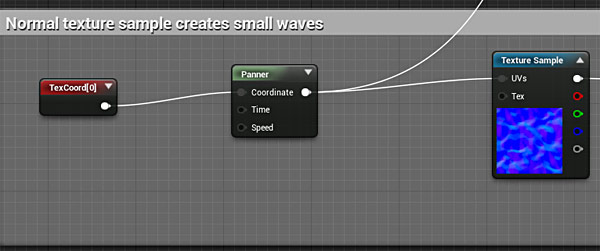
We will end up with the following parameters:
- Small Wave Tiling
- Small Wave Speed
First is small wave tiling.
"TexCoord (Default: .75)" controls Normal Map texture tiling of small waves. Insert "Scalar Parameter" node and rename it to "Small Waves Tiling". Then, insert "Multiply" and connect "Scalar Parameter" and "TexCoord" into it:

Set parameter "Small Waves Tiling" to "Default Value: 1":
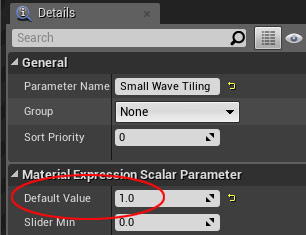
Second is small wave speed.
"Panner" controls the speed of small waves. Panner's speed default values are: -.07.
Insert "Scalar Parameter" and rename it to "Small Wave Speed" and connect "Scalar Parameter" into "Panner" speed input:

Set "Default Value: -.07":

Controlling the Transition Between Small and Large Waves
Last part of all this is the ability to control the switch transition between Large and Small waves. This is done in "Create a Gradient Far Away From the Camera" section.
There are 2 values for this, one plugged into "Subtract" and second is plugged into "Divide":

We only need the second one that has a value of 2000, the one that is connected into "Divide":

Right-click on the "Constant (2000)" node and "Convert to Parameter":

Rename to "Wave Transition Small to Large":
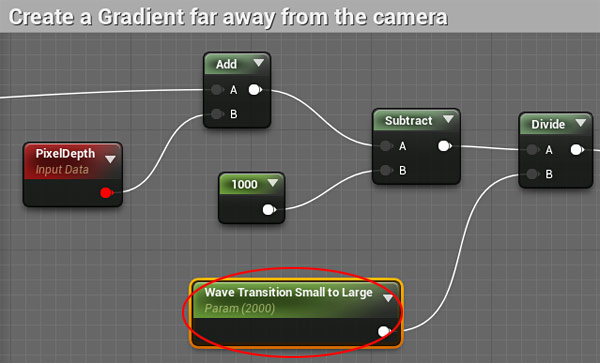
Set "Default Value" to "2000":

Apply and Save the Material
Make sure you hit "Apply" and "Save" the Material:

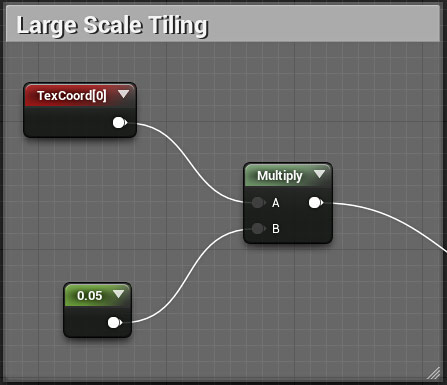
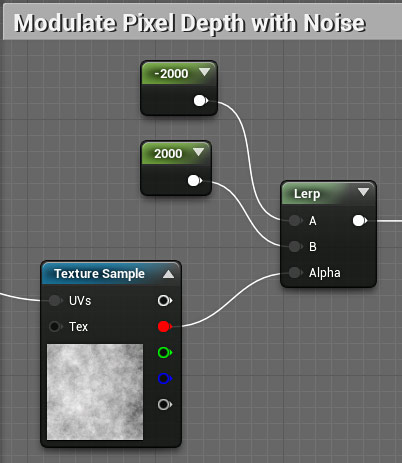
Additional Parameters Not Used
There are additional parameters that don't add any significant changes to the water material, so I left them out. But you can experiment to see if you get any changes.
Large Scale Tiling:
Modulate Pixel Depth with Noise:
Panner Sine Speed:

Material Instance Values
We can now go into the "Material Instance" for "M_Water_Ocean_Inst" and begin tweaking values:

First begin changing Large Waves. Move your camera away from the water and begin adjusting:
- Large Wave Tiling
- Large Wave Speed
- Large Wave Noise Speed
- Large Wave Movement Tiling
- Large Wave World Position Tiling

Second, move your camera closer to the water and begin adjusting:
- Small Wave Tiling
- Small Wave Speed

Last, adjust the transition value between small and large waves:
- Wave Transition Small to Large
![]()
Final values I used for "Shape_Plane" Static Mesh that is scaled to 1000x:
- Large Wave Tiling: 300
- Large Wave Speed: -.01
- Large Wave Noise Speed: .4
- Large Wave Movement Tiling: 400
- Large Wave World Position Tiling: 800
- Small Wave Tiling: 400
- Small Wave Speed: -.07
- Wave Transition Small to Large: 2500
Fixing Black Spots/Gradient on the Water
Dark gradient on each side of the screen when you are looking at your water is due to either a lack of Sky Light or Reflection Capture:

Make sure you have a Sky Light in your scene and it is set to "Stationary" and that you have a "Sphere Reflection Capture" in your scene:

Exponential Height Fog
Make the water plane blend better into the scene at the horizon by inserting "Exponential Height Fog".
"Visual Effects > Exponential Height Fog":

Exponential Height Fog creates more dense fog in low places and less dense fog in high places. The values you change will depend on the scene. For this example I used:
- Fog Density: .05
- Fog Height Falloff: .4
- Start Distance: 500
Without/With "Exponential Height Fog":

Final "Material Instance" Ocean Water
Final result of the water in the scene:

Next Tutorial: UE4: How to Create Your First Decal Material
Home Terms of Use/Trademarks/Disclaimers Privacy Policy Donate About Contact
All content on this website is copyrighted ©2008-2024 World of Level Design LLC. All rights reserved.
Duplication and distribution is illegal and strictly prohibited.
World of Level Design LLC is an independent company. World of Level Design website, its tutorials and products are not endorsed, sponsored or approved by any mentioned companies on this website in any way. All content is based on my own personal experimentation, experience and opinion. World of Level Design™ and 11 Day Level Design™ are trademarks of AlexG.
Template powered by w3.css


 Modular Environment Design Masterclass Tutorial Course
 Maya Foundation: Home-Study Course - Model and UV Environments
 Substance 3D Painter Essentials - Master Texturing
 UE5: Fundamentals Vol.1 - Create with Unreal Engine 5
 UE5: Retro Office Project - Create Beautiful Interior Env
 UE5: Master Material Creation - Create Master Materials in UE5
 Preproduction Blueprint: Plan Environments and Level Designs


