World of Level Design™
Tutorials to Becoming the Best Level Designer and Game Environment Artist (since 2008)
UE4: Recreate the Dynamic Time of Day Template Level - Why You Should and How-To
Category: UE4
January 26, 2021

Best way to learn something is to recreate it.
First reverse engineer it,
Then…
Re-create it.
I did this with traditional drawing. I've done this with UE4 landscapes and I've done this with UE4 materials.
Right now I am doing this new UE4 Volumetric Clouds.
The new Time of Day level template was introduced in 4.24. It includes dynamic lighting setup with new Sky Atmosphere actor and in 4.26 the new Volumetric Cloud actor.
BUT before you start using the new Time of Day level template there are few important things you need to understand.
The set of actors used in the template are dependent on each other to make the lighting, the Sky Atmosphere, the Sky Light and the Volumetric Fog work together.
If you use the Time of Day level template without understanding how they are connected and what properties will change, you will have a hard time trying to make them work to create what you want.
What if you don't want to use the Time of Day template or what if you want to start from a blank map and set this up yourself?
Let's reverse engineer what's happening in the Time of Day template and recreate it, so you know how everything is working together.
Video Tutorial
Time of Day Level Template As-Is
New Time of Day template can be found under File > New Level and choose TimeofDay:

Actors included:
- Directional Light
- SkyAtmosphere
- SkyLight
- VolumetricCloud
- SkyDomeMesh
- PlayerStart
- Floor (SM_Template_Map_Floor)
- TextRenderActors
- SM_MatPreviewMesh_01
Only 10 actors.

Few things you should know:
- Directional Light and Sky Light are set to Movable (Dynamic Lighting)
- Directional Light and Sky Atmosphere are connected to work together
- Sky Dome Mesh is used as a Sky Sphere Static Mesh to render bottom world color and moving clouds that aren't Volumetric (more on this later)
- If you spawn into the map you will have a long fade-in effect, this is due to Auto-Exposure (I will show how to fix this later)
Let's re-create the template from scratch and actually make it better.
New Empty Level
Go to File > New Level: Empty Level:

We need a ground plane.
Enable Engine Content:

In Content Browser navigate to Engine Content > Map Templates folder and insert SM_Template_Map_Floor:

If you want to use the Preview Mesh, you'll find it in Engine Content > EngineMeshes:

I won't be using the Preview Mesh or the Text Render Actors.
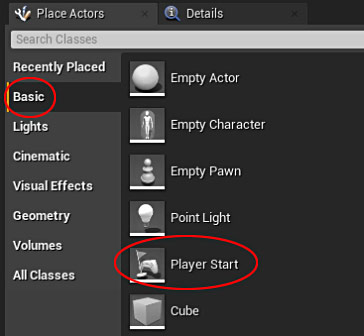
Insert a Player Start so you can spawn into the map. Place Actors > Basic: Player Start:
I will also insert a Character Reference Scale to help me judge size of the map and geometry around it. I use UE4 Mannequin Mobile that can be downloaded from the Marketplace.
Here is how to download and include UE4 Mannequin Mobile with every project you work on:
Directional Light
Directional Light is the sun light of your environment.
Go to Place Actors > Lights: Directional Light:

Change the Following Properties:
- Mobility: Movable
- Intensity 1.0
- Atmosphere Sun Light: enabled
- Cast Cloud Shadows: enabled
- Cloud Shadow Extent: 100 (default 150)
Atmosphere Sun Light: is used to connect it with Sky Atmosphere.
Cast Cloud Shadows: determines if the light should cast shadows from clouds onto the atmosphere.
Cloud Shadow Extent: radius of the cloud shadow map around the camera in kilometers.
Sky Atmosphere
Sky Atmosphere is the new atmosphere rendering component introduced in 4.24.
Go to Place Actors > Visual Effects: Sky Atmosphere:

The only property that was changed in the template is Trace Sample Count. This scales the atmosphere tracing sample count, its quality level scalability.
- Trace Sample Count Scale: 4.0 (default 1.0)
Since we already enabled Atmosphere Sun Light property in the Directional Light, these two actors will be linked up.
Sky Light
Sky Light will illuminate the indirectly lit areas of your environment. Things the sun cannot hit directly.
Go to Place Actors > Lights: Sky Light:

Change the following properties:
- Mobility: Movable
- Real Time Capture: enabled
- Lower Hemisphere is Solid Color: disable
- Cloud Ambient Occlusion: enabled
- Cloud Ambient Occlusion Extent: 100 (default 150)
Real Time Capture will help with showing you more accurate Sky Light capture when you change Directional Light and Sky Atmosphere settings. This is a new setting that was introduced in 4.26 and I recommend using it.
By default Lower Hemisphere is Solid Color is enabled. But in the template it is disabled. Enabling it allows for accurate scene lighting on a planet where the ground blocks the sky. Disabling it can be useful to approximate skylight bounce lighting.
You will have to play with enabled or disabled depending on the environment. But I'll keep it disabled in this tutorial just like in the template.
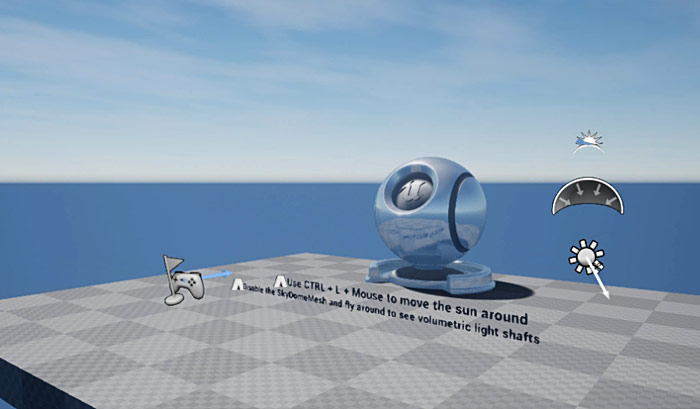
Sky Dome Mesh
Sky Dome Mesh is a Sky Sphere Static Mesh scaled very large to give you two things.
- Bottom ground color
- Moving clouds across the sky
Prior to 4.26 Volumetric Clouds, this was how you would have moving clouds across your sky. And if you don't want to use Volumetric Clouds, this is how you would do it.
But in 4.26 Sky Dome Mesh is distracting because you see the Volumetric Clouds and then you also get the Sky Dome Mesh Material clouds.
However, Sky Dome Mesh does have a function. It gives you a solid color in the level for bottom of the world. Otherwise you would see solid black void.
The only way to avoid bottom black void color is:
- Use geometry to hide it (landscape, Static Meshes)
- Use a Sky Sphere just like Sky Dome Mesh
- Exponential Height Fog (explained later)
You can safely delete the Sky Dome Mesh and not use it. For this tutorial I will delete it.
You will find Sphere to use in Engine Content > BasicShapes:

Change the following properties:
- Mobility: Movable
- Scale: X 1000000, Y 150000, Z 1000000
- Location: X 0, Y 0, Z -7300000
- Rotation: X 90
- Can Character Step Up On: No
- Collision Presets: NoCollision
- Cast Shadow: disabled
Material for the Sky can be found in Engine Content > EngineSky and apply M_SkyTimeofDay material onto the Sphere:


Volumetric Clouds
Volumetric Clouds were introduced in 4.26 and give you the ability to spawn beautiful volumetric clouds that react to Directional Light, Sky Atmosphere and Sky Light. It gives you the complete atmosphere to create what you want.
Go to Place Actors > Visual Effects: Volumetric Cloud:

Change the following properties:
- Tracing Start Max Distance: 200 (default 350)
- View Sample Count Scale: 1.5 (default 1.0)
- Reflections Sample Count Scale: 4 (default 1.0)
Tracing Start Max Distance: maximum distance of the volumetric surface before accepting to start tracing (kilometers)
View Sample Count Scale: scale of tracing sample count; this is quality level/sample count resolution
Reflections Sample Count Scale: scales the tracing sample for reflections; this is quality level/sample count resolution for reflections
Introducing Exponential Height Fog (Optional)
Since I deleted the Sky Dome Mesh, I don't have anything rendering below the horizon line. It is solid black void.
You can use Exponential Height Fog to fill this void with a color and also give you additional fog for added atmosphere.
Exponential Height Fog is not necessary as Sky Atmosphere is capable of rendering its own fog but if you want to use it you can.
I personally like using Exponential Height Fog with Sky Atmosphere.
Go to Place Actors > Visual Effects: Exponential Height Fog:

Change the following properties:
- Fog Density: lower this value
- Fog Inscattering Color: black
- Directional Inscattering Color: black
Important: you must enable Support Sky Atmosphere Affecting Height Fog in Project Settings.

Post Process Volume
If you spawn into the map right now, you will see a fade in effect. This is due to Auto-Exposure.
Auto Exposure (Eye Adaptation) is how your eyes naturally adjust when you walk from bright into dark environment or from dark into bright environment.
In UE4 this happens automatically in all levels unless you control it.
This is distracting in the beginning of a project and I like to disable it. Then work with it later in the project.
Go to Place Actors > Visual Effects: Post Process Volume:

Change the following properties:
- Auto-Exposure Min and Max Brightness: 1.0
- Unbound: enabled
Because we adjusted Auto-Exposure, you need to increase the Direcitonal Light Intensity. I increased mine to 5.
In Closing
That is it!
You now have a better dynamic lighting Time of Day level template with all the new features of 4.26+ and additional actors to help you get your levels started.
UE4 Fundamentals Vol.1 Tutorial Course
These Quick Tips are just a small part of a very complex Unreal Engine. Get started with UE4 as an absolute beginner by downloading "UE4 Fundamentals Vol.1 - The Essential Beginner's Guide" tutorial course.

SUBSCRIBE & GET FREE UE5 PDF GUIDE
Subscribe to receive NEW/UPDATED and FREE "UE5 Beginner's Quick Start Guide" PDF (90 pages).

Visit this page for more info about the guide...
TOP 7 TUTORIAL COURSES FOR 2026
 Modular Environment Design Masterclass Tutorial Course
 Maya Foundation: Home-Study Course - Model and UV Environments
 Substance 3D Painter Essentials - Master Texturing
 UE5: Fundamentals Vol.1 - Create with Unreal Engine 5
 UE5: Retro Office Project - Create Beautiful Interior Env
 UE5: Master Material Creation - Create Master Materials in UE5
 Preproduction Blueprint: Plan Environments and Level Designs
TUTORIAL CATEGORIES
UE5 FUNDAMENTALS VOL.1 COURSE
UE5: RETRO OFFICE PROJECT

MODULAR ENVIRONMENTS MASTERCLASS

LEARN THE PREPRODUCTION PROCESS

ABOUT WoLD & ALEXG

My name is AlexG. I am self-taught level designer, game environment artist and the creator of World of Level Design.com. I've learned everything I know from personal experimentation and decades of being around various online communities of fellow environment artist and level designers. On World of Level Design you will find tutorials to make you become the best level designer and game environment artist.
Home Terms of Use/Trademarks/Disclaimers Privacy Policy Donate About Contact
All content on this website is copyrighted ©2008-2024 World of Level Design LLC. All rights reserved.
Duplication and distribution is illegal and strictly prohibited.
World of Level Design LLC is an independent company. World of Level Design website, its tutorials and products are not endorsed, sponsored or approved by any mentioned companies on this website in any way. All content is based on my own personal experimentation, experience and opinion. World of Level Design™ and 11 Day Level Design™ are trademarks of AlexG.
Template powered by w3.css