World of Level Design™
Tutorials to Becoming the Best Level Designer and Game Environment Artist (since 2008)
Workflow: Creating Low-Poly Game Prop "File Cabinet" with Maya LT/Maya and UE4
Category: UE4, Maya LT/Maya, Game Environment Art
August 19, 2017

In the following workflow tutorial we'll go through the process of creating a low-poly game prop - file cabinet. We'll use Maya LT (regular version of Maya can also be used), Adobe Photoshop and Unreal Engine 4. The tutorial isn't about the file cabinet itself but more about the workflow steps and what it takes to create a low-poly game prop for Unreal Engine 4.
These steps are transferable to many game environment props you decide to create.
Make sure to go through this "Massive In-Depth Guide to Creating Custom Static Meshes for Unreal Engine 4" to understand the entire process.
This tutorial workflow moves fast. If you are looking for step-by-step pipeline - you need this "UE4 Custom Static Mesh Formula".
Software Used
I'll be using the following software:
- Maya LT for modeling (Maya can also be used; Maya LT vs Maya)
- Unreal Engine 4 for importing, lighting, testing and using the prop in your level
- Photoshop for texturing (Gimp can also be used)
If you are using other 3d modeling software such as 3dsMax, Modo, Blender etc. you will still be able to follow and use this pipeline. Remember, this tutorial covers the workflow, not how-to of individual software.
Pipeline Overview
Quick overview of how we are going to approach this prop.
First, we'll create low-poly mesh which will be a simple cube with some handles, thumb levers and sign inserts:

Then, create high-poly mesh to bake normal maps from:
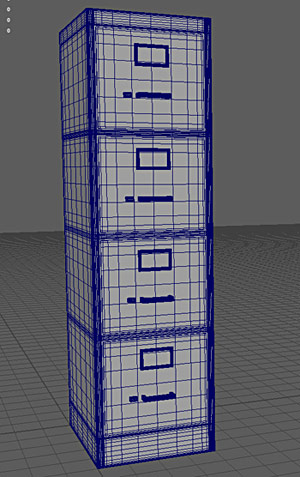
UV low-poly for texturing:

Bake normal maps and ambient occlusion maps:

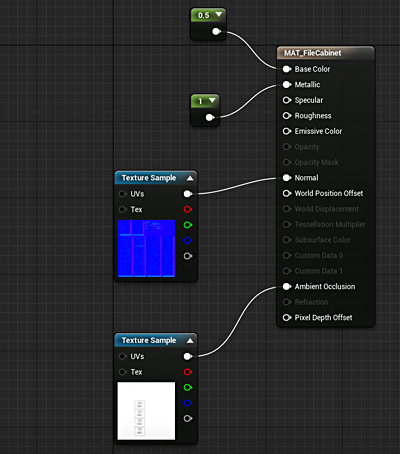
Set up the initial material in UE4:
Create collision:

Create textures such as albedo map and roughness map:
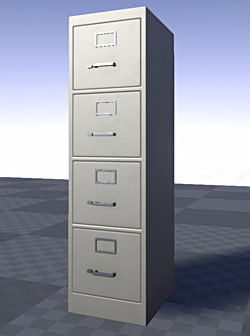
Create lightmaps:

Finally, create a Material Instance to have a different base color and roughness map for prop re-usability:

We'll also be exporting/importing the prop throughout this entire pipeline. You want to get Static Meshes into UE4 as quickly as possible and to continue re-importing constantly.
Final goal is this:

Preproduction/Planning
Before starting to work on any game environment prop, environment design or playable level - you need to spend time in planning and preproduction. This involves knowing what you are going to create, why you are creating it (purpose), research on how this prop works, how it is constructed in the real world, photo reference and how it is going to look (final result you are after).
I cover planning and preproduction process extensively in this tutorial and in "Preproduction Blueprint" book.
For this file cabinet prop I collected image reference, did some quick sketches to understand the shape, how I'm going approach high-poly mesh, decided on the type of file cabinet I'm going to create (such old or new? number of drawers 2 or 4? type of environment this prop will be used in?) and made a quick list for the pipeline I'll use.
The entire process took about an hour - quick but essential.
Photo reference:

Quick sketch with some notes:

Project File Set Up
I set up projects for Maya LT/Maya, UE4 and My Project. These folders keep all the content organized and in one place.
Maya LT/Maya Project: contains Maya LT/Maya project files:
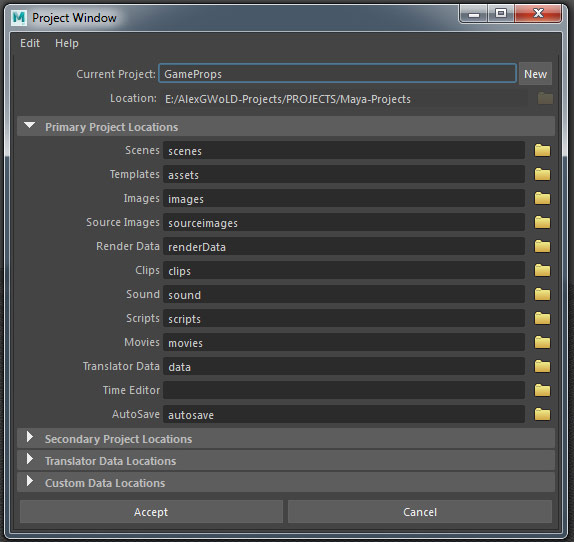
Unreal Engine 4 Project: contains Unreal Engine 4 project files such as maps, materials and all imported Static Meshes and textures:
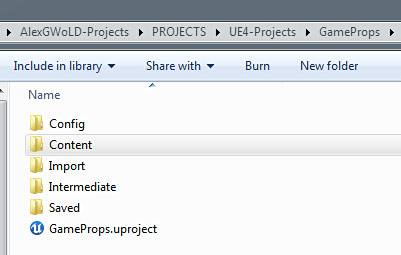
My Project Folder: contains work-in-progress textures, final textures, reference and all other non-Maya LT/Maya or UE4 project related files:

After preproduction and setting up project folders, I'm ready to begin.
Creating File Cabinet Base and Low-Poly Model
In Maya LT/Maya I create a scale reference box with 180 units in height and 60 units in width/depth:

These values are default dimensions of a playable character in-game.
Everything you create should be done to proper in-game character reference. Always judge prop and environment proportion to a character scale within your scene.
You also need to make sure that Maya LT/Maya grid set up matches UE4:
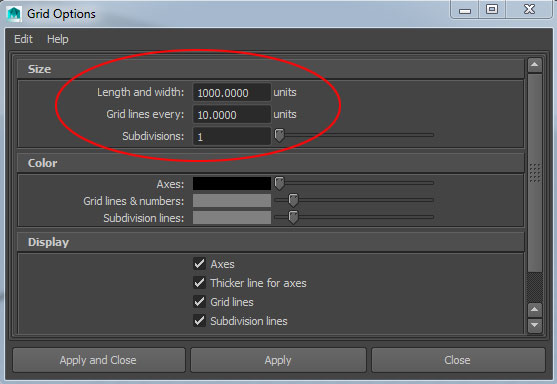
I create low-poly base for file cabinet size and scale:
- Width: 40
- Height: 145
- Depth: 50

I modify the pivot point to be at a bottom vertex and reposition the mesh at its pivot point to (0, 0, 0) world origin. This will ensure the pivot point will be exported to UE4 and remain in exact same place as it is in Maya LT/Maya:
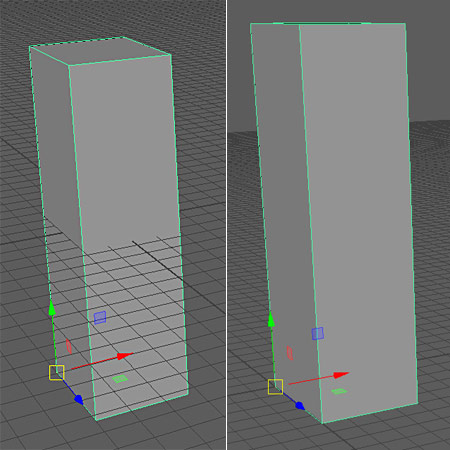
Here is the scale reference with the file cabinet in Maya LT/Maya:

I need to make sure proportions look correct compared to in-game character before continuing to model the file cabinet. I select the low-poly and rename it to "file_cabinet_base_LP" and "Modify > Freeze Transformation":

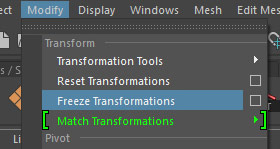
I export from Maya LT/Maya and import into UE4. Export options in Maya LT/Maya:
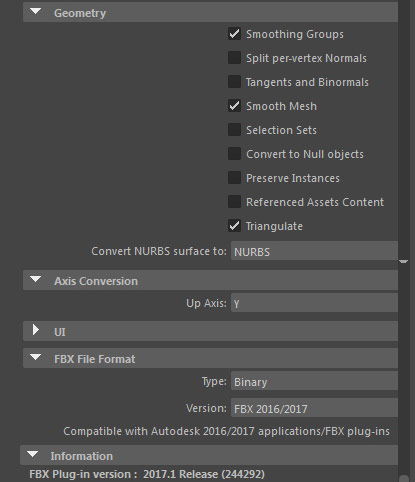

Import options in UE4:

I insert the file cabinet into a "Default" level and place a Mannequin into the scene. This really helps to judge scale and proportion:
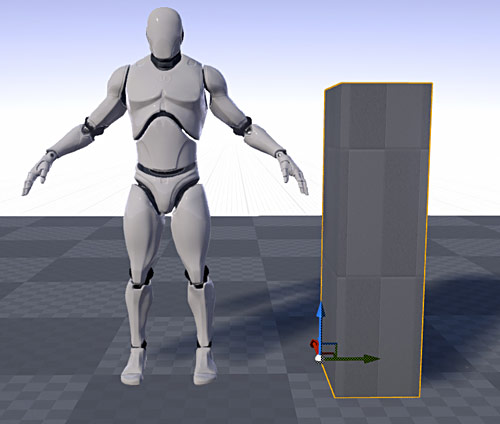
I like the size of the file cabinet. If the proportions were "off" as in the file cabinet looked too big or too small, I'd go back to Maya LT/Maya and fix it. It is important to make sure you get the correct scale down very early in this process before continuing.
As far as the low-poly goes, this is it. Nothing else needs to be modeled in the main file cabinet base. Except for drawer handles, thumb levers and sign inserts, which we'll create later. But the actual base of low-poly is done and drawers detail will be baked from high-poly mesh.
Creating High-Poly
High-poly mesh will be created to exact same dimensions as low-poly.
I won't be sculpting the high-poly but rather use sub-d modeling method. Sculpting would add more time to the project and for this mesh, it's unnecessary. Sub-d modeling will do the job for most hard-surface models.
I create a new cube with the following dimensions:
- Width: 40
- Height: 130
- Depth: 50
- Subdivisions Height: 4
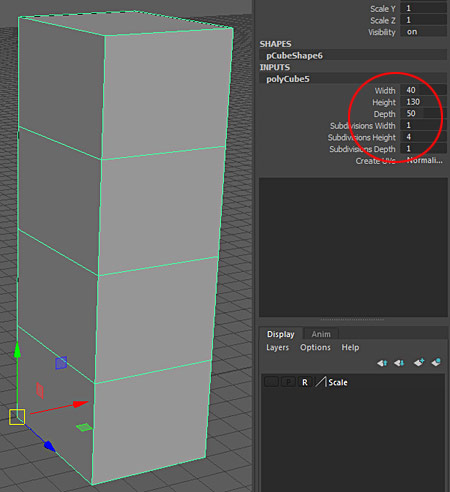
Subdivisions define the drawers with edges set at equal distance from each other. I could have also used "Insert Edge Loop" tool, using "Multiple edge loops" set to "4".
I then extrude the top and bottom faces:
- Extrude Top: 5
- Extrude Bottom: 10


This makes file cabinet height at 145, just like the low-poly:

With "Insert Edge Loop" tool I insert 2 more edges and scale them out to define the file cabinet side borders for drawers:
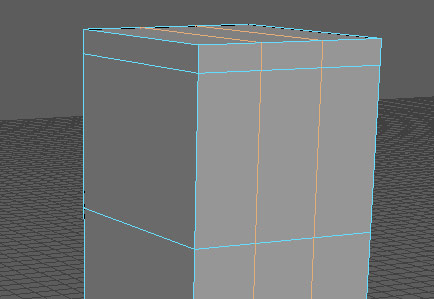
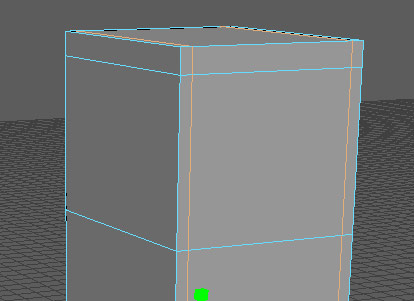
To make sure high-poly mesh is smoothed properly, I need to add edge loops around the entire object to help maintain its shape.
Press 3 to preview what the model will look like Smoothed.
- 3 = Smooth Mesh Preview
- 1 = Original Mesh
High-poly mesh will collapse:
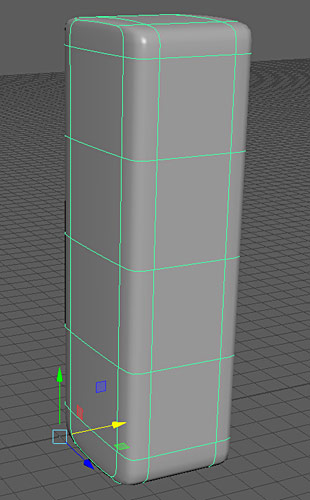
So I add control edge loops around the entire object near collapsing edges. It is very important to constantly check how your high-poly mesh will be smoothed so you can add proper edge loops. I constantly press 3 to smooth preview, then 1 to go back to original mesh.

If I press 3 now, the object will keep its shape:
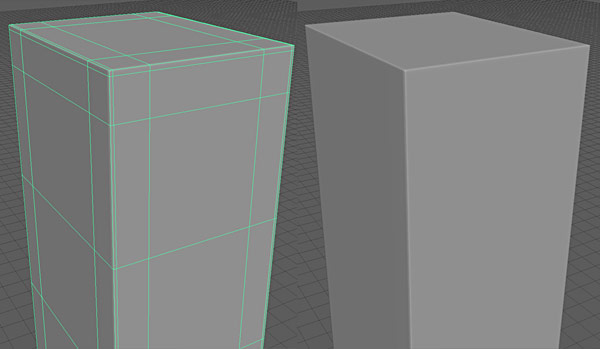
My goal at this point is to create high-poly mesh with detail of a filing cabinet while making sure it looks good smoothed.
Using sub-d modeling method will be different from object to object. Sometimes you'll add edge loops to control smoothing, other times you'll bevel edges and faces.
Spending time prior to creating high-poly to decide how you are going to approach modeling sub-d will save you time. If you are a beginner, you will have to go through a lot of false starts and experiment with different ways of creating sub-d high-poly. This file cabinet prop is good practice to get started on the right path.
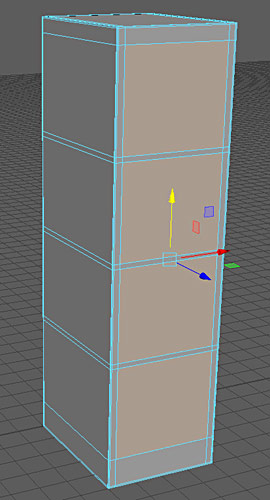
I then bevel the 3 following edges to add extra geometry that will allow me to extrude file cabinet drawers. I select these 3 edges:

"Edit Mesh > Bevel" and set "Fraction" set to "0.05":

I now select the faces for drawers and "Extrude" them in with "Thickness: -2":
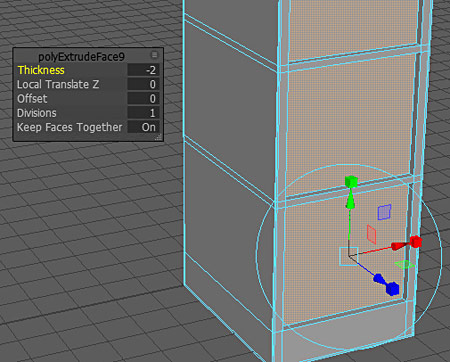
"Extrude" again with "Offset: 0.4":

"Extrude" again with "Thickness: 2":
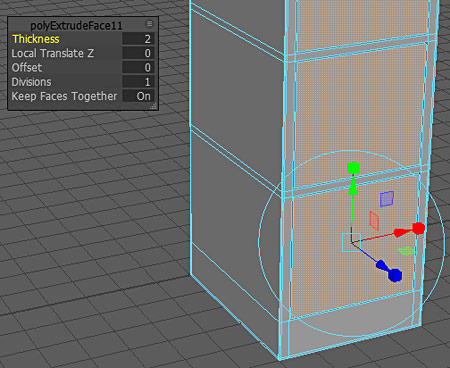
I now have drawers:

The drawers will collapse when smoothed:

So I add insert edge loops all around the drawers to make the high-poly keep its shape when smoothed. I do this for every drawer and in different directions:
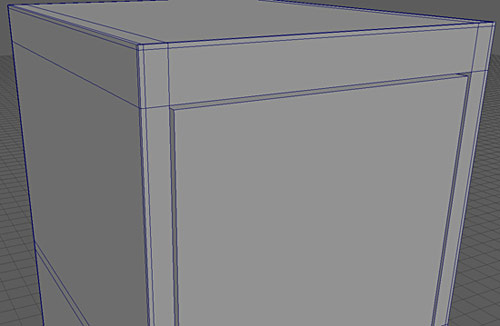

Smooth preview again and the filing cabinet looks good:


I also created a high-gloss material which helps to see smoothing on the mesh better. In "Hypershade", create new "Phong" material and name it "phongShiny". I increase "Specular Color" and adjust "Cosine Power":

Apply the "phongShiny" to the file cabinet prop:

I select the high-poly mesh and rename it to "file_cabinet_base_HP":

Creating Low-Poly Handle, Lever and Sign Insert
I now need to create low-poly handle, thumb lever and sign insert.
For handle, I use a cube with "Subdivision Width: 3" and scale the edges out:

Then extrude to get the handle shape:
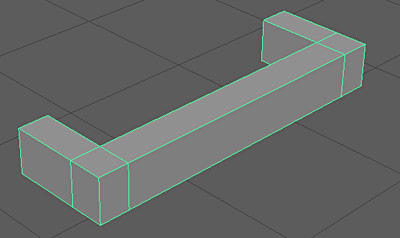
I delete inner faces that won't be seen in-game because that part of the handle will be aligned flush against the file cabinet drawer:

I create a thumb lever using cube that's re-scaled:
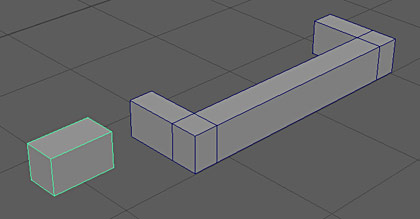
Finally I create sign insert using a cube that is resized, has additional subdivisions added and edges scaled out:

I delete the inner face to form a hole:

I use "Append to Poly" tool to add missing polygons:
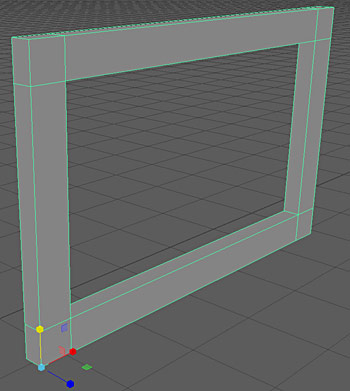
Just as with the handle, I delete the unseen faces on the thumb lever and sign insert:

I use the high-poly mesh as a template where to place the handle, thumb lever, sign insert and what size they should be:

I don't duplicate to position to all drawers just yet. I need to UV them first. This way I only have to UV one set of the handle, thumb lever and sign insert.
I select them and combine into one piece of geometry "Mesh > Combine" and rename the object to "handle_lever_sign_LP":

Creating High-Poly Handle, Lever and Sign Insert
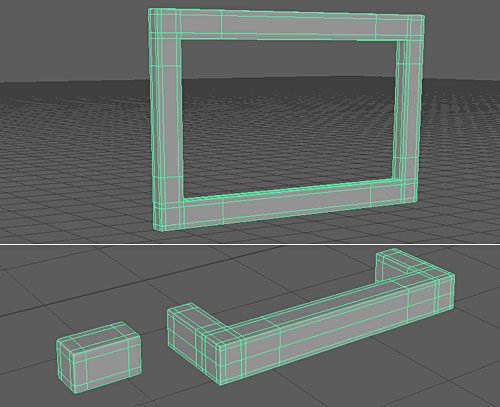
I duplicate the combined handle, thumb lever, sign insert for high-poly and rename it to "handle_lever_sign_HP":

Insert edges for edge loop control:

And press 3 to see how it will be smoothed:
Optimize Low-Poly Mesh
I optimize the low-poly mesh by merging few vertices and remove extra edges (before on the left, optimized on the right):

UV Low-Poly for Texturing
Now that low-poly and high-poly meshes are done, it is time to UV. I only need to UV the low-poly mesh. High-poly doesn't need it.
I open "UV Editor" and manually unwrap UVs:


These are very simple objects to UV so this doesn't take a lot of time to do.
Duplicate Low-Poly Handle, Thumb Lever, Sign Insert
Now that the low-poly handle/lever/sign has been UVed, I can duplicate them for the rest of the drawers. I use the high-poly mesh as a template where to place the handle, thumb lever, sign insert:
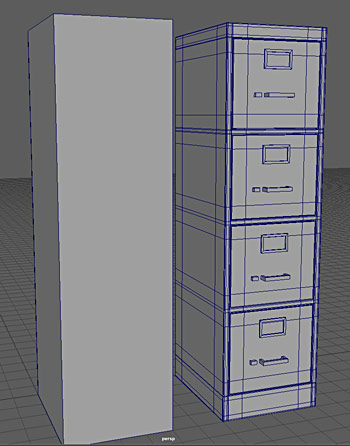
I move all the duplicated low-poly handle/lever/sign objects next to low-poly file cabinet base:

Baking Normal Maps
I need to generate a Normal Map by baking high-poly mesh down to a low-poly mesh. I do this all in Maya LT using Turtle Baker, which produced good results.
I will bake file cabinet base and handle/lever/sign separately then combine both normal maps into one in Photoshop.
I've been using Smooth preview to see what high-poly meshes would look like with Smooth but they are not truly Smoothed. I select high-poly cabinet base and handle/lever/sign and apply "Smooth", under "Mesh > Smooth" with divisions set to "2":
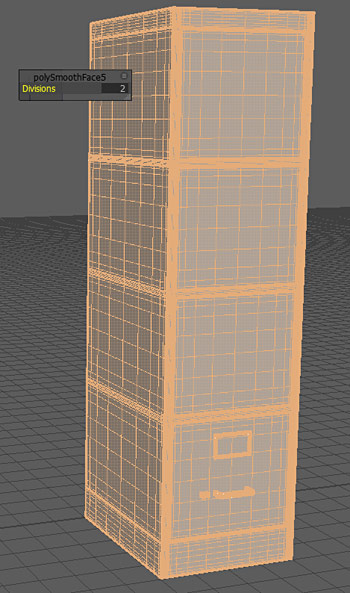
Baking Normal Maps or Ambient Occlusion Maps is a 3 step process:
- Baking Layer Setup
- Baking Settings
- Baking Maps
I place high-poly mesh on top of low-poly to overlap:

Step 1: Set up Baking Layers
Open "Bake Layer Editor" by going to "Windows > Material/Texture Baking Editors > Turtle > Bake Layer Editor":

I then create a "New Layer", rename the layer to "File_Cabinet_Base_Bake" and add low-poly under "Target Surfaces" and high-poly under "Source Surfaces":
- Target Surface: Low Poly object
- Source Surfaces: High Poly object

Step 2: Texture Baking Settings
Open "Texture Baking Settings" by going to "Windows > Material/Texture Baking Editors > Texture Baking Settings":
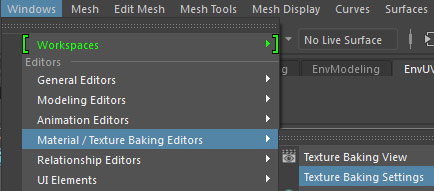
And enable "Bake" and adjust "Sampling Tab: Anti-Aliasing":
- Min Sample Rate: 1
- Max Sample Rate: 2 (when doing a final bake I change this value to "4")

I switch to "Baking" tab, choose which baking layer to bake and set "Bake To: Texture":

"Target Surfaces" and "Source Surfaces" will be set from "Bake Layer Editor" and "Envelope" will be empty":

I then set the following settings.
Transfer Settings:
- Sampling Preset: Closest
- Front Range: 100
- Back Range: 100
- Front Bias: 0
- Back Bias: 0
- Transfer Space: World Space
- Selection Mode: Distance
- Mismatch Mode: Use Background
- Ignore Inconsistent Normals: enabled

Texture Bake Settings:
- Height/Width: 1024x1024
- Save to File: enabled
- File Format: TGA
- Bilinear Filter: enabled
- Edge Dilation: 5 (edge padding)
- UV Range: Default (0,1)

Under" Outputs: Shader Outputs" switch to "Normal Map" and disable everything else:

Under "Advanced Settings: Normal Map" set "Coordinate System" to "Tangent Space":

Step 3: Baking
Go to "Windows > Material/Texture Baking Editors > Texture Baking View":
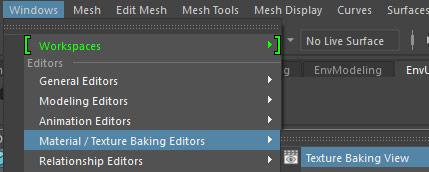
Click on "Bake (Turtle)" icon:

Normal Map will now be baked:
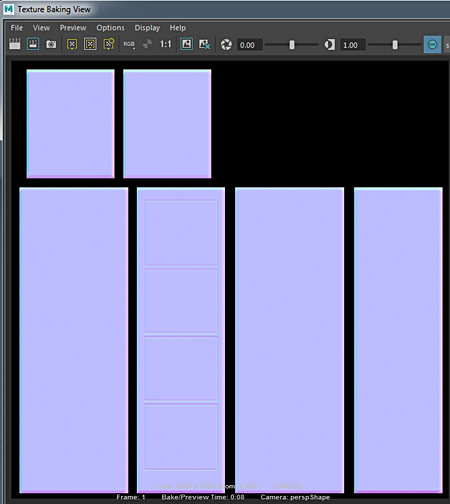
You'll find all baked maps inside Maya LT/Maya project folder, "\turtle\bakedTextures":

I repeat the above steps to bake Normal Map for handle/lever/sign:
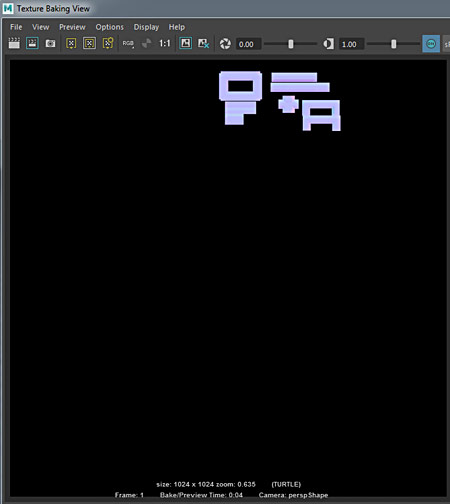
Then combine these two normal maps in Photoshop:

Baking Ambient Occlusion
Ambient Occlusion will help to add shadowing into crevices and overlapping geometry of the object, making it look a lot better. Instead of overlaying AO map over your diffuse like you would in previous version of Unreal Engine, UE4 now has its own Ambient Occlusion material input:

I prep for AO baking by duplicating high-poly handles/levers/signs and position them in exact same space as low-poly version. This will provide with shadowing caused by these handles/levers/signs on all the drawers. I also combine them all into one object:

I position low-poly to overlap the high-poly.
Since these are two separate objects, cabinet base and handles/levers/signs - I will have two AO maps that I will need to combine.
Steps for baking Ambient Occlusion are almost identical as baking a Normal Map. I set up the layers to have both objects under "Target Surfaces" and "Source Surfaces":

"Baking Settings" are exactly the same as for Normal Map, except under "Outputs: Shader Outputs" I switch to "Custom Shader" and disable everything else:

Click on checkered icon next to "Custom Shader" input:
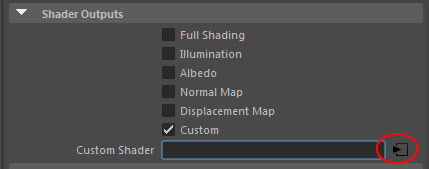
"Create Shading Node" menu will pop up. Select "Surface" and choose "Ilr Occ Sampler":
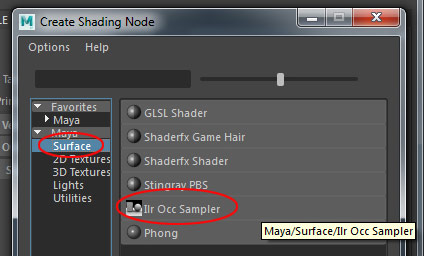
"Custom Shader" input will now have "ilrOccSampler1":
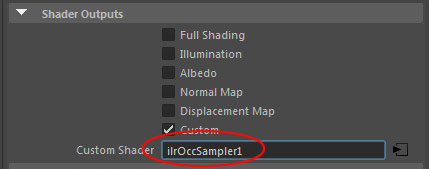
Go to "Texture Baking View" and bake Ambient Occlusion:

You'll find AO map inside Maya LT/Maya project folder, "\turtle\bakedTextures":
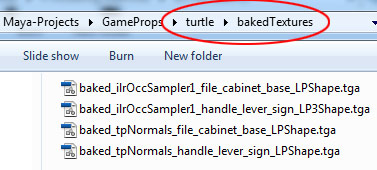
I end up not combining both Ambient Occlusion bakes and only using the file cabinet base bake, discarding the handles/levers/signs. The handles/levers/signs pieces are too small to produce any significant improvements so I don't use them.
Re-Import the Static Mesh
I constantly re-import the Static Mesh from Maya LT/Maya into Unreal Engine 4 throughout the entire process.
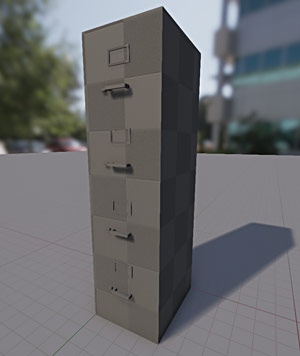
Creating Material in UE4
In Unreal Engine 4, I create a new Material and name it "MAT_FileCabinet":

Import Normal and AO map:

Inside Texture Editor for the Normal Map I enable "Flip Green Channel" to make sure the Normal Map is displayed correctly:

Use them as Texture Sample Nodes inside the Material Editor connecting them into their proper inputs:
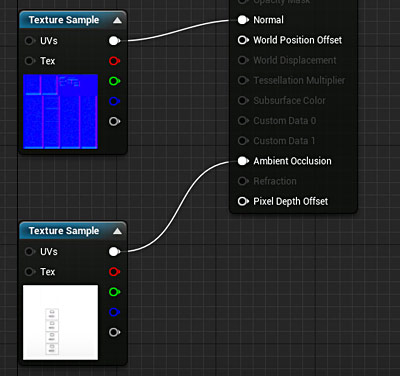
I temporarily use "Constant1Vector" for Base Color input with a value of .5 (middle gray) until I have an albedo map. This allows me to have a base color to check Normal Map and OA map in the editor:

I plug "Constant1Vector" into "Metallic" input with value of 1 (1 = metal; 0 = nonmetal):

I then assign the "MAT_FileCabinet" onto the Static Mesh using "Static Mesh Editor":

Left to Right: (1) Base Color, (2) Base Color with Metallic, (3) Base Color, Metallic and Normal Map, (4) Base Color, Metallic, Normal Map and Ambient Occlusion:

Collision in UE4
I open up "Static Mesh Editor" and create simple box collision, "Collision > Box Simplified Collision":


I could have created a collision primitive to be exported alongside the Static Mesh from Maya LT/Maya but for such a simple mesh I use UE4 "Static Mesh Editor".
Combining Low-Poly
In Maya LT/Maya I combined low-poly cabinet base and handles/levers/signs into one single object. This could have been done earlier but I often keep pieces separate for as long as needed to make baking easier.
Although combining is not necessary because you can select everything, export it and import it into UE4 as one single Static Mesh. Reason I combine is to make creating lightmaps easier, so I don't have multiple objects to deal with when unwrapping.
I selected both cabinet base and handles/levers/signs and "Mesh > Combine".
I rename the object back to "handle_lever_sign_LP".
After combining objects, the pivot point will be reset to the middle of the mesh:

I position the pivot point to be back at bottom vertex of an object and at (0, 0, 0,) world origin:

Creating Lightmaps
Lightmap is a texture that stores light/shadow information for the Static Mesh after building lights in Unreal Engine 4. Second UV channel is used to store Static Mesh's lightmap.
Lightmaps are very important and should be set up by creating a second UV channel and unwrapping those UVs specifically for lightmap use. So the Static Mesh will have a texture UV channel and Lightmap UV channel.
In Maya LT/Maya, I open up UV Editor and copy existing UVs into new UV set:
- "UV Sets > Copy UVs to UV Set > Copy into New UV Set"

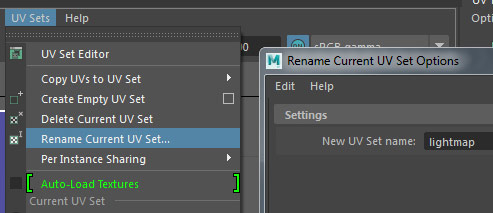
I rename the UV set to identify it better, "UV Sets > Rename Current UV Set" to "lightmap":
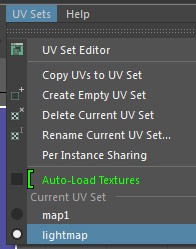
Make sure "lightmap" UV set is selected:
At this point, I unwrap the object's UVs for lightmaps. I make sure to separate UVs along edges where there is a significant light/shadow change such as 90 angles. This will ensure to reduce any light/shadow bleed.
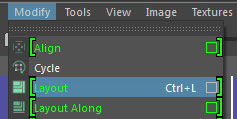
I apply "Layout" options for better lightmap layout. Go to "Modify > Layout" (options):
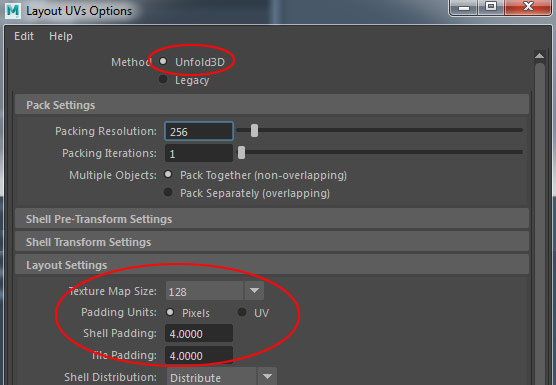
I use following properties:
- Unfold3D
- Texture Map Size: 128
- Padding Units: Pixels
- Shell Padding and Tile Padding: 4 units (lower value for high resolution lightmaps, higher value for low resolution lightmaps)
Here are the results for lightmap UVs:
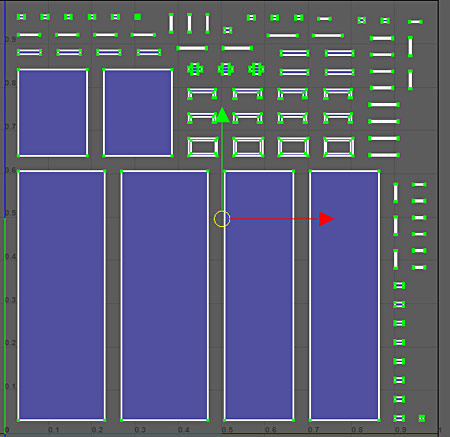
I export the low-poly mesh and re-import it into UE4. In "Static Mesh Editor" I check to see if the lightmap was imported properly by enabling "UV" and changing to "Channel 1":
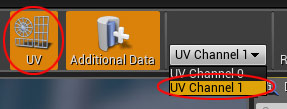

I set "Light Map Coordinate Index" to "1" and "Save" the Static Mesh:

And click "Build" to see how lightmaps look on the Static Mesh:

Results are good. There is no light or shadow bleed:
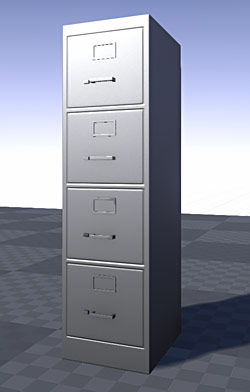
Lightmaps are now done.
Creating Albedo/Diffuse Texture
I set up working texture Photoshop file with folders for all the maps I will create. These include Normal Map, Albedo/Diffuse and Roughness:

I also save screenshot from "UV Editor" for UV layout of the mesh:


And use it in Photoshop as the top layer, inverted and set to "Multiply":

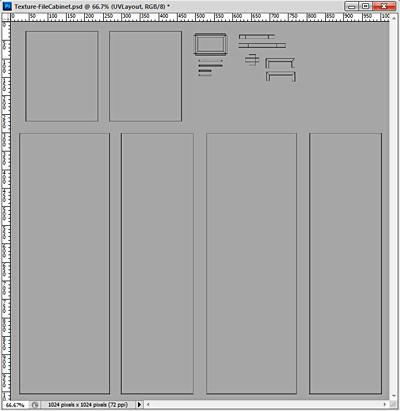
I use very simple and solid colors for my albedo map and define the base file cabinet and handle/lever/sign:

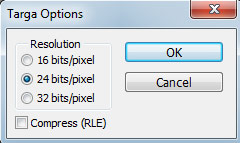
The texture is saved as 24bit Targa:
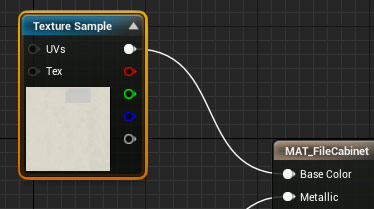
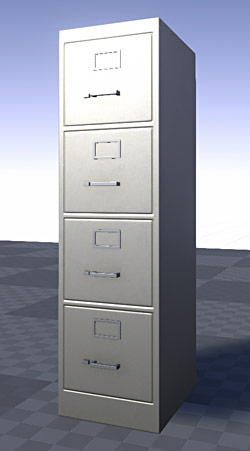
Imported into UE4 and used in "Material Editor: Base Color" input:
Creating Roughness Texture
Roughness texture will define how rough or how smooth (shiny) the material is. These are determined by black to white values.
- White = rough surface (matte)
- Black = smooth surface (shiny)
In UE4, I use "Constant1Vector" with value set to ".65" plugged into Roughness input to estimate how shiny I want the file cabinet base to be:


I want handles/levers/sign shinier than the file cabinet base and for that I want a value of ".4":
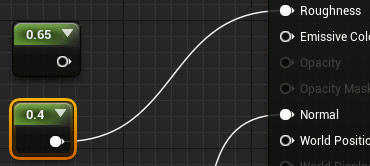

I use "Constant1Vector" to find the Roughness values first. I want to establish base values inside Unreal Engine 4 without having to create, export/import a Roughness texture. Once I found the Roughness values that look good, I can create a Roughness texture using the base values as a starting point.
In Photoshop, inside "Roughness" folder I create 2 new layers inside the working texture document and name it "Base Handle" and "Base Cabinet":

Using the Color picker, I fill the file cabinet base section using (H = 0, S = 0, B = 65%) values:

Then fill handles/levers/signs section with (H = 0, S = 0, B = 40%):

"65%" and "40%" values match the "Constant1Vector" ".65" and ".4" values from UE4.
I also use the dark drawers inset parts from Ambient Occlusion map as part of the Roughness texture. I erase everything else and invert it so blacks become white. Remember that when it comes to a Roughens map, whites are rough and blacks are shiny. This ensures that the dark inner areas where the drawers inset are rough, thus reflecting no light:

I export the Roughness map as 24bit Targa:

In UE4, I import the Roughness texture and disable "sRGB" in "Texture Editor":

This is very important because I want my Roughness map to be in Linear Space and to ensure the values I used in HSB for 65% and 40% match UE4's "Constant1Vector" values.
I now have a simple roughness texture controlling how rough/shiny our surface is:

Here is the Static Mesh as I have it now:

Creating Material Instance in UE4
I want to change base color of filing cabinet to any color and control roughness intensity while having the default base mesh I already created at the same time. For this I will create a Material Instance.
To change color of the file cabinet base but not the handles/levers/signs and control roughness intensity for cabinet base and handles/levers/signs separately I need to use a mask. The mask will control which parts are file cabinet base and which are handles/levers/sign.
In Photoshop I create a mask using black and white values:
- White = what you want to show (opaque)
- Black = what you want to hide (transparent)
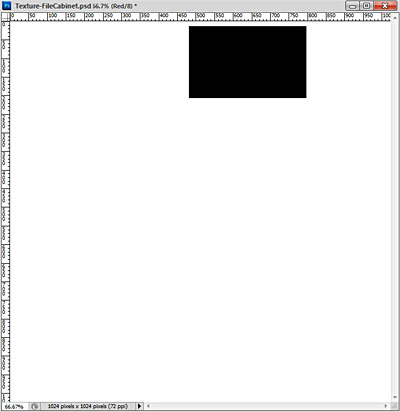
Although the parts that are black and white don't matter because I will invert the mask (reverse the white/black values) to control both parts of the material. I'll need to mask out the handles/levers/sign and mask out the file cabinet base. So instead of creating 2 different masks, I'll use the same mask but invert black/white using "OneMinus" node in UE4.
I pack the mask into RGB channels of a texture, instead of saving this mask within an Alpha Channel of a texture. I create a new document at 1024x1024, then copy and paste this mask into the Red channel. This way I can use Green and Blue channels for additional masks and for Roughness texture.

I export this masks texture as "T_FileCabinet_MASKS" and 24bit targa.
I import the mask texture into UE4 and in "Texture Editor" change "Compression Settings" to "Masks (no SRGB):
![]()
I then use the Masks texture to set up cabinet base and handles/levers/sign color changes:
click on image to view full size
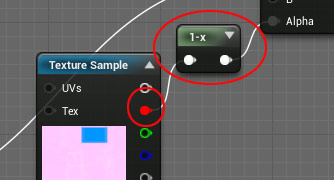
You can see I use 1-x (OneMinus) node to invert the mask. Also note I am using the Red channel of the Mask texture:
For albedo/diffuse I use "Constant3Vector" node converted to Parameter which will then allow me to use "Constant3Vector" property inside Material Instance to change color. I name this "Constant3Vector" Parameter node "Base Cabinet Color" and set RGB values all to 1, which defines no change in the current material:
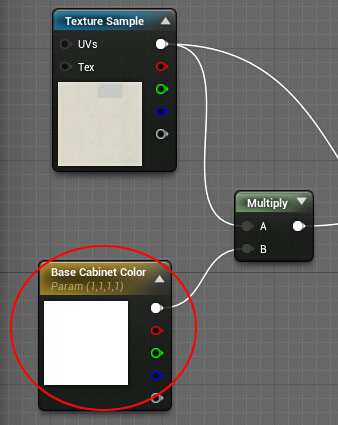
I use combination of "Lerp" and "Multiply" nodes to connect them all together into "Base Color":

click on image to view full size
I create Material Instance and name it "MAT_FileCabinet_INST":

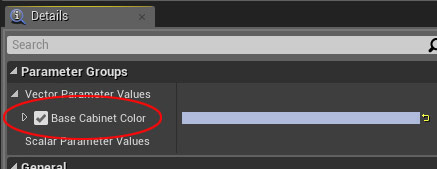
In its properties I enable "Base Cabinet Color" parameter and define new color for the file cabinet:
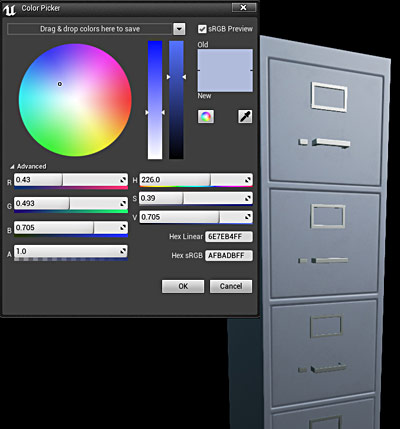
I duplicate file cabinet Static Mesh in the scene and apply Material Instance to the mesh:

I can now change Material Instance "Base Cabinet Color" to anything I want without changing handles/levers/signs color:

For Roughness variation I create a new roughness mask in Photoshop. This is a black and white texture image that will define which parts are going to be shiny and which parts are rough. I used photo image and "Color Range" to define a selection and then fill the selection with white:

This is will be used to mask out different parts of Roughness's texture. I then copy/paste this texture into Green channel of the Masks texture:
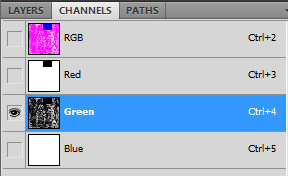
I now have the Red channel to mask cabinet base and handles/levers/signs and Green channel to mask roughness variation within a texture.
I then insert 4 "Constant1Vector" nodes, convert them to Parameters and give them appropriate names so they show up in the Material Instance. These will control "Roughness Cabinet Handle", "Roughness Cabinet Base", "Roughness Dirt #1" and "Roughness Dirt #2":
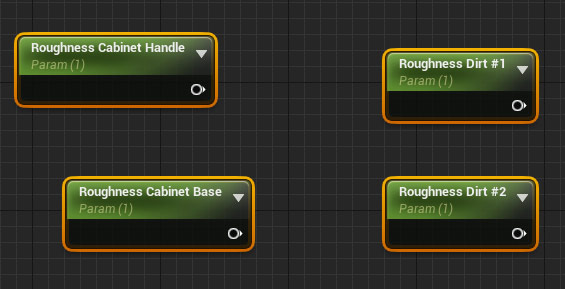
For "Roughness Cabinet Handle", "Roughness Cabinet Base" I use the Red channel mask:
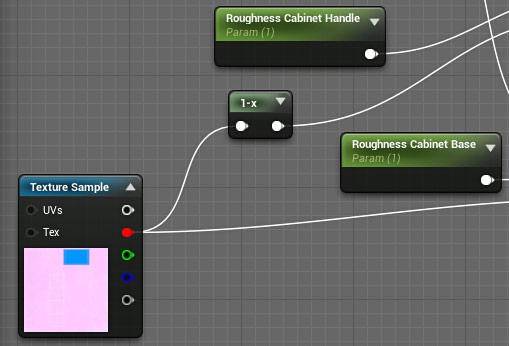
For overall Roughness variation of the file cabinet "Roughness Dirt #1" and "Roughness Dirt #2" I use Green channel mask:
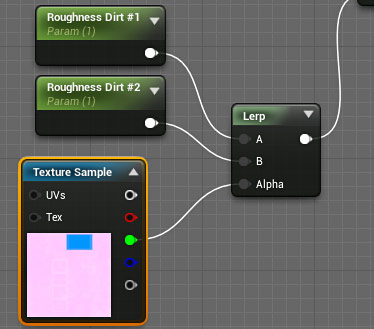
I use combination of "Lerp" and "Multiply" nodes plugged into Material's Roughness:
click on image to view full size
Nothing changes in this original material; everything I just set up is for Material Instance properties.
In Material Instance I enable 4 new properties:
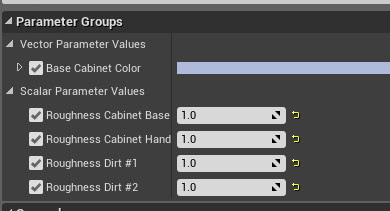
And adjust the values to change the look of the file cabinet:
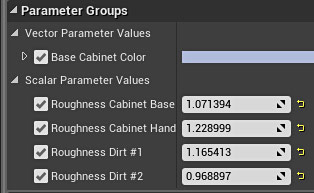

Final Static Mesh
Final file cabinet Static Mesh, one is clean version and the other has Roughness and Color variation:

Step-by-Step Static Mesh Formula Tutorial
If this tutorial workflow was too fast and didn't give you enough of a step-by-step pipeline then you need "UE4 Custom Static Mesh Formula".
Home Terms of Use/Trademarks/Disclaimers Privacy Policy Donate About Contact
All content on this website is copyrighted ©2008-2024 World of Level Design LLC. All rights reserved.
Duplication and distribution is illegal and strictly prohibited.
World of Level Design LLC is an independent company. World of Level Design website, its tutorials and products are not endorsed, sponsored or approved by any mentioned companies on this website in any way. All content is based on my own personal experimentation, experience and opinion. World of Level Design™ and 11 Day Level Design™ are trademarks of AlexG.
Template powered by w3.css


 Modular Environment Design Masterclass Tutorial Course
 Maya Foundation: Home-Study Course - Model and UV Environments
 Substance 3D Painter Essentials - Master Texturing
 UE5: Fundamentals Vol.1 - Create with Unreal Engine 5
 UE5: Retro Office Project - Create Beautiful Interior Env
 UE5: Master Material Creation - Create Master Materials in UE5
 Preproduction Blueprint: Plan Environments and Level Designs

