World of Level Design™
Tutorials to Becoming the Best Level Designer and Game Environment Artist (since 2008)
UE5: Definitive Guide to Using Quixel Bridge to Create, Texture and Detail Your Environments
Category: UE5
February 13, 2024
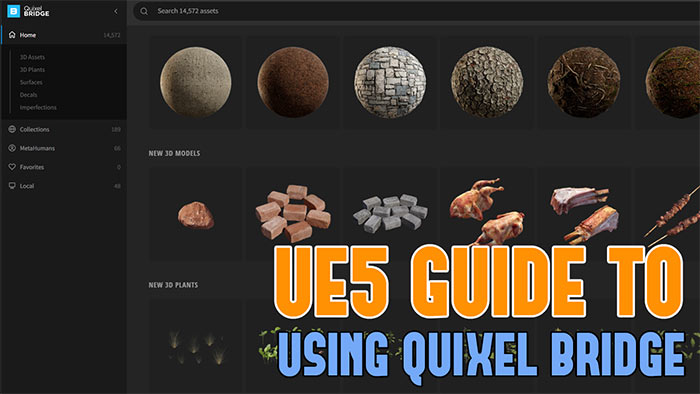
Quixel Bridge gives you access to completed Megascans assets such as materials, 3d models and MetaHumans to bring into Unreal Engine.
With these you can detail your environments very quickly.
In this in-depth tutorial guide, I'll tell you everything you need to know to begin using Quixel Bridge to create with.
Video Tutorial
Opening Quixel Bridge in UE5
Two options using Quixel Bridge:
- Plugin inside UE5
- Stand-alone application found here
In this tutorial we are going to focus entirely on using Quixel Bridge in UE5. But the stand-alone app will work in similar ways. You'll just have to open your UE5 project alongside stand-alone Bridge app define some properties for asset downloads. See this tutorial I did using Quixel Bridge for UE4 that uses a stand-alone app.
In UE5, check if the Plugin is enabled. Go to Edit > Plugins and type Bridge:


Open Quixel Bridge by going to Window > Quixel Bridge:

Or go to toolbar and click Quickly Add to Project icon and open Quixel Bridge:

Changing Download Location
By default, all assets will be downloaded to your C: drive. You may want to change this to another location. I changed mine to an external drive.
Go to Settings > Preferences:

Change Library Path to where you'd want Bridge store all downloaded content:

Searching for Assets
Assets you can download and use include:
- 3D Assets (3D models or Static Meshes)
- 3D Plants
- Surfaces (Materials)
- Decals (Materials that can be projected onto Static Meshes)
- Imperfections (grayscale texture maps, most often will be used for Roughness)
Find what assets to download using search bar or side category menus:

Filter your search by adjusting the category types below the search bar:

Left-Click on an asset to open Preview window and see its details:

Collections will include a set of assets that have been grouped together by theme.
MetaHumans will include life-like digital humans.
Favorites are any asset you hearted as you searched through Bridge.
Local will contain all assets you have already downloaded and are stored on your computer:

Adding and Using Surfaces
Surfaces are materials that can be applied to Static Meshes. Surfaces will usually include materials that should be assigned to walls, floors, ground and more. Many of these materials will be tillable.
In Bridge, click over to Surfaces:

Find what you are looking for and left-click on the thumbnail to bring up the preview and note some options such as the scale of the texture and if it is tillable:

Quality applies to the texture size you want to download:

- Low Quality: 1024x1024
- Medium Quality: 2048x2048
- High Quality: 4096x4096
- Highest Quality: 8192x8192
Click Download (Green Arrow):

Then Click Add (Blue Arrow) to add it into your project:

You will find Surfaces available inside the Content Browser under Megascans/Surfaces folder:

You can also download and add right from the preview thumbnail:


To use Megascans Surface, simple Left Click and Drag the Material Instance onto a Static Mesh inside the level:

You can also assign this Surface Material at a Static Mesh Editor level:

All downloaded Surfaces will be a Material Instance. If you open up the Material Instance editor, you will have a number of options to change how this Surface will look inside your level. Play around with various options available to you:

Adding and Using Decals
Decals are texture detail that can be used to project onto Static Meshes. This will add variety to your existing material surfaces without having to include that detail in the texture itself.
Perfect example of this would be leakage, cracks, signs or graffiti.
Switch over to Decals and look for what you want to download:

Quality applies to the texture size you want to download:
- Low Quality: 1024x1024
- Medium Quality: 2048x2048
- High Quality: 4096x4096
- Highest Quality: 8192x8192
Click Download (Green Arrow):
Then Click Add (Blue Arrow) to add it into your project:
You will find Decals available inside the Content Browser under Megascans/Decals folder:
To use Megascans Decals, simple Left Click and Drag the Decal into your level. All decals will project down onto a Static Mesh.

Note the dark blue arrow, this is the projection direction. You can rotate the decal to project onto walls or ceiling. The projection arrow should face that direction.

Use the Scale tool to change the size of the Decal and its bounding box. The height of the bounding box should be very small and overlapping the Static Mesh onto which you want to project that Decal.

If your Decal is black, this means one of your Scale Axis is negative. Check the projection direction so it's not pointing backwards and then check the Scale values so they are NOT negative:


You can control which Static Meshes will Receive Decals. Select the Static Mesh and look for Receive Decals. Disable it if you don't want that Static Mesh to receive decal projection:

All downloaded Decals will be a Material Instance. If you open up the Material Instance editor, you will have a number of options to change how this Decal will look inside your level. Play around with various options available to you:

Adding and Using 3D Assets/Props
3D Assets and 3D Plants are 3D Models (Static Meshes).
Search for the one you want to download and use:

Left Click on the thumbnail to bring up a preview and check for Size and if it's an Open or Closed Mesh:

- Open: asset contains open edge borders and back faces
- Closed: asset is completely sealed and contains no open edge borders
Quality applies to the texture size you want to download:
- Low Quality: 1024x1024
- Medium Quality: 2048x2048
- High Quality: 4096x4096
- Highest Quality: 8192x8192
Click Download (Green Arrow):
Then Click Add (Blue Arrow) to add it into your project:
You will find added 3d models inside the Content Browser under Megascans/3D_Assets or 3D_Plants folder:
To use Megascans 3D Assets, simple Left Click and Drag the Static Mesh into your level:

3D Assets will have a Material Instance to adjust how it will look on the Static Mesh. Open the Material Instance and you will have a number of options to change how this Material will look on the mesh. Play around with various options available to you:

Deleting and Finding Megascans Assets
There are two ways to deleting Megascans Assets. One from your current project, the other is from your computer.
Deleting Assets from Your Project
Go to Megascans folder and select a specific asset folder then hit Delete.
Another menu will open asking you to either Force Delete or Delete:

DO NOT Force Delete assets. This means you have the asset being used in one of your levels. Remove any instances of the asset being used in your levels before Deleting. If you force delete then you'll have an empty actor container left over which clutters the level. It may also introduce issues when you try to package your level or your game.
The option you want to see is pure Delete.
Deleting Assets from your Computer
Once you deleted the asset from your project, you still have it on your computer.
Bridge places all downloaded assets to use in projects into a folder under Settings > Preferences: Library Path:
Easiest way to navigate to the asset you want to delete is inside Quixel Bridge. Right Click on the asset you want to delete and choose Go to Files:

Then select that entire folder and delete:

You may have to close and open Quixel Bridge to refresh the icon preview, so it no longer appears inside your Local section.
UE5 Fundamentals Tutorial Course
To use Quixel Bridge you'll need to know how to use Unreal Engine 5. I've put together the most comprehensive beginner tutorial course to help you get started with Unreal Engine 5 in just a few hours. Learn how to use, model, create and light in UE5 without any prior experience. Download "UE5 Fundamentals Vol.1" tutorial course here.


SUBSCRIBE & GET FREE UE5 PDF GUIDE
Subscribe to receive NEW/UPDATED and FREE "UE5 Beginner's Quick Start Guide" PDF (90 pages).

Visit this page for more info about the guide...
TOP 7 TUTORIAL COURSES FOR 2026
 Modular Environment Design Masterclass Tutorial Course
 Maya Foundation: Home-Study Course - Model and UV Environments
 Substance 3D Painter Essentials - Master Texturing
 UE5: Fundamentals Vol.1 - Create with Unreal Engine 5
 UE5: Retro Office Project - Create Beautiful Interior Env
 UE5: Master Material Creation - Create Master Materials in UE5
 Preproduction Blueprint: Plan Environments and Level Designs
TUTORIAL CATEGORIES
UE5 FUNDAMENTALS VOL.1 COURSE
UE5: RETRO OFFICE PROJECT

MODULAR ENVIRONMENTS MASTERCLASS

LEARN THE PREPRODUCTION PROCESS

ABOUT WoLD & ALEXG

My name is AlexG. I am self-taught level designer, game environment artist and the creator of World of Level Design.com. I've learned everything I know from personal experimentation and decades of being around various online communities of fellow environment artist and level designers. On World of Level Design you will find tutorials to make you become the best level designer and game environment artist.
Home Terms of Use/Trademarks/Disclaimers Privacy Policy Donate About Contact
All content on this website is copyrighted ©2008-2024 World of Level Design LLC. All rights reserved.
Duplication and distribution is illegal and strictly prohibited.
World of Level Design LLC is an independent company. World of Level Design website, its tutorials and products are not endorsed, sponsored or approved by any mentioned companies on this website in any way. All content is based on my own personal experimentation, experience and opinion. World of Level Design™ and 11 Day Level Design™ are trademarks of AlexG.
Template powered by w3.css