How to Create "The Corridor" Environment in 10 Hours With UE4
"Step-by-Step Workflow to Creating "The Corridor" with Unreal® Engine 4"

Videos
Hours
Project Files
GB

- Double Bundle

- Includes:
- UE4 Fundamentals and UE4 Corridor
-
$114$67
- UE4 Quad Bundle
-
 Best Offer
- Includes:
- UE4 Fundamentals Vol.1 & Vol.2, UE4 Corridor & UE4 Decals
-
$230$99
- Double Bundle
-

- Includes:
- UE4 Corridor and UE4 Decals
-
$106$47
Now What? Going Beyond The Basics
"So I've learned the basics of Unreal Engine 4.
I know how to create a simple environment using default starter content assets. I can light an environment, insert some Static Meshes, add materials and build the environment. I can get pretty good results and I think I got a good hold of the basics of Unreal Engine 4.
Now what?
What do I do next? Is there a way to move past the basics and focus on doing another project?"
How do you go beyond the basics of Unreal Engine 4 to create something original and unique?
With Unreal Engine 4 you are only after one thing - to create your own game environments.
Once you've learned how to get around the editor and have used Starter Content to create a simple level - it is time to move past the basics.
Now, you may think that you are now ready for a completely custom game environment with all new self-created Static Meshes, and maybe you are. But unless you know how to use a 3d modeling application, creating your own models at this stage will lead you to a very steep learning curve which will take you away from Unreal Engine 4.
So what is the next project to do to get past the basics?
First Recommended Project was to create a small environment with Starter Content. The key to this first UE4 project is to keep it very small. Your primary goal is to learn Unreal Engine 4 functionality, fundamentals and principles of using this game engine. This was covered in detail in "UE4 Fundamentals".
Second Recommended Project is to create a slightly larger environment with a set of new custom Static Meshes. These custom static meshes should be either something you already have or something you downloaded from Marketplace/Learn sections. Don't create your own custom Static Meshes yet. You want to expand your UE4 knowledge and experience beyond the beginner by forcing yourself to create larger and more unique environment while using a set of Static Meshes already created.
The goal is to learn intermediate and advanced tools of what it takes to create a visually interesting and unique game environment which will separate you from being a complete beginner to a more intermediate and advanced user.

First Recommended Project: covered in "UE4 Fundamentals"

Second Recommended Project: covered in "UE4 The Corridor Project"
Second Recommended Project
"UE4: The Corridor Project" is the second recommended project. A series that will take you from beginner of UE4 Fundamentals and show you how to go beyond the simple Starter Content environments and use Unreal Engine 4 with more advanced purpose.
In this premium tutorial series you will go through 21 video workflow of how to construct "The Corridor" environment with provided set of Static Meshes and learn more intermediate to advanced techniques that you will use in your future projects.
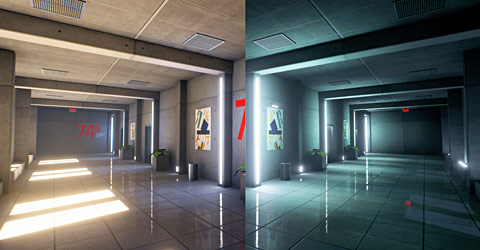
The final result will give you one environment that is lit two different ways. Both will look dramatically different from each other.

UE4 The Corridor: Exterior Lighting Scenario

UE4 The Corridor: Interior Lighting Scenario
You will have a video flythrough and screenshots to show. You will learn a lot of information, techniques and how-to methods for creating your own game environments. See "What You Will Learn" section below for more info.
10 Hours With "The Corridor Project"
Let's break this down into hour-by-hour. Please note that the running time of all the tutorials are 4 hours; 10 hours is the framework in which The Corridor is constructed.

Hour 1
Project Setup

Hour 2
BSP Block-In
Hour 3
Meshing

Hour 4
Detailing

Hour 5
Pre-Lighting Prep

Hour 6
Ext Lighting Scenario

Hour 7
Int Lighting Scenario
Hour 8
Post Processing

Hour 9
World Settings and Final Build

Hour 10
Flythrough and Screenshots
Spotlight: Submitted Artworks from "UE4 The Corridor Project"
Following screenshots and videos are "UE4 The Corridor Projects" bought, completed and submitted by others. For more screenshots see the full blog post published on "UE4: Spotlight - 12 Submitted Artworks From "UE4 The Corridor Projects".


What You Will Learn
Follow entire production pipeline from the start-to-finish on how to create/construct "The Corridor" environment with a set of existing Static Meshes (included with this series).
- ow to set up "The Corridor" project and use Static Meshes provided with this project
- Learn the naming file convention I use to save maps and keep levels organized
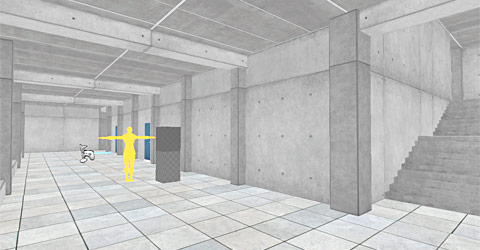
- How to build "The Corridor" environment or any other environment you create to correct player scale and proportion
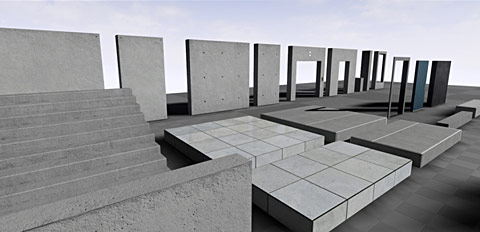
- How to use BSP brushes to block in corridor environment
- Discover the workflow of replacing all BSP brushes after the block-in phase with Static Meshes
- How to work with variety of Static Meshes to make them fit and a part of the environment without any gaps with a sense of unity and cohesive aesthetics
- What should you block-in during the BSP stages; how detailed should you get and how much to focus on the BSP block-in
- Why you should master the Geometry Editing mode to modify your BSP brushes for sped-up workflow
- Tip: Whether you create stand-alone game environments (non-playable) or playable level designs always treat all environments you create as playable; where there is always a possibility that one day, a player will walk through your environment and interact with it
- How to start replacing BSP brushes with Static Meshes; where to start and how to continue.
- How to use Static Meshes together to create interesting geometry variation and combinations
- Tip: Static Meshes will be replacing all BSP brushes; BSP brush block in is used as a skeleton or a frame of the environment onto which Static Meshes are built. It is important that everything is being snapped to the grid and built correctly from the start as everything is built from the previous inserted Static Mesh.
- Various design thought process about adding additional detail information through Static Meshes in the moment to fix flat boring geometry with more interesting shapes within the Corridor
- How to detail with Static Meshes and Decals
- Tip: start with major structural elements of architecture (walls, floors, ceiling, windows, columns) then expand to minor or details of structural elements of architecture
- How to start thinking about light sources or where lighting is going to be coming from to light your environments
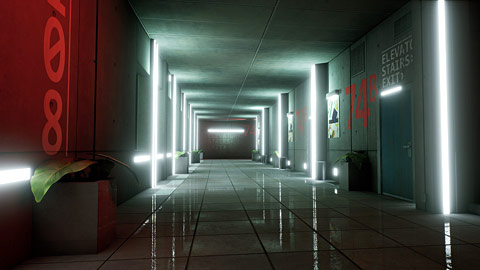
- How to place and arrange Emissive Light Strips for functionality and aesthetics
- How to insert and work with decals
- How to fix "My Decals Don't Show Up in Baked Indirect Lighting and in Unlit Mode" problem (i.e. enabling DBuffer decals)
- How to use decals to add unique detail into your environment
- How to set up and work with Auto-Exposure/Eye Adaptation inside your level
- How to completely disable Auto-Exposure/Eye Adaptation in your level if you don't want to use it
- How to insert Post Process Volume and make it universal
- Tip: to make Post Process Volume global (work everywhere whether you are inside that volume or not) check "Unbound" inside the Post Process settings
- How to make material reflections work in your level with the use of Sphere Reflection Capture
- How to prevent Static Mesh geometry lighting bleeds
- How to light environments two different ways; as Exterior Lighting Scenario and Interior Lighting Scenario (daytime and nighttime)
- How to light "The Corridor" with Directional Light
- Design choices for creating interesting lighting/shadow patterns
- Tip: focus first on Primary Lights of your environment before you continue to add secondary and filler lights
- How to check before and after as you change and tweak your lighting; it is very difficult to tell if what you are doing after you've built lighting to know if your lighting is improving or not - using the screenshot comparison before/after you'll know exactly what you are changing and how it is improving your environment
- How to start adding secondary lights and filler lights to improve upon your main primary lights
- Deciding on complimentary color choices
- Using Emissive Light Strips to add light illumination into the environment
- How to work with having more than 4 Stationary Lights in your scene
- How to include Atmospheric Fog and Exponential Height Fog to add atmosphere, sun disk and sky into your environment
- How to use Directional Light for subtle moonlight detail lighting only
- How to organize your lights inside the scene using the World Outliner
- Design choices in the moment for including additional lighting in the interior lighting scenario to balance the composition
- How to use Post Process to change scene colors of your level
- How to use Post Process Color Grading technique and create a LUT or Color Look Up Table (one of my favorite techniques to use for changing how your environment looks)
- How to create a Color Look Up Table (LUT) for exterior and interior lighting scenarios
- How and which properties to change under World Settings Lightmass to improve your scene baked-in lighting
- How to change Environment Color to update indirect lighting shadow color
- Building your environment on Production Lighting for best visual quality of your scene
- How to use the Matinee editor and create a camera fly-through to showcase from your environment
- How to render an AVI video file directly from the Unreal Engine editor
- How to set up a two camera cut fly-through
- How to set up your camera fly-through to start exactly as you spawn into your level
- How to create a fade-in and fade-out effect in the video from the Matinee Editor
- How to take quick screenshots from the editor
- How to take very high-resolution screenshots of your environment
31 Custom Static Meshes Included
In addition to the video tutorials, you will receive and be able to use the Static Mesh set that was used to construct "The Corridor" with. It contains 31 usable Static Meshes to follow along with this project. Major architectural meshes such as walls, columns, floor, ceiling, stairs are modular.
"The Corridor" Static Mesh set

"The Corridor" Static Mesh set
Video Breakdown
Watch this video for in-depth tutorial series breakdown.
No Risk, 30 Day - 100% Money Back Guarantee

I know you will find these tutorials extremely helpful.
But, if for any reason you don't like it, I am offering 30 days, 100% money-back guarantee.
I've been running World of Level Design.com since October 2008. I'm not going anywhere. So if you don't like this premium tutorial series then I don't want your money. Full refund.
Just let me know why you didn't like the product and how I could have made it better.
UE4: The Corridor Project
Videos
Hours
Project Files
GB
FAQ
Frequently asked questions. Click on each tab to see more.
Click 'Add to Cart' and go through the purchasing process. Once you are done, you will receive an email with a download links to the product. The email is sent to the same email address you used to purchase the tutorial series with.
This is a downloadable product. You will NOT receive a physical package shipped to you in the mail. The entire package will be immediately available for you to download and get started right away after ordering. You will receive access to any bonuses on the download page as well (if available).
Each tutorial series is compressed/zipped file and ready to download.
After you download the files, Right Click on each zipped file and choose "Extract All" or "Unzip".
For now I offer digital downloads only. This is a one-time payment. You pay once and you download the product to keep. No recurring payments or subscriptions fees.
If you encounter any issues during your download and need your links to be renewed and re-download again, email me at alex@worldofleveldesign.com using the email you purchased the product with and I will re-activate all the downloads.
All payments are processed on a secure server. This website uses Paypal for transaction and E-Junkie for download delivery. E-junkie is certified by PayPal and Google Checkout and it is secured by GeoTrust.
PayPal uses SSL technology to keep your information safe. In addition, when you send a payment using PayPal, the recipient won't receive sensitive financial information like your credit card or bank account number. This way, you don't have to worry about paying people you don't know.
Absolutely. PayPal is only used to process your payment. You do not need to have a PayPal account to checkout.
You can pay with Credit Card, Debit Card or PayPal.
If you do not have a PayPal Account. Follow these steps
1. Click "Add to Cart"
2. Choose "Check out with PayPal"
3. Now, instead of using PayPal you will have an option to use Debit Card or Credit Card to pay.
PS.
If you have spent some time visiting World of Level Design website, read and watched video tutorials then you know that each video and each tutorial I create is focused on giving you a lot of value and information in each one.
When I release a product, I make sure that you get your money's worth and walk away learning more than what you paid for.
![]()
Creator of World of Level Design.com
Home Terms of Use/Trademarks/Disclaimers Privacy Policy Donate About Contact
All content on this website is copyrighted ©2008-2024 World of Level Design LLC. All rights reserved.
Duplication and distribution is illegal and strictly prohibited.
World of Level Design LLC is an independent company. World of Level Design website, its tutorials and products are not endorsed, sponsored or approved by any mentioned companies on this website in any way. All content is based on my own personal experimentation, experience and opinion. World of Level Design™ and 11 Day Level Design™ are trademarks of AlexG.
Template powered by w3.css