World of Level Design™
Tutorials to Becoming the Best Level Designer and Game Environment Artist (since 2008)
How to Plan Level Designs and Game Environments in 11 Steps
Category: Environment Art, Level Design
December 01, 2011 (Updated: November 21, 2016)

How to plan your game environments and level designs?
After failing over and over for years at level design and game environment art I finally found something that has helped me to begin, work and complete most of my projects.
My senior year in college I completed my animation thesis due to an entire semester in planning course called Animation Prepro. I completed DM-IcyApex in 3 weeks and DM-LightHouse map in 11 days because I spent time in planning and knew exactly what I was going to create prior to opening a level editor.
This planning process is called "preproduction" and since 2009 I have completed dozens of projects using the "Preproduction Blueprint" method.
In this tutorial you will learn the planning workflow to use for all your projects to help you finish them.
The way I used to plan for game environments or level designs in the past that failed me were:
- Get an idea
- Open level editor and go to work
Sometimes I would collect some photo reference and create a top down layout but most of the time it was idea straight to level editor. This usually led to an unfinished project.
I missed a lot of key steps in the process - steps that would have helped me during production.
After years of figuring out, developing and testing the system for planning, I came up with 11 planning steps that I go through every time I start any project. The planning process can be for a stand-alone game environment or a full playable level and it is what I call "Preproduction Blueprint".
There are 2 types of projects you will usually work on - playable level or stand-alone game environment.
- Playable level design includes gameplay mechanics, scripted events, obstacles and objectives for the player to complete. This may be a single-player or a multiplayer map.
- Stand-alone game environment does not include any playable mechanics and does not require player participation. Stand-alone game environments are usually created for a portfolio, a scene to admire, to explore, to showcase or to learn a game engine or specific software.
Step #1: Idea
Everything begins with an idea. A thought in the artists mind can become a playable level, a stand-alone game environment or a full game.
There are two ways you get ideas - spontaneously or deliberately.
- Spontaneous ideas can come at any moment. You can be taking a shower, driving your car or grocery shopping and all of a sudden you have an idea for a level you want to create.
- Deliberate ideas are developed intentionally. This is when you sit down and search for game environment ideas you may want to do.
Ideas are everywhere and you have them all the time. Whether your ideas are deliberate or spontaneous you have to write them down or you will not remember them. Carry a sketchbook or a notepad with you everywhere you go. When you get an idea, write it down or do a quick sketch. This notepad and sketchbook should be specifically dedicated to game environment art and level design.

To generate ideas deliberately you must begin to see everything around you as possible playable game space. Begin to shift your perspective from everyday locations to seeing possible playable spaces within those locations.
Back alley that you've passed hundreds of times on the way to work can become a game location:

Abandoned house down the road that you haven't noticed can become the next project you work on:

Other ways to deliberately look for ideas is in architecture or photography books, comic books, magazines, stock photo websites, concept art, paintings, movies, tv shows and games.
Whatever the idea you are naturally being pulled to explore is the idea you should pursue. Pay attention to what you find interesting, what you are naturally drawn to, excited and inspired by.
When you have an idea or see an image of a possible game environment and you hear inner voice saying "Oh, that's cool" is a good indicator that you may want to pursue that idea further.
Some of the things I feel drawn to are overcast days, rain, snow, abandoned locations (houses, buildings, cities), modern contemporary architecture, realistic, dark and gritty movies. Most of the environments I create reflect that. Of course it doesn't mean you should only do those types of environments. It is important to develop yourself as a full artist and explore variety of styles that you aren't comfortable with. But, initially pick ideas on things you are interested in and feel passionate about. If I don't feel a high level of interest it won't be long before I abandoned that project.
You may be working for a client or in a studio where you have to fulfill someone else's ideas. You have specs to follow and an art director to answer to. It could be difficult to find excitement and inspiration to continue working on ideas that are not what you would choose. The key is finding something within that idea you can be excited and inspired about. Maybe you like the lighting within the environment or you care about the story being told. Whatever it is, find that aspect of the environment in any way you can.
Step #2: Setting, Location and Theme
Once you have the idea you want to pursue you must decide on the environment setting, location and theme.
- Environment setting is a general, physical location of where your game environment takes place. Where does it take place? Urban or Rural? Interior or Exterior? What about time period?
- Location is the actual place where your idea is set. It is a more specific place within the environment setting.
- Theme is the subject matter of your location. It is a unifying and dominant idea that brings your environment together. Theme is more abstract such as a particular design style, time of day, time in history, weather, atmosphere, mood, feeling or an event.
Here is an example of a custom fan made map I created in L4D2, Brooklyn Bridge:
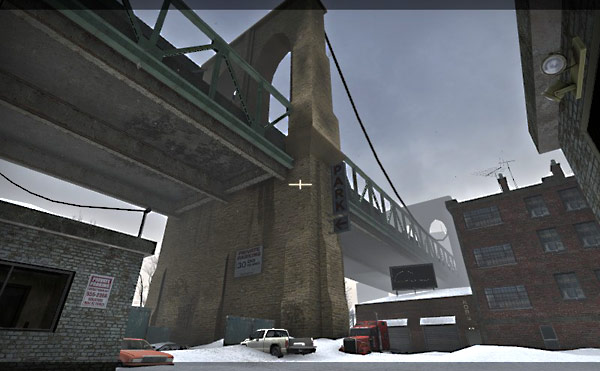
- Environment Setting: New York bridge
- Location: underneath the Brooklyn Bridge in an abandoned car repair garage and scrap yard
- Theme: winter, isolation, cold, abandoned
Step #3: Project Purpose
Since you are going to dedicate a set amount of time to this project you want to make sure you have a good reason for pursuing it. For this you have to define project purpose.
Project purpose is a very important internal decision of why you want to pursue working on this idea.
Project purpose can be a variety of things. For example:
- to get a job at a specific studio
- to create a portfolio game art to improve hand-painted texturing
- to learn Maya LT software for game environment art
- to construct a custom made environment with UE4
- to improve baking normal maps for hard-surface geometry
- to create a map for a mod you are working on
Purpose helps to stay focused on the outcome you are after and get the project finished. Know why you want to create this game environment and see it come to life.
Step #4: Set of Features
Features are elements in the environment that will make your project stand out, make it unique and different from anything else out there.
Every game released has a set of features to help it sell that game to you.
For example, going over to Amazon.com and looking at "Tom Clancy's The Division" game:
- Seamless Multiplayer: The Dark Zone - Collaborate with other players, or attack and steal their loot.
- A Living, Breathing World - Use the environment for strategic advantages to dominate fights and ambush your enemies.
- Urban Jungle - Fight the Cleaners who wield flamethrowers, take on thugs who roam the city, and encounter enemy factions.
- Gear Up and Customize Your Agent - Customize your agent and your backpack. Level up your weapons, gear, and skills.
- Cutting-Edge Tech - Choose and upgrade your skills, and synergize with teammates to increase your chances of winning in combat.
You should come up with a set of defining features for your playable level or stand-alone game environment.
- How will you make your playable level or stand-alone game environment stand out visually and/or technically?
- What elements will you focus on that will make your environment unique and stand out from the rest?
- What do you want the player or the viewer to experience?
List of features is a good guideline to follow to keep your project on track.
Step #5: Photo Reference and Research
You cannot create a realistic and authentic game environment without collecting, studying and using image reference.
With environment setting, location, theme, purpose and features defined, looking for photo reference will be a lot easier. You will know exactly what you need to search for.
You must collect the following reference:
- Environment and location reference
- Set design and props reference
- Lighting reference
- Style/visual development reference
Environment and location reference:

Set design and prop reference:
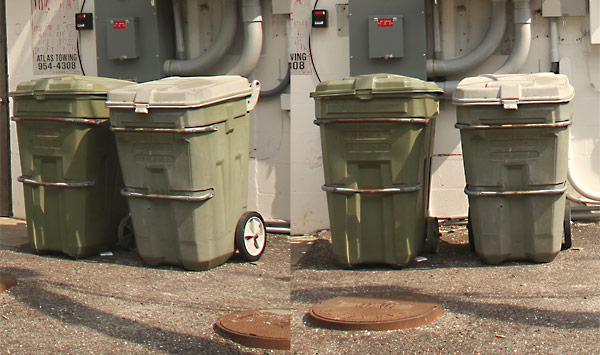
Lighting reference:

Style/Visual development reference:

These images will be used as reference for texturing, modeling, lighting and constructing your stand-alone game environment or playable level.
In addition to collecting image reference you should also conduct research. Naturally, you will have a lot of questions come up about the environment. Write down all the questions and answer them. Most of the research will be done through Google or Bing (whichever search engine you use).
Image below shows some research of winery props I was creating. Some questions I had were about the wine barrel:

- Why is the wine barrel this shape?
- How heavy is the barrel?
- How is this barrel transported?
- What is the type of wood used?
Answering these questions helped me to make better art decisions and to understand what I was creating.
Step #6: Environment's Story
There are two types of game environment story and two ways to communicate that story.
Two types of game environment story are:
- What happened in the environment prior to the player getting there?
- The story of how the character came to that environment. What are they doing there? How did the player arrive to the environment? What brought them there?
Write history about your environment. How did it come to be? And what is the player doing within that environment. Why are they there? This doesn't have to be extensive. A few paragraphs or a list should be enough. This will help to create a sense of place and purpose for the environment to exist. The environment will have its own background story which will make decisions about that environment easier such as placing props, texturing and detailing.
The two ways to communicate that story is explicitly or implicitly.
Explicit: explicit environment storytelling is told through character dialogue/monologue, cinematic, text on screen and game/level objectives. Explicit storytelling is told to you, leaving no room for confusion or doubt.
Explicit storytelling through AI character in Max Payne 2:

Explicit storytelling from "Max Payne 2" (©Remedy Entertainment)
Implicit: implicit environment storytelling is implied. Blood smudge on the walls, dead body next to an electric fence or specific prop placement – all communicate story. You don't know exactly what happened but you figure out what may have happened.

Implicit storytelling from "Max Payne 2" (©Remedy Entertainment)
Step #7: Objectives, Obstacles and Set Pieces
Objectives, obstacles and set pieces (scripted events) are gameplay elements that are part of your playable level or stand-alone game environment.
- Objectives: what does the player need to do within the environment in order to progress?
- Obstacles: opposition that player has to overcome. This can be in a form of a puzzle, exploration, item collection, AI battles etc.
- Set pieces: events that happen in the environment, also known as scripted events. Set pieces help to immerse the player into the game by providing an interactive game environment. These events come from direct/indirect response from the player's actions or are part of the world itself.
In a playable level design you will have to create and implement all three.
In a stand-alone game environment you may not need any objectives or obstacles since it is not a playable level. But you may need scripted events (sunrise/sunset, rain, wind, sounds, particle effects etc).
Mind-mapping is a very useful tool that helps to design objectives, obstacles, set pieces structure. It allows for a simple way to explore options how the player may approach a given objective and overcome obstacles. It works like "if-else-then" decision scenario. If the player does "this" then certain thing happens, or else "this" happens:
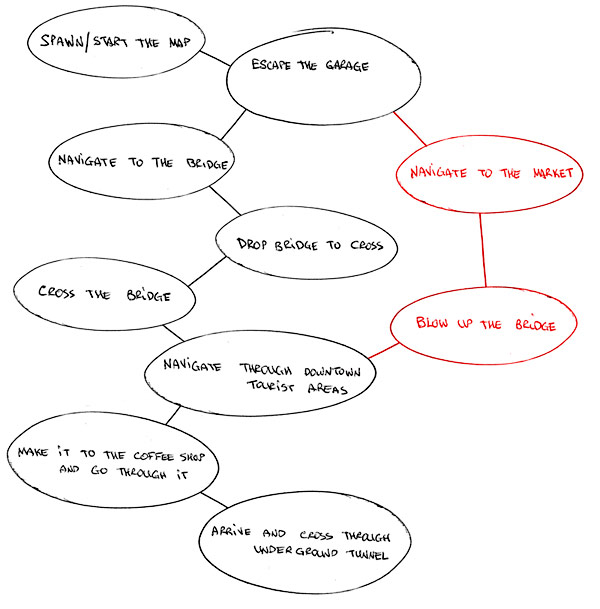
Another example of a simple flow chart for single-player map objectives and obstacles:

Step #8: Focal Points
Focal points are important visual landmark locations. There are three reasons for focal point/s.
- Functional purpose - helps the player to orient themselves in the environment. Player will always know where they are in relationship to a focal point.
- Visual aesthetic function - visual appeal
- Helps to draws player's attention to a location. It becomes a point of interest to explore.
You may have single or multiple focal points within the environment.
In single player maps, you may want multiple focal points using architectural structures, landscape elements, lighting that help the player to travel from one location point to another.

"L4D2: Dark Carnival" is a great study in multiple focal points (©Valve Software)
In multiplayer maps, you may want a single focal point (depending on the size and gametype of course). This one landmark helps the player orient themselves in the environment and where they are upon spawn.

Single focal point example from "CS:GO" de_lake map (©Valve Software)
In addition to gameplay, focal points serve visual purpose of helping your map stand out – providing a way for the player to remember your environment by.
Depending on the type of game environment you are working on, you may design a single or multiple focal points. Also these do not have to be grand structures that stand out in the environment. They can be very small elements that draw player's attention to the area through lighting, animation or sound.

Lighting focal points from "Alan Wake" (©Remedy Entertainment)
Step #9: Top Down Layout
Top down layouts are schematic drawings or designs for what a stand-alone game environment or playable level design is going to look and play like. It contains buildings, landscape areas, map's boundaries, player paths, alternate routes, spatial relationships, flow, pacing, cover, player starts, AI position, important locations, and focal points.
Most common way to create top-down layouts is with pen and paper. First few drafts are always very rough as you are figuring things out, planning and visualizing playable space. With every iteration of the layout you'll begin to get a better sense of the environment you want to create.

You can scan the drawing into Photoshop to refine the layout and clean everything up:

Other ways to generate top-down layouts are whiteboard, Google maps or SketchUp. But most common way will be pen and paper.
Most important thing to remember, top-down layout is a guide for you to follow during block-in creation of your game environment inside the editor but it is never final representation of what your environment's layout will be. Many things will often change during production due to play testing and constant feedback you'll receive that will force the layout to be updated.
Step #10: Visual Development
Visual development is the art direction that defines the visual style, lighting, and color palette of the environment.
There are two options where you will not need to define a visual direction of your game environment.
- If you are working in a studio as a level designer or environment artist - the style of game environments you need to create will almost always be defined for you by the concept artist and the game director.
- If you are creating a custom add-on map (level) for an already existing game. Such as Half-Life series, L4D series, Team Fortress 2, Counter-Strike Series, and Unreal Tournament games etc. The style and art direction is already pre-determined. So for the most part you would have to keep true to the visual style of the game.

Example of visual development and style from "Team Fortress 2" map (©Valve Software)
If you are creating your own custom game, your own custom map or stand-alone game environment that is independent from any existing game, then you have to define visual art style yourself.
You may not be a concept artist, so creating your own digital painting probably isn't an option. Although it is ideal to create your own concept art, it is not a big deal. You can use already created concept art to help you define visual style. You can also use traditional paintings, movies and games help you decide on a visual direction.

Primary visual development elements to pay attention to are color palette, atmosphere, lighting, texture, detail and style (realism, photorealism, hand-painted, exaggerated, illustrative, cartoonish, pixel, abstract etc).
So, you can either create your own visual style through concept art, or look through existing concept art, traditional paintings, movies and games to get ideas of a style you want to mimic.
Step #11: Making Lists
The final step is to create working lists.
Lists will help you organize a series of tasks that need to be worked on, assets that need to be created and what you should be focusing on at any given time. Do not keep anything in your head. Write everything down.

Lists should be broken down into following categories:
- Assets List (3d models, textures, materials, audio/sound, particle effects)
- Production List (pipeline of what to work on and in what sequence)
- Project Management document or on-going list that includes notes, bugs/errors you need to fix, things you need to do next
These are the 3 lists you should start with. Once you have experience and knowledge working on a few projects you should change and adapt lists that work for you.
Preproduction Blueprint
After going through all 11 steps you end up with "Preproduction Blueprint" for your project. A working level design/game environment document that guides you through production.
To go more into depth in each of the 11 steps I highly recommend that you pick up a paperback or Kindle version on Amazon "Preproduction Blueprint: How to Plan Game Environments and Level Designs" book.
The book includes:
- Updated and revised
- 240 pages and 11-step planning system workflow
- Two versions are available: Paperback or Kindle
- Paperback version qualifies for free shipping (US Only)
- Kindle version is instant digital download
- Purchase and check out with Amazon.com
- Preproduction Blueprint is not game or engine dependent. It is a stand-alone planning system that can be used for any level design and game environment project.
Full "Preproduction Blueprint" is available as Paperback or Kindle here on Amazon, and if you need more info on the book visit here...

SUBSCRIBE & GET 2 FREE PDF GUIDES
Subscribe to WoLD and receive 2 FREE PDF Level Design Guides (200+ pages).

Want to know more what you are getting by subscribing?
TOP 7 TUTORIAL COURSES FOR 2026
 Modular Environment Design Masterclass Tutorial Course
 Maya Foundation: Home-Study Course - Model and UV Environments
 Substance 3D Painter Essentials - Master Texturing
 UE5: Fundamentals Vol.1 - Create with Unreal Engine 5
 UE5: Retro Office Project - Create Beautiful Interior Env
 UE5: Master Material Creation - Create Master Materials in UE5
 Preproduction Blueprint: Plan Environments and Level Designs
TUTORIAL CATEGORIES
MODULAR ENVIRONMENTS MASTERCLASS

LEARN THE PREPRODUCTION PROCESS

ABOUT WoLD & ALEXG

My name is AlexG. I am self-taught level designer, game environment artist and the creator of World of Level Design.com. I've learned everything I know from personal experimentation and decades of being around various online communities of fellow environment artist and level designers. On World of Level Design you will find tutorials to make you become the best level designer and game environment artist.
Home Terms of Use/Trademarks/Disclaimers Privacy Policy Donate About Contact
All content on this website is copyrighted ©2008-2024 World of Level Design LLC. All rights reserved.
Duplication and distribution is illegal and strictly prohibited.
World of Level Design LLC is an independent company. World of Level Design website, its tutorials and products are not endorsed, sponsored or approved by any mentioned companies on this website in any way. All content is based on my own personal experimentation, experience and opinion. World of Level Design™ and 11 Day Level Design™ are trademarks of AlexG.
Template powered by w3.css