World of Level Design™
Tutorials to Becoming the Best Level Designer and Game Environment Artist (since 2008)
32 Lessons I Learned from Creating 32 Modular Pipe Assets
Category: Environment Art, Maya LT/Maya, UE4
March 12, 2019
For 5 years I saw pipes everywhere...

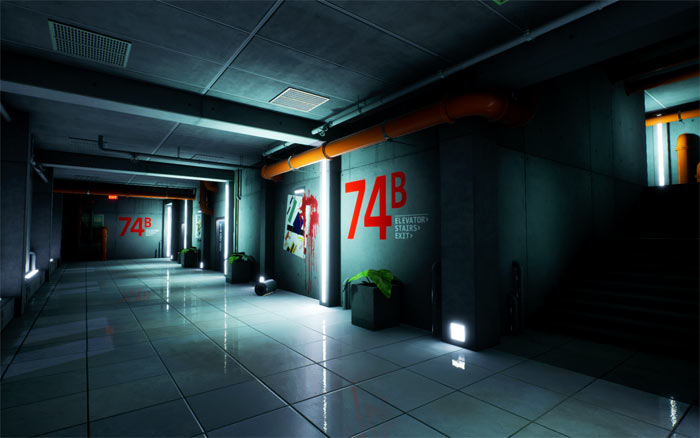
I saw pipes in "Mirror's Edge", pipes in "Dishonored", pipes in "Wolfenstein" series and pipes in "The Division".


The list can go on and on.
It got so bad, I would see pipes everywhere I went.
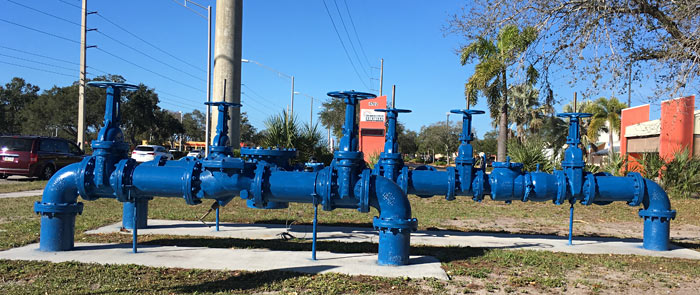
I couldn't take it anymore. I had to create my own set of modular pipes to use in my own projects.
As a game environment artist and level designer you will have to know how to create and use modular pipes at some point. This is unavoidable.
Here are 32 lessons I learned from creating 32 modular pipe assets.
Full Tutorial Series: "UE4: Modular Pipes Project" is here...
Video Tutorial
1. Pipes Need to be Modular
Pipes you create need to be modular. They need to snap together to construct variety of configurations and networks like these:

To make this happen, 3 things you must keep in mind:
- Each pipe has to be created on the grid
- Pivot points must be controlled
- You have to test the pipes before committing to the final set for modeling
Of course, sometimes you'll have unique set of pipes that won't be reused anywhere else. But if you want to have high level of reusability, the pipes have to be modular. Every single one of them has to work with each other.
2. You Will Need 3 Different Pipe Sizes (Large, Medium, Small)
For maximum reusability and variety you should create 3 different pipe sizes.
Large Pipes for mostly exterior environments:

Medium Pipes for both exterior and interior environments:

And Small Pipes for fine detail:

Of course all 3 can be juxtaposed next to each other in single scene:
3 different sizes will give you the most flexibility out of your modular pipes.
3. Determine Pipe Sizes and Dimensions Early
Figure out what pipe sizes you need and what their dimensions will be before starting to work on them.
Spend couple of hours doing some tests.
Test different pipe sizes, dimensions and proportions. Decide on a standard you'll use for the rest of your project that every pipe will follow.
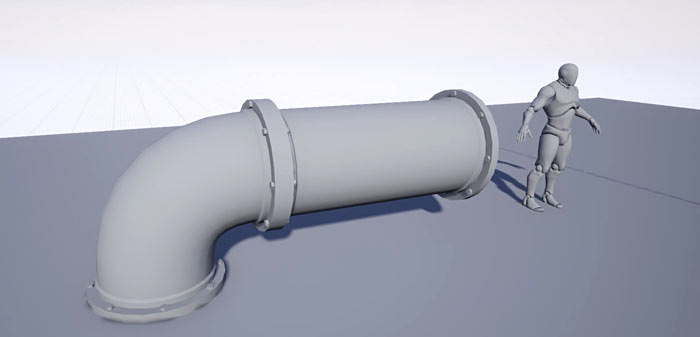
For example for large pipes, I decided on:

- Radius: 50
- Subdivision Axis: 24
- Length: 500 and 200
And for 90 degree turns I decided on 8 segments:

Use a human reference scale in your 3d modeling software to judge proportions as I did above. Simple box will do.
Export these simple meshes to UE4 for in-game testing. This will but will be worth it to eliminate any problems with scale.

Once you are happy with their size, it is time to model.
4. Word on Specific Styles and Creating Highly Reusable Pipes
The more unique you make the modular pipes adhering to a specific style, the less adaptable they can be for other projects. I wanted to re-use these modular pipes not just in one project but in many others.
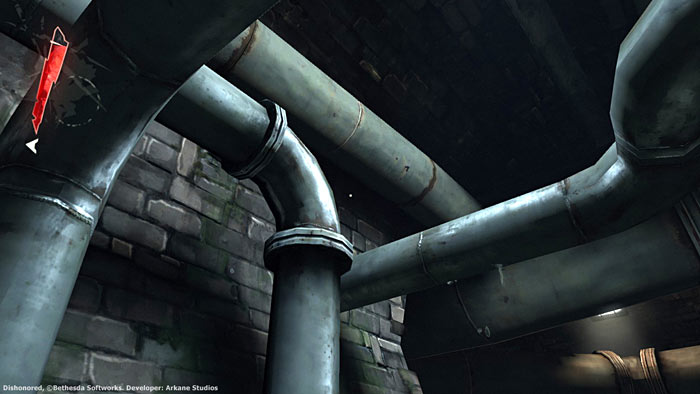
For example in Dishonored, the art style is very specific and very stylistic. The pipes here are less adaptable to other game projects, unless they are using the same art style.
While in Battlefield 3 and 4, the art style is more realistic. Pipes in these games are something you might see in everyday life. So this makes them highly reusable and flexible, not just in Battlefield 3 and Battlefield 4 games, but in other similar environments.

So, I decided to create clean, modern and semi-realistic pipes you would see in everyday life to make them extremely versatile to use.
The art style of the pipe depends on the game environment you are creating. The style is decided ahead of time but the process to create them will be the same. You will need the same set of modular pipes - straight, angled, 45, 90, 180 degrees, 3-way, 4-way pipes and so on.
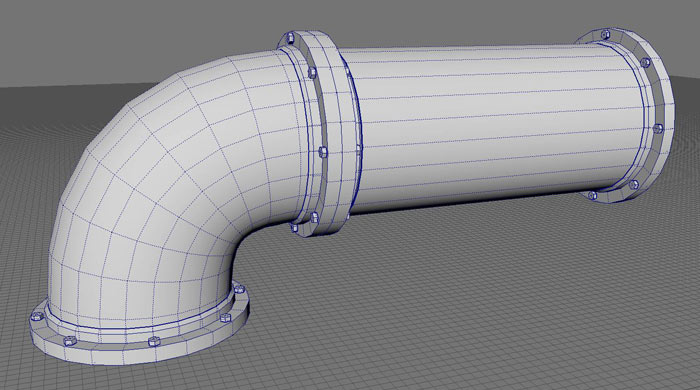
5. Use Bridge Tool for 90 and 45 Degree Angled Pipes
Position 2 straight pipes like so:

Distance between them is where the curve will be created. For wider angle position them further, for tighter angle position them closer.
You must combine these two objects into one.
Then select edges or faces where you want to create 90/45 degree geometry and go to "Edit Mesh > Bridge".
Set "Curve Type: Blend" and define the amount of "Divisions":

Then you can delete the straight pipe geometry to leave yourself with the 45/90/180 degree turns.
6. Use Booleans (Yes Booleans) for 3 and 4-Way Pipes
To create 3-way and 4-way pipes use Boolean.
Position two pipes to overlap each other for 3-way or 4-way:

Select both pipes then go to "Mesh > Boolean > Union (Edge and Union)".
Booleans create problems so you will need to clean up your geometry of overlapping vertices by merging them. The selected vertecies below is what you'll need to merge.

7. Model Pipe Caps and Pipe Bolts Separately
I created 9 large pipes, 9 medium pipes and 9 small pipes. Each pipe has a pipe cap. If I had to model each pipe cap and UV it separately, it would have taking me a long time. But that's unnecessary.
To speed this up, I modeled one pipe cap, UVed it and duplicated for all other pipes.

Important part is the pipe cap must match the pipe cylinder so it can be merged together later.
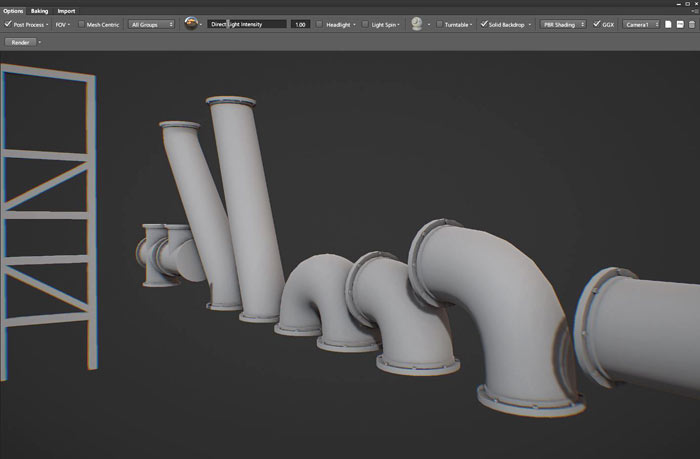
Here is a test of the pipe and pipe caps:
8. Create Pipe Supports
Pipes by themselves will get you far. But for longer and taller pipe network configurations you will need pipe supports to help distribute their weight.
I created two supports for large pipes:

Two supports for medium pipes and one support for small pipes:

I had plan and test at what height to create the supports from and how I could reuse them. I created large pipe supports that can be used as two different height variations with the same mesh. I can also reuse the same pipe support on walls or from ceilings.

For medium pipes I created a ground support and one that can be used from ceilings or walls:

For small pipes, I only created one ceiling/wall pipe support:

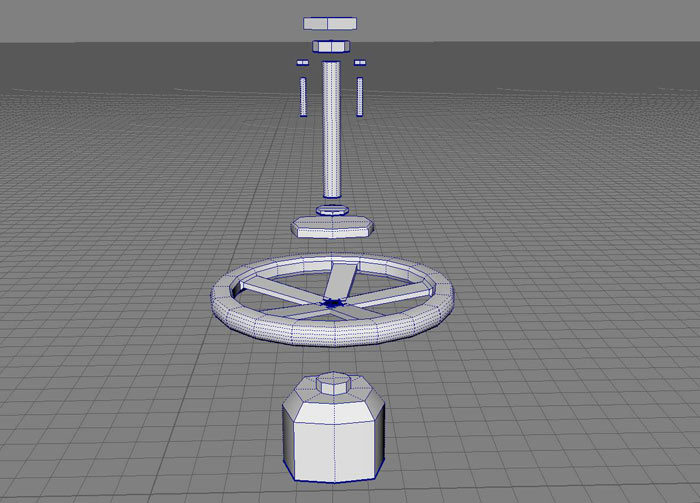
9. Modeling the Valve Medium Pipe and Small Pipe
The valve was the most time consuming to model in this project. But it's not as difficult as it seems. The trick is to break down the reference into simple geometric shapes. Then model those shapes one at a time.
All these meshes were then combined into one object. I included the pipe cap I already did then UVed the mesh. I duplicated the valve. Resized it to match the proportions of small pipes and moved the UVs so medium and small pipe valves have their own unique UV space.
I now have 2 different size valves which was only modeled once.

10. Use Shift+D (Duplicate with Transform) to Create Repeated Patterns
Useful technique I used to duplicate the bolts is Shift+D.
If you modeled for any amount of time, you know this shortcut. It is duplicate with translate (Shift+D). For a beginner, this is a time saver and opens up new possibilities for quick and precise architectural patterns.
Once I had one bolt created on the pipe cap, I selected it, pressed Shift+D then rotated it 45 degrees. Then continued to press Shift+D to duplicate with translate the bolt along the pipe cap at the same rotational distance.
11. Soft vs Hard: Control Your Edges
You must control edge quality of your geometry. Is it a soft edge? Or is it a hard edge?
Soft edges will give smooth shading on your meshes, while hard edges will give you, well hard shading on your meshes.
Select the edges, go to Mesh Display and set the selected edges to a Hard or Soft Edge:

Toggle Soft Edge Display holding down Shift then Right Click Hold, go to "Soften/Harden Edges" and select "Toggle Soft Edge Display".
The edges you set will directly translate to UE4. Hard edges on the left and soft edges on the right:

You must export as FBX, with "Smoothing Groups" and "Smooth Mesh" enabled.

12. Add More Variation to Pipe Caps for Realism
For maximum reusability and modularity, I chose to have the pipe lugs appear the same on all pipes.
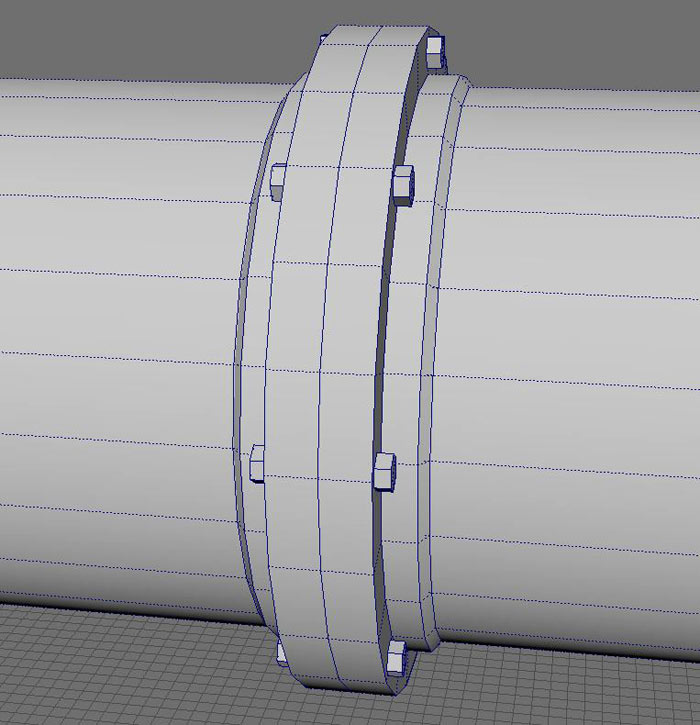
When it comes to a game, the player is unlikely to notice or care that much if the lugs and bolts don't appear like they do in the reference here:

BUT, if you want more realism then you'll have to create additional pipe cap variations. I tested out a few and really liked how they looked.

Also you can go a step further and increase adding more detail by creating a space between the pipes like so , which looks really good:

In the end I went with a simpler version of the pipe caps.
13. Bake Normal Maps Right Inside Maya LT/Maya for Great Results
Maya LT's Turtle baker does a really good job baking Normal Maps. This saves a lot of time than trying to bake in an external software such as xNormals. Especially when there are so many Static Meshes.

The high-poly versions were created using SubDiv modeling to get nice additional detail within the pipes. Taking the low-poly versions and creating a high-poly to bake normal maps from. I didn't sculpt with Mudbox or ZBrush. The art style dictated that I don't need to.

The baked normal map was then also used as the input inside NDO/DDO for texturing.
14. UV Then Duplicate
So you modeled one pipe cap and duplicated it. But now comes time to UV. You don't want to UV each pipe cap. That's 54 pipe caps.
Instead, UV one pipe cap and duplicate it for the rest of the pipes:
UVs will overlap and share the same texture.
I did this with the pipe caps and pipe lugs. I created one pipe cap. Unwrapped it and duplicated it.
The pipe cap will share the same texture. Although this doesn't allow for unique detail in each pipe cap, it does save UV space. You could layout the UVs differently and give each pipe cap unique UV space. You have to decide what's more important to you - unique textures or more UV space.
15. Maintain Correct Texel Density Between All Pipe Sizes
I have 3 different pipe sizes and a total of 32 meshes. All these pipes can be used together within one view and within one environment. For this to work, you have to maintain the same texel density between ALL pipes.
Texel Density is the size or resolution of a UV shell. You have to keep each UV shell size across all Static Meshes the same. You could have slight size difference but nothing drastic. Otherwise the player will notice the texture resolution difference between each mesh then they are next to one another.
To match all UV shells to the same texel density across every mesh, do the following.
Inside UV Editor, select a UV shell and under "Transform" tab, click "Get" to collect the value of Texel Density for that UV shell. Then select another UV shell (you can select more than one) and click "Set" to apply the value from "Get".

The UV shell will now have the same Texel Density as the one you chose to Get from.
Do this for all UV shells on your meshes to maintain a consistent Texel Density.
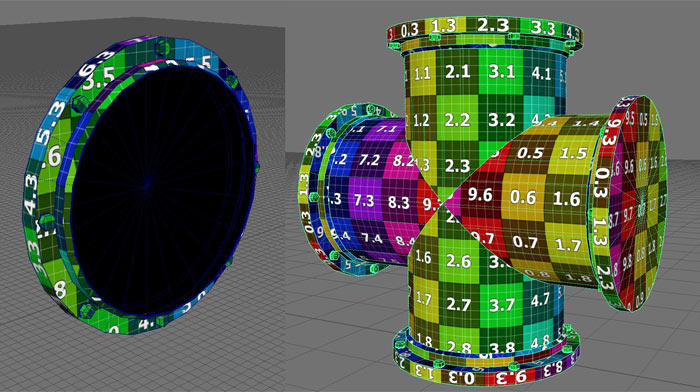
16. Quick Way to UV Any Modular Pipes
UVing can be very time consuming and tedious. Well, it was. Now within the last couple of years, UV Editing tools have been dramatically improved.
In fact what used to take me hours now takes me minutes. No plugins, no scripts. Just default UV tools that come with Maya LT and Maya.
To UV the pipes I used the following method to quickly UV all the pipes.
- Project on X, Y or Z
- Select an edge to cut along (this will be your texture seam)
- Run "Unfold", "Unfold Along U or V"
- Then" Straighten Shell" or "Straighten UVs" if needed
Try any of these variations of Unfold to see which option produces the best results. With just a few clicks, I UVed all the pipes.
17. Combine All Pipes into One Object for Texturing in Quixel
All pipes share the same texture so it would help to see them in the scene at the same time. Texturing them separately just doesn't make sense and would take too long.
I decided to combine all the pipes that share the same texture into one object. Then export the mesh as OBJ to be used in Quixel. That way I will be able to see and texture all the pipes at once. Just remember, DO NOT save your scene after combining and exporting. As this is only temporary, so I can export it for Quixel.

18. Don't Export as FBX for Quixel
When exporting a mesh for Quixel, use OBJ instead of FBX.
Exporting as FBX will cause an error when you load that mesh in Quixel.
Error Loading Mesh: Assimp.AssimpException: Error importing file: FBX-Tokenize (offset0x34) block offset is out of range:
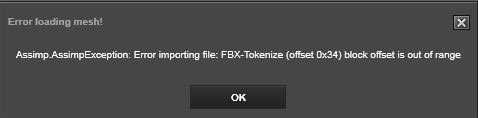
The solution to this error is to export as FBX but change FBX version to 2013 or older.
Instead, I exported as OBJ with the following options:
- Smoothing: ON
- Normals: ON
- Materials: OFF
- Point Groups: OFF
- Groups: OFF

19. Quickly Texture in Quixel DDO
One of my biggest frustrations and road blocks was texturing. I started many projects that were never finished due to lack of skill with UVing and texturing.
Texturing modular pipes with Quixel's DDO and NDO was quick and pain free.
I used a few layers to create a simple yet good looking material. Adjusted scratches, roughness values and normal map intensity then exported the textures using UE4 preset.

Quixel DDO generated an Albedo, Roughness, Metallic and Normal Map that were physically correct and ready to be used in UE4.
First time using Quixel was a bit cumbersome as the interface is unlike anything I've seen before. But in the Modular Pipes tutorial series, I show you a quick crash course how to get started as you texture modular pipes.
20. Setup 3DO for High Quality Preview
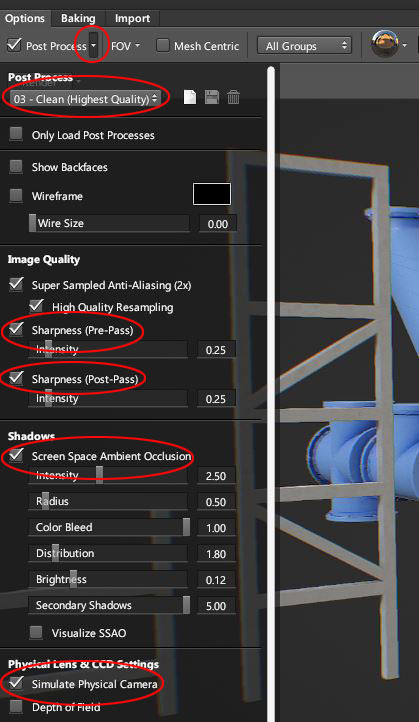
To see the best texture/material preview on your meshes use the following settings in 3DO. Under "Post Processing", enable:
- 03 - Clean (Highest Quality)
- High Quality Resampling (Lanczos)
- Sharpness (Pre-Pass) and (Post-Pass)
- Screen Space Ambient Occlusion
- Simulate Physical Camera
21. Creating Color ID Map
Color ID map is how you texture parts of the mesh that require different materials in Quixel's DDO.
For all 11 large pipe assets I have 3 different materials (surface types ) to work with. One for painted pipe metal, one for steel bolts and one for steel pipe supports. Each material requires a different look.
Same for medium and small pipes.
To do this in DDO you need a Color ID map so Quixel can assign a specific material to certain parts of the mesh.
You could bake this Color ID map from Maya LT/Maya or you can create it manually.
I only have 3 different surface types, so I created the Color ID manually. In Photoshop, I marquee selected different parts of the UV layout for each surface type (painted steel, steel bolts, steel pipe supports) and filled them with a solid color.
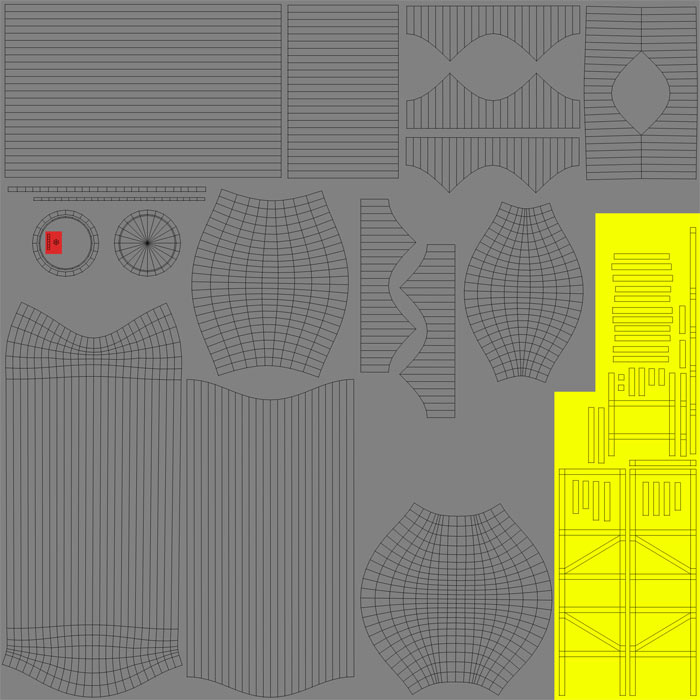
Then exported it as TGA.
During project set up in DDO I assigned the Color ID on the mesh. Then during texturing I applied materials I want to those specific color IDs. DDO did the rest.

22. Have All Your Pipes Share the Same Texture
Having a set of meshes using the same texture will not only improve performance, but make your job to texture and creating materials a lot easier.
I have 11 large pipe assets that share the same texture:

Then I have medium and small pipes that also share one single texture:

That means for all 32 static meshes, I have only 2 sets of textures (2 Albedos, Metallic, Roughness and Normal Maps) and 2 Materials. I could probably make this work with one Master Material. But for now two materials is still pretty good.
The way this works is I Unwrapped each mesh in Maya LT, then selected all the meshes I want to include on one texture sheet. Then inside the UV Editor, I layout all the UVs within 0-1 UV space for all selected meshes as if they are one object. I did the same for all medium and small pipe assets.
23. Disable sRGB Option for Metallic and Roughness Maps in UE4
Metallic and Roughness textures have to be used in Linear Space.
Right after you import these 2 textures, disable sRGB option in the Texture editor. Do this before using them in the Material Editor.

This is especially important to make the Roughness match what you saw in Quixel's DDO or Substance.
24. Create Lightmap Channel to Use Pipes with Static Baked Lighting
Lightmaps are used to display shadow and light information on your meshes after you bake lighting. If meshes don't have a lightmap UV channel then after baking lighting you will get light/shadow artifacts.
If you are going to be using dynamic lighting, then you don't need to worry about lightmaps.
You can generate lightmaps in UE4. But this won't give you ideal results. Since UE4 takes the texture channel UVs, duplicate it and then repacks the UVs for lightmaps. Sometimes it works but often it doesn't.
For best results, you should create a second UV channel inside your 3d modeling software and UV the object specifically for lightmaps. You may need to split some UV shells, separate others. Also lightmap UVs cannot overlap. Make sure you give sufficient UV padding between each shell.
Inside the UV editor in Maya LT. Go to UV Sets > Copy UVs to UV Set > Copy Into New UV Set:
You will now have second UV channel that UE4 will use for lightmaps.
Unwrap these UVs for lightmaps.
25. FIX: Why Your Re-Imported Lightmaps Don't Work
Lightmaps are created later in the process. But you export your meshes to be tested very early on, usually during blockout stage.
During import into UE4, I disable Generate Lightmaps. Too soon. We are just testing.

When you finally get to do the proper Lightmap channel and reimport your mesh to test, it won't work. After lighting build, you will still have light/shadow errors and "Lightmap UVs are Overlapping" error.
You have to change Lightmap Coordinate Index to 1 for each Static Mesh.
In Static Mesh Editor under "General Settings", set "Light Map Coordinate Index: 1" and change "Light Map Resolution" to resolution you want as default:

Then bake lights and test. Reimported lightmaps will now work.
26. Using Material Instances for Color and Roughness Changes
I wanted to have different color pipes just like in Mirror's Edge. White, red, blue, yellow, orange pipes.

You do not need to have a separate texture for each pipe color. All you need is a Material Instance.

Right click on your Material, choose Material Instance. Apply this Material Instance onto the Static Mesh and adjust the color.
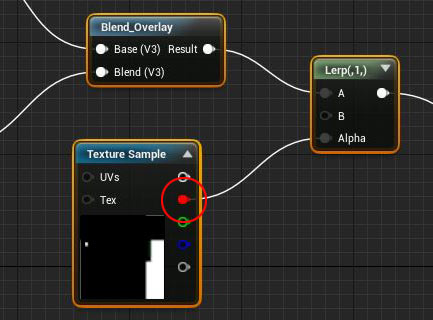
Now of course, to make this work you'll need to add parameters within the Material so UE4 knows what to do and what to change. I used Blend_Overlay node with Albedo texture and a Constant3Vector node.

You could also use Multiply node instead of Blend_Overlay.
I also set up a way a parameter to adjust pipe Roughness.
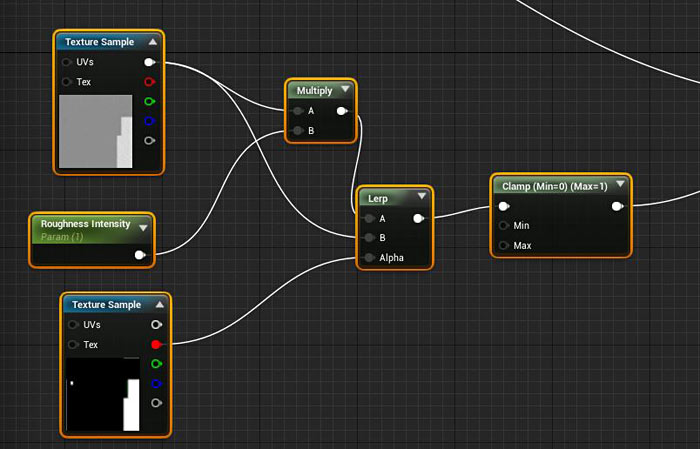
27. Reuse Existing Textures as Masks
I had to mask out the bolts, valve rods and pipe supports so the color change from the Material Instance doesn't affect them.
In my case, for large pipes I was able to use the Metallic texture as a Mask. I plugged the Red channel from Metallic into the Albedo color setup and successfully masked out the bolts, valve rod and pipe supports from being affected by Material Instance.
You may have to create a separate texture to use as a Mask. But sometimes, using Metallic texture can work.
In the case of medium and small pipes, Metallic didn't work. I had to create a custom Mask.
28. Pack Mask Textures into RGB Channels
Metallic texture didn't work for medium and small pipes. I had to create a custom texture Mask to be used.
To do this, utilize channel packing. This means you place a texture mask inside a single channel of your texture. You can place up to 4 different Masks into one single texture. One for Red, one for Green, one for Blue and one for Alpha.
1 texture = up to 4 masks.
Below I only used 2 channels (Red and Green). I have Blue and Alpha available for any other additional Masks I decide to include.

Then in UE4, you would use individual channels for the mask you need.
After importing Mask texture into UE4, change compression settings to "Masks (No sRGB)".

29. Create Collisions in UE4 to Save Time
The time you spend on creating custom collisions in 3d modeling software can add up. Especially if you have a lot of Static Meshes.
For many of these modular pipes, UE4 will create pretty good static mesh collisions right inside the Static Mesh Editor.
Under Collisions, choose any of the available presets.

For more complex geometry you'll need to use "Auto-Convex Collision":

Adjust the settings for Hull Count, Max Hull Verts and Hull Precision. Keep the collisions to a low hull count, low hull verts while still maintaining accurate hull shape to do its job.

Save and test.
30. Create Custom Collision in Maya LT/Maya
Collisions created in UE4 will not always work. Sometimes you will need to create custom collisions inside your 3d modeling software.
Here are some guidelines:
- Use simple primitives (cubes, cylinders, spheres)
- Shapes must be closed (no deleting of faces)
- Shapes have to be convex, cannot be concave
- Add convention to use is UCX_NameOfMesh
- Multiple primitives can be used, for that add a number at the end of the collision name
- Example: UCX_ pipes_large_01, UCX_ pipes_large_02 and so on
- Select the mesh and all the collisions then re-export
- Re-import in UE4
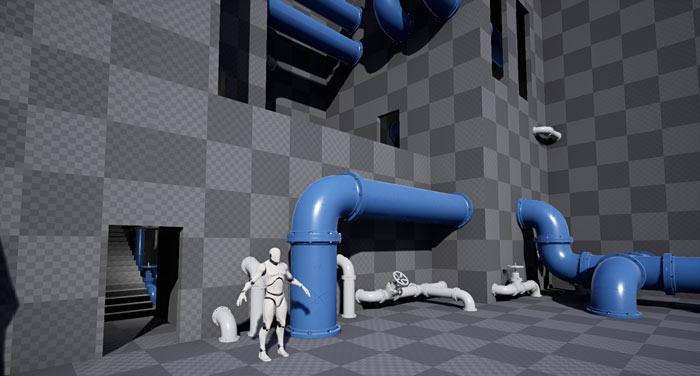
31. Do Tests and Construct Scenes with Your Assets
Once you have all your pipes created and imported into UE4, it is time to have some fun. Give yourself a few hours or couple of days to experiment and get familiar with using modular pipes.
I did a couple of quick challenges.
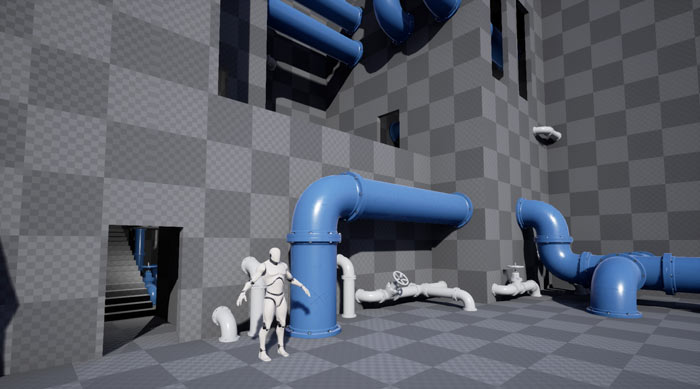
First I created a simple BSP environment then placed the pipes in it. I followed a commonly used process of blockouts to get a sense of space and scale. At this state, I could continue to take the environment further. Include more Static Meshes, light and post-process the scene.
Second I used the "Modular Pipes" and "Corridor Project" assets to create a small open set:
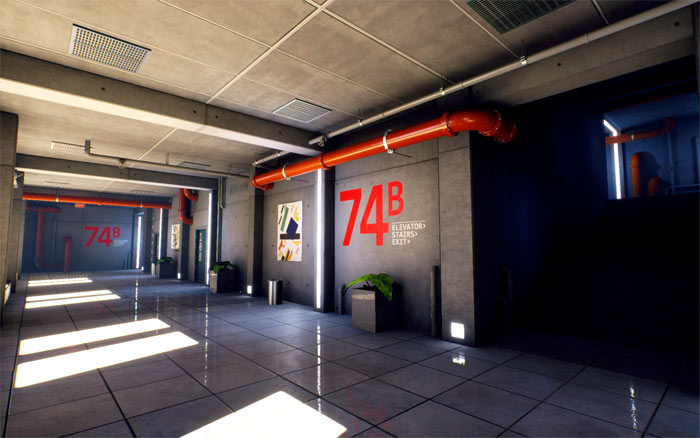
And third, I used the "Modular Pipes" and included them in completed daytime and nighttime scenes that were created during the "The Corridor Project" tutorials series:
32. Setup Your Project Folders from the Start to Maintain High Level of Organization
Setting up a consistent and organized folder structure for all your project files will save you a lot of time and eliminate frustrations. You will know where all your exported meshes are kept, where you should keep your saved textures and where to place collected reference.
I have developed a system I use to manage ongoing projects, although I'm constantly tweaking and adjusting.
I create primary folder with the project name. Inside this folder I create additional folders. Each for specific software and/or topic:
- MayaLT/Maya: files related to Maya LT/Maya
- Texturing: files related to texturing (NDO, DDO, final textures, source textures)
- Reference: photo reference, concept art, inspiration, sketches
- UE4: files related to UE4
See this in-depth tutorial on the topic.
UE4 Modular Pipes Project
I love pipes! Learn how to create your own set of modular pipes with "UE4 Modular Pipes Project".
- 9 hours of descriptive and in-depth tutorials
- 45 tutorial videos
- All project files
- Including 32 Static Mesh pipe assets
Download Full Tutorial Series: "UE4: Modular Pipes Project" here...


SUBSCRIBE & GET FREE UE5 PDF GUIDE
Subscribe to receive NEW/UPDATED and FREE "UE5 Beginner's Quick Start Guide" PDF (90 pages).

Visit this page for more info about the guide...
TOP 5 TUTORIALS TO LEARN UE5
 UE5: How to Download and Install Unreal Engine 5 in 5 Minutes
 UE5: 11 Principles to Learning and Using UE5 as a Complete Beginner
 UE5: Crash Course Quick-Start Guide to Begin Using UE5 - TODAY
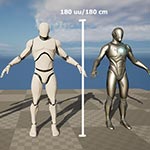 UE5: Complete Guide to Player Scale, Dimensions and Proportions
 UE5: Fundamentals Vol.1 - Essential Beginner's Guide to Getting Started
TUTORIAL CATEGORIES
UE5 FUNDAMENTALS VOL.1 COURSE

UE5: RETRO OFFICE PROJECT

LEARN THE PREPRODUCTION PROCESS

ABOUT WoLD & ALEXG

My name is AlexG. I am self-taught level designer, game environment artist and the creator of World of Level Design.com. I've learned everything I know from personal experimentation and decades of being around various online communities of fellow environment artist and level designers. On World of Level Design you will find tutorials to make you become the best level designer and game environment artist.
Home Terms of Use/Trademarks/Disclaimers Privacy Policy Donate About Contact
All content on this website is copyrighted ©2008-2024 World of Level Design LLC. All rights reserved.
Duplication and distribution is illegal and strictly prohibited.
World of Level Design LLC is an independent company. World of Level Design website, its tutorials and products are not endorsed, sponsored or approved by any mentioned companies on this website in any way. All content is based on my own personal experimentation, experience and opinion. World of Level Design™ and 11 Day Level Design™ are trademarks of AlexG.
Template powered by w3.css