World of Level Design™
Tutorials to Becoming the Best Level Designer and Game Environment Artist (since 2008)
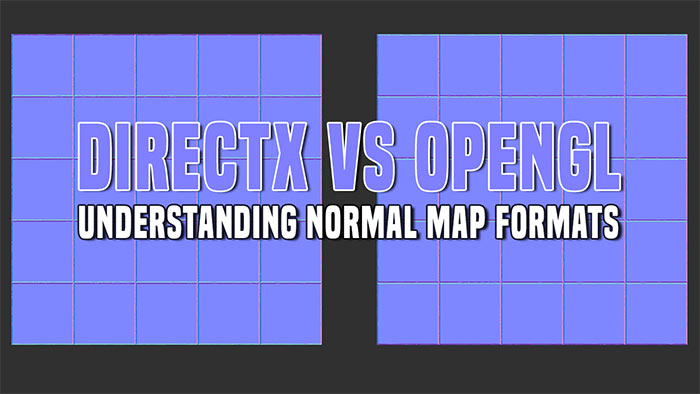
DirectX vs OpenGL: Understanding, Using, Creating DirectX or OpenGL Normal Map Formats
Category: Substance Painter, Texturing, UE5
June 17, 2026
Normal Maps are essential textures that add surface detail to your environment assets. This could be a prop, hero asset or any modular environment geometry.
Normal Map creates the illusion of geometry detail without having to add additional modeling polygons on the object.
In this post you will learn the difference between DirectX vs OpenGL Normal Map formats - how to create them, use them and export them.
Video Tutorial
All About Normal Maps
You will often author or create these Normal Maps yourself:
- Using Substance Painter, Designer or Sampler
- Baking high-poly geometry down to low-poly geometry capturing the geometry detail into the Normal Map texture using modeling software such as Maya, 3dsMax, Blender or others
You will have:
- Macro Normal Maps = defines larger, bigger overall geometry shapes (panels large welds, bumps, sculpted shapes, etc.)
- Micro Normal Maps = defines smaller, high frequency surface detail (cracks, dirt, grain, bumps etc.)
You’ll be dealing with 2 Normal Map formats depending on the output:
- DirectX
- OpenGL
Both Normal Map outputs work but are designed to be used in specific software or game engines:
- DirectX Normal Map Format = UE4/UE5, CryEngine, 3dsMax
- OpenGL Normal Map Format = Maya, Unity, Blender
The major difference is: DirectX requires a Flipped Green Channel.
Substance Painter
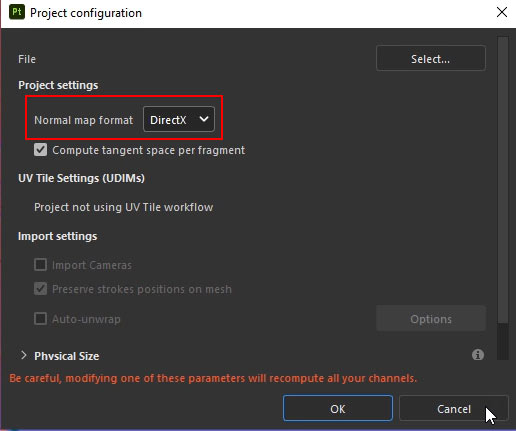
By default Substance Painter displays and exports DirectX Normal Maps. But this can be easily changed in Project Configurations to OpenGL.
Go to Edit > Project Configuration and change Normal Map Format:
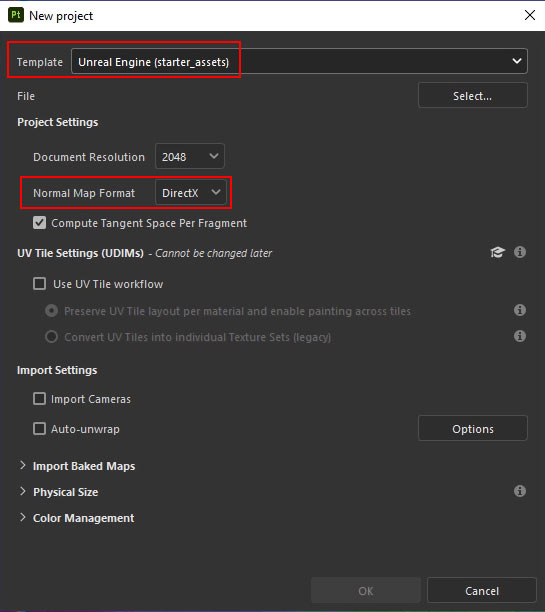
And you also control which Normal Map format Substance Painter will use during New Project Setup by going to File > New:
Which Normal Map Format is Exported from Substance Painter
The type of Normal Map format is exported from Substance Painter will depend on the export Output Template you will use.
By going to File > Export Textures (Ctrl+Shift+E), then choosing Output Template.
It will generate the correct Normal Map format for that software or game engine.
- For Maya Arnold: Arnold Ai Standard
- For UE4/UE5: Unreal Engine (Packed)
- And so on...
What Normal Map Format is Exported in Other Software?
This will depend on what that software or game engine uses as it’s Normal Map format.
If you are baking Normal Maps from high-poly to low-poly in Maya, this will create OpenGL Normal Maps.
If you are baking Normal Maps in UE5 using Modeling Mode, this will be DirectX Normal Maps.
Converting Normal Maps to OpenGL or DirectX Quickly
Sometimes you have a Normal Map that was authored in the format that you don’t want and can’t use.
Such as OpenGL Normal Map but you want to use it in UE5 which uses DirectX Normal Map format.
Or vice versa, you have a DirectX Normal Map but you need OpenGL.
The solution to this is very simple: Flip the Green Channel.
Open the Normal Map in Photoshop, go to the Channels and select the Green Channel:
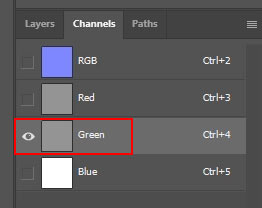
Go to Image > Adjustments > Invert (Ctrl+I) to invert the Green Channel:
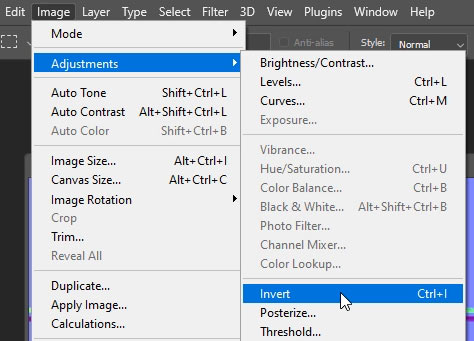
Save and done.
Some game engines and software will have their own methods to flipping the green channel directly in the texture settings or in the Material Editor, eliminating the need for Photoshop.
For example in UE4 or UE5, go to Normal Map and double click on it to open up the Texture Editor. Then enable Flip Green Channel option and save the texture.
![]()
How to Tell What Format Normal Map Is by Looking At It
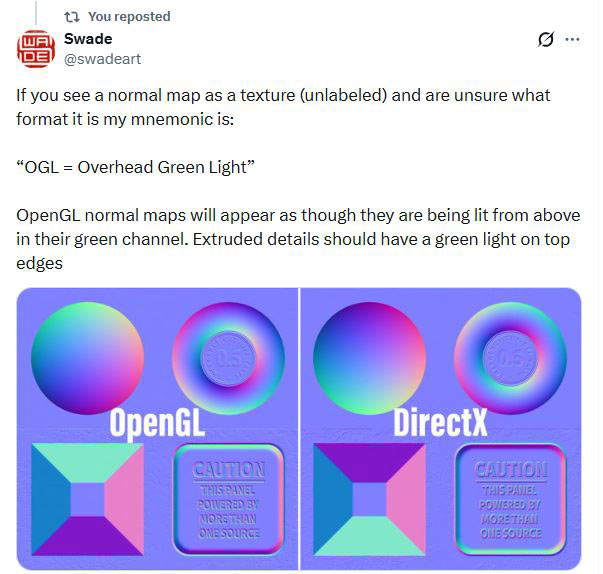
I recently learned this from SwadeArt on how to look at any Normal Map and know if it is DirectX or OpenGL.
“If you see a normal map as a texture (unlabeled) and are unsure what format it is my mnemonic is: “OGL = Overhead Green Light”. OpenGL normal maps will appear as though they are being lit from above in their green channel. Extruded details should have a green light on top edges.”

SUBSCRIBE & GET FREE, UPDATED PDF GUIDE
Subscribe to receive FREE & Updated "Maya 3D Primer" PDF Guide (200+ pages).

See more about this Free PDF Guides and what you are subscribing to.
TOP 7 TUTORIAL COURSES FOR 2026
 Modular Environment Design Masterclass Tutorial Course
 Maya Foundation: Home-Study Course - Model and UV Environments
 Substance 3D Painter Essentials - Master Texturing
 UE5: Fundamentals Vol.1 - Create with Unreal Engine 5
 UE5: Retro Office Project - Create Beautiful Interior Env
 UE5: Master Material Creation - Create Master Materials in UE5
 Preproduction Blueprint: Plan Environments and Level Designs
TUTORIAL CATEGORIES
SUBSTANCE PAINTER ESSENTIALS

MAYA FOUNDATION COURSE

MODULAR ENVIRONMENTS MASTERCLASS

ABOUT WoLD & ALEXG

My name is AlexG. I am self-taught level designer, game environment artist and the creator of World of Level Design.com. I've learned everything I know from personal experimentation and decades of being around various online communities of fellow environment artist and level designers. On World of Level Design you will find tutorials to make you become the best level designer and game environment artist.
Home Terms of Use/Trademarks/Disclaimers Privacy Policy Donate About Contact
All content on this website is copyrighted ©2008-2024 World of Level Design LLC. All rights reserved.
Duplication and distribution is illegal and strictly prohibited.
World of Level Design LLC is an independent company. World of Level Design website, its tutorials and products are not endorsed, sponsored or approved by any mentioned companies on this website in any way. All content is based on my own personal experimentation, experience and opinion. World of Level Design™ and 11 Day Level Design™ are trademarks of AlexG.
Template powered by w3.css