World of Level Design™
Tutorials to Becoming the Best Level Designer and Game Environment Artist (since 2008)
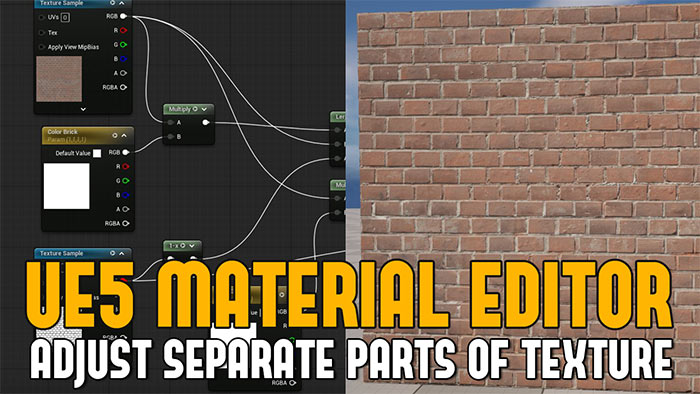
UE5: Adjust/Change Different Parts of Texture Using Masks, Lerps and Multiply in Material Editor
Category: UE5
December 17, 2025
In this tutorial, you'll learn how to set up a way to adjust different parts of a texture independently, without affecting the rest of the surface.
As an example: a brick wall where you'll need to adjust the brick and the grout separately but this can be done with any surface type.
This method relies on texture masks, Multiply nodes and Linear Interpolate (Lerp) nodes.
Let's begin.
Video Tutorial
Starting Setup
A flat plane with a Material Instance applied.
- Base Color
- Normal Map
- Green Channel Roughness from packed texture

Also a separate texture that will act as our mask. You'll need a mask to define which parts of the texture you want to change and which parts will be unaffected.

Masks can be created in Substance Sampler, Substance Painter, Substance Designer or Photoshop.
The Goal
- Default look = original texture (no changes being made)
- Ability to tint or recolor only the bricks (grout stays untouched)
- Ability to tint or recolor only the grout (bricks stay untouched)
Common (But Suboptimal) First Approach: Simple Lerp
The usual approach would be to plug the original texture into Lerp A, a color into Lerp B and the mask into Alpha.

This works, but it has a big downside: the moment you create the parameter, you are already forcing a color change (even if you try to match the original).

The default state is no longer the pure texture.
But we want the default to be 100% untouched texture and only applying changes when we need it.
The Best Setup
Step 1: Control the Brick Color
- Multiply node
- Texture Sample (RGB) > Multiply A
- Constant3Vector converted to Parameter with default value of pure white (Color Brick)
- Connect Constant3Vector Multiply B
- Insert LinearInterpolate (Lerp)
- Multiply goes into Lerp A
- Texture Sample (unaffected brick) goes into Lerp B
- Mask Texture (Red Channel or any other channel if it is a packed mask texture) goes into Lerp Alpha
- You may need 1-x node to invert the mask texture values, depending what you are trying to adjust

You now have the first setup for controlling one part of the texture through a mask, in my case it is the brick color:

Step 2: Add Grout Control
Now start adding controls for grout.
- Insert another Multiply node
- Original Texture Sample goes into Multiply A
- Create Constant3Vector converted to Parameter with default value: pure white (Color Grout)
- Connect Constant3Vector Color Grout into Multiply B
- Insert a second Lerp
- Connect first Lerp output into Lerp B (second Lerp)
- Second Multiply output goes into second Lerp A input
- Mask Texture (Red Channel or any other channel if it is a packed mask texture) goes into second Lerp Alpha
- You may need 1-x node to invert the mask texture values, depending what you are trying to adjust
- Second Lerp output can now be connected into Base Color of the Material

You now have control for 2 parts of the texture. In my case, color of the brick and grout.
Final Result: Option 1
This exact node structure can now be used for any other Material setup you have where you need to control different parts of the texture, individually.


click on image to view full size
Final Result: Option 2 (Simpler Setup)
Different and simpler setup of the above which achieves the same result.

click on image to view full size
UE5 Master Material Creation
Learn more for how to use UE5's Material Editor from scratch and start creating usable Materials for your environment assets. Get "UE5 Master Material Creation" tutorial course

SUBSCRIBE & GET FREE UE5 PDF GUIDE
Subscribe to receive NEW/UPDATED and FREE "UE5 Beginner's Quick Start Guide" PDF (90 pages).

Visit this page for more info about the guide...
TOP 7 TUTORIAL COURSES FOR 2026
 Modular Environment Design Masterclass Tutorial Course
 Maya Foundation: Home-Study Course - Model and UV Environments
 Substance 3D Painter Essentials - Master Texturing
 UE5: Fundamentals Vol.1 - Create with Unreal Engine 5
 UE5: Retro Office Project - Create Beautiful Interior Env
 UE5: Master Material Creation - Create Master Materials in UE5
 Preproduction Blueprint: Plan Environments and Level Designs
TUTORIAL CATEGORIES
UE5 FUNDAMENTALS VOL.1 COURSE

UE5: RETRO OFFICE PROJECT

MODULAR ENVIRONMENTS MASTERCLASS

LEARN THE PREPRODUCTION PROCESS

ABOUT WoLD & ALEXG

My name is AlexG. I am self-taught level designer, game environment artist and the creator of World of Level Design.com. I've learned everything I know from personal experimentation and decades of being around various online communities of fellow environment artist and level designers. On World of Level Design you will find tutorials to make you become the best level designer and game environment artist.
Home Terms of Use/Trademarks/Disclaimers Privacy Policy Donate About Contact
All content on this website is copyrighted ©2008-2024 World of Level Design LLC. All rights reserved.
Duplication and distribution is illegal and strictly prohibited.
World of Level Design LLC is an independent company. World of Level Design website, its tutorials and products are not endorsed, sponsored or approved by any mentioned companies on this website in any way. All content is based on my own personal experimentation, experience and opinion. World of Level Design™ and 11 Day Level Design™ are trademarks of AlexG.
Template powered by w3.css