World of Level Design™
Tutorials to Becoming the Best Level Designer and Game Environment Artist (since 2008)
Ultimate Guide to Alpha Channels for Opacity/Transparency Textures - TGAs vs PNGs (w/UE5 Examples)
Category: Texturing, UE5
February 19, 2026
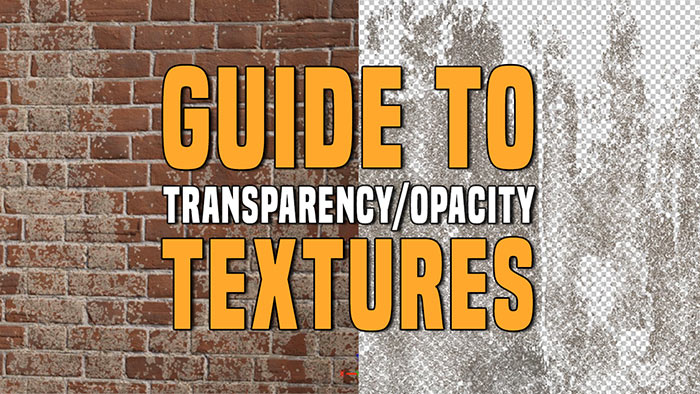
You will often need to create textures for environments that you can see through or textures that give you on/off visibility.
Some examples of this include chain link fences, metal grates, decals like graffiti, logos, dirt, leaks and many more.
These textures are done through the creation of Alpha Channel using black and white values that give you this visibility control.
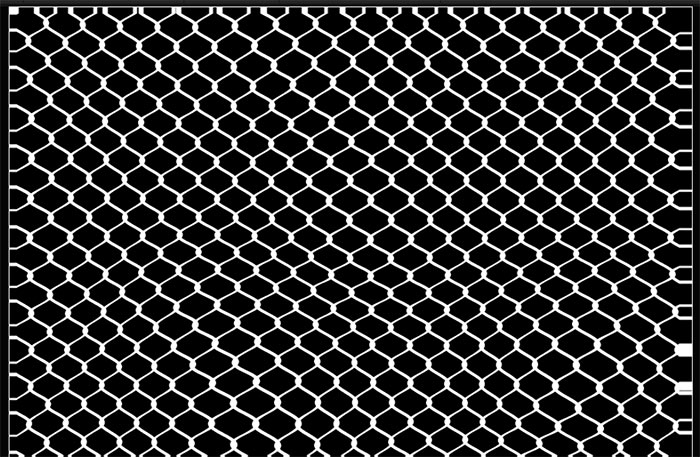
For example: instead of modeling a chain link fence, you create a black and white texture to define which parts are visible (chain link - white values) and which parts are invisible (between the chain link - black values). This information is then used in game engine to define what is visible, what is invisible and if there are any see-through parts in-between.
Here is a chain link Alpha Texture:
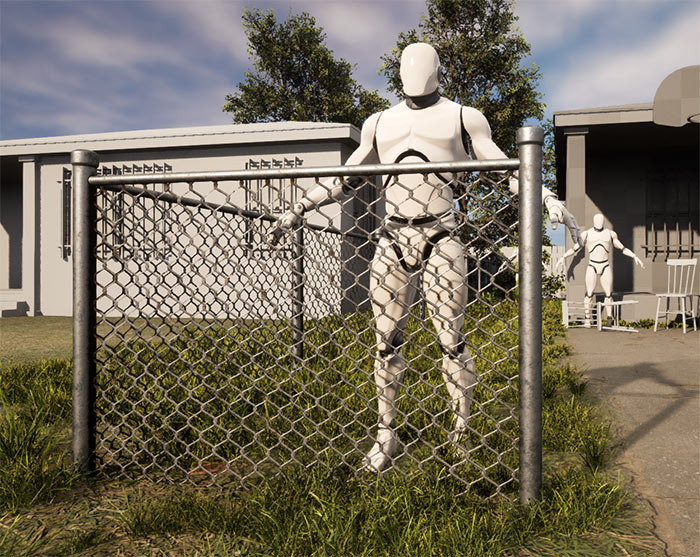
Here is a chain link Material with Alpha Texture that controls the opacity applied to a flat plane:
Now there are two terms often used to describe visibility: Opacity and Transparency.
- Opacity: creates solid control (areas of visibility and invisibility) no in-between; it's either black or white, on or off, 0 or 1.
- Transparency: creates see through areas (various degrees of visibility); this can black, white or any gray values in-between.
Alpha textures tend to be used as Opacity: black or white, on or off.
But it's also common to have some degree of gray values in-between to define degrees of transparency. All this depends on the texture and the Alpha you are trying to create. Basically, what are you trying to show and hide with your Alpha texture?
Important to Know Alpha Color Values:
- White= Opaque/Visible
- Black = Transparent/Invisible
- Grays = Various Degrees of Visibility In-Between
There are 3 formats you can create this Opacity or Transparency texture:
- As PNG texture that contains transparency
- As TGA texture that contains an Alpha Channel
- As a packed texture mask file where you have 3 Opacity Masks packed into its color channels, into the Red, Green and Blue channels (no Alpha channel).
All these methods have their pros and cons and in this post I will breakdown all of them.
By the end, you will know what you should be using and what are the pros and cons of each method so you can decide the best way for you to create Opacity/Transparency with your textures.
I will be using UE5 game engine as an example to show how all of this works but these methods can be applied to other game engines as well.
Let's get started.
Video Tutorial #1: PNG Transparency/Opacity
In this video I'll show you how to create transparency with PNGs using Photoshop and how to get them to work in UE5.
Step 1: Prepare Your Texture in Photoshop
- Open Your Image: You can start with a high-res image texture. For this example, I'll use a dirt texture.
- Texture Size: make sure you have the image sized using power of 2 values so you can use them in your game engine. I have mine set to 2048x2048.
- Promote Background Layer: Double-click the "Background" layer to convert it to a regular layer.
- Isolate Parts of the Texture: Press W for the Magic Wand Tool and click on the area you want to extract or keep (such as dirt in my example). Copy the selected info and then in a new layer paste. Then hide the original texture layer. This gives you the transparent background with the copied texture information in a new layer.
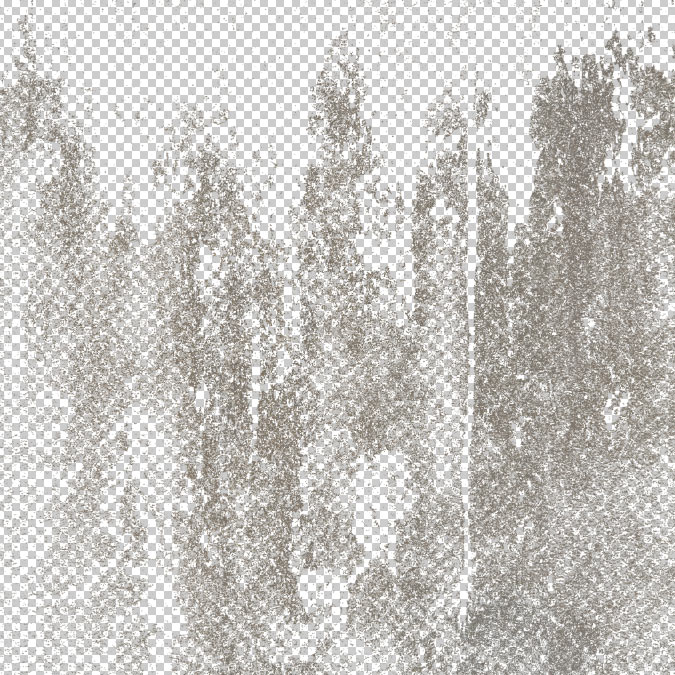
Tip: Wand tool will often give you varying degree of transparency (unless it's a solid color selection) but if you want solid transparent separation such as for graphic logos then use the Marquee tool and delete areas what you don't want to show so you see the transparency behind the image.

Step 2: Export as PNG with Transparency
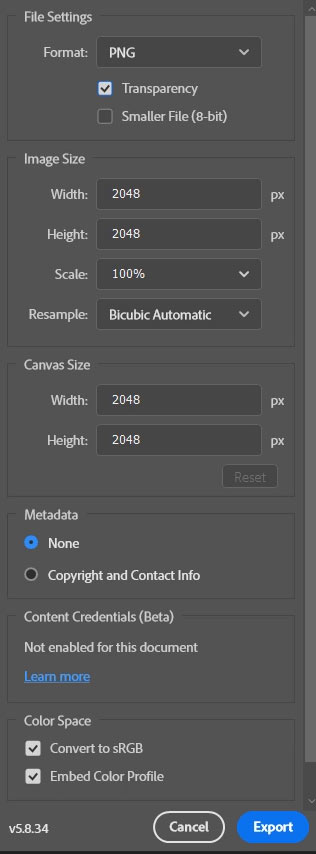
- File > Export > Export As (Alt+Shift+Ctrl+W).
- Select PNG format.
- Ensure Transparency is checked (it will be if checkerboard is visible).
- Keep everything else default.
- Save, name it and export.
Step 3: Import into UE5
- Drag and Drop: Left-click and drag the PNG into UE5 Content Browser.
- In the Texture Editor, confirm the Alpha Channel is present.
- Compression: Automatically set to DXT5 (with Alpha). Non-transparent textures use DXT1 (no Alpha).
Note: DXT5 files will be larger in storage size due to Alpha transparency. For optimization you could separate alpha into packed texture masks instead, more on this later.
Step 4: Create a New Material and Test
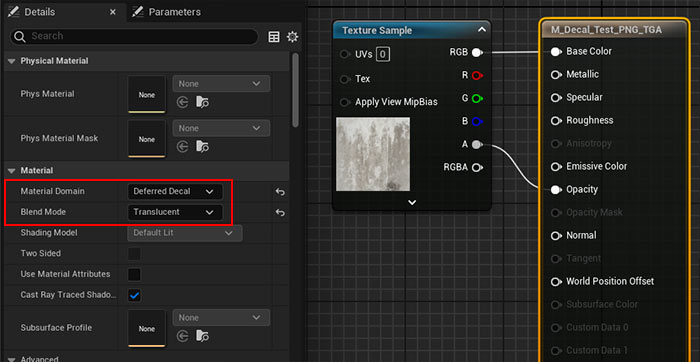
Create a new Material in UE5 to test your texture. In this example, I'll create a decal.
- Material Domain: Deferred Decal.
- Blend Mode: Translucent.
- Connect RGB to Base Color.
- Connect Alpha to Opacity.
Drag the Material into the level, this creates a Decal Actor and begins to project it onto the surrounding assets.
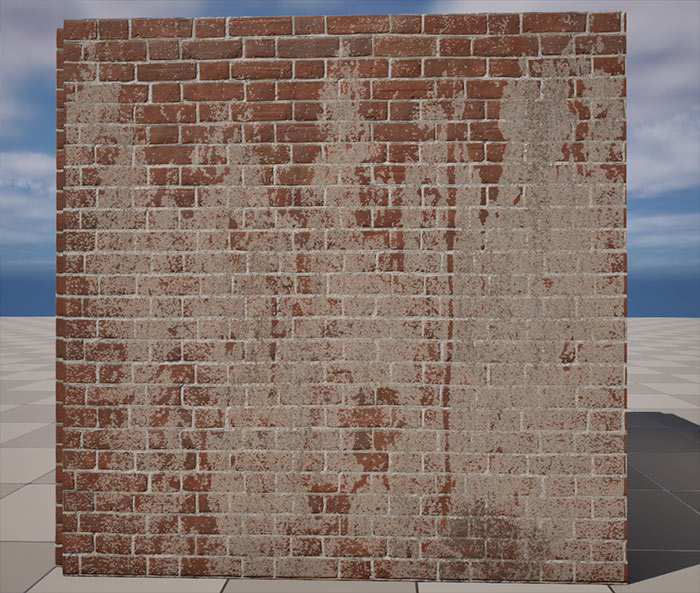
Here is the dirt decal example:
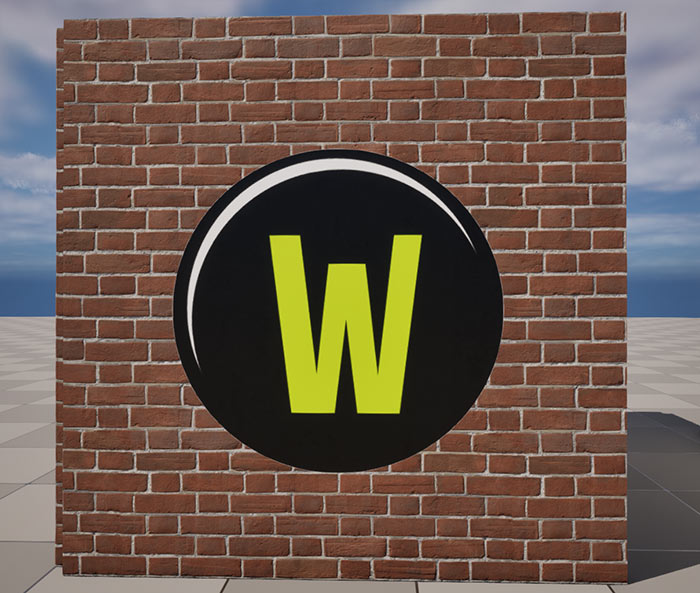
Here is the solid logo decal example:
For full control and to avoid Normal Map and Roughness showing up from the texture below through your decal, add Normal Map and Roughness maps in your Decal Material.
Artifacts Bleed: If you are experiencing color texture bleeds around the edges, then use TGA texture format instead and create an actual Alpha channel. More on this below.
Video Tutorial #2: TGA Transparency/Opacity (TGA vs PNG)
In this video I'll show you how to create transparency with TGAs using Photoshop and how to get them to work in UE5. This will often be a better option to reduce texture color bleed that often can be seen with PNG Alphas. I'll then also give an option for how to reduce texture size and pack opacity alphas into a separate texture.
Why TGA Over PNG?
Targa (TGA) textures allow you to put color into the transparent areas of your Base Color texture to help avoid color bleeds on the edges of Alpha. Something you cannot do with PNGs, as PNG transparency inserts a solid white color into your background Base Color by default.
Step 1: Prepare Base Texture in Photoshop (Dirt Decal Example)
- Create the Texture: Create a texture resized to power of 2 values so you can use it in the game engine of your choice.
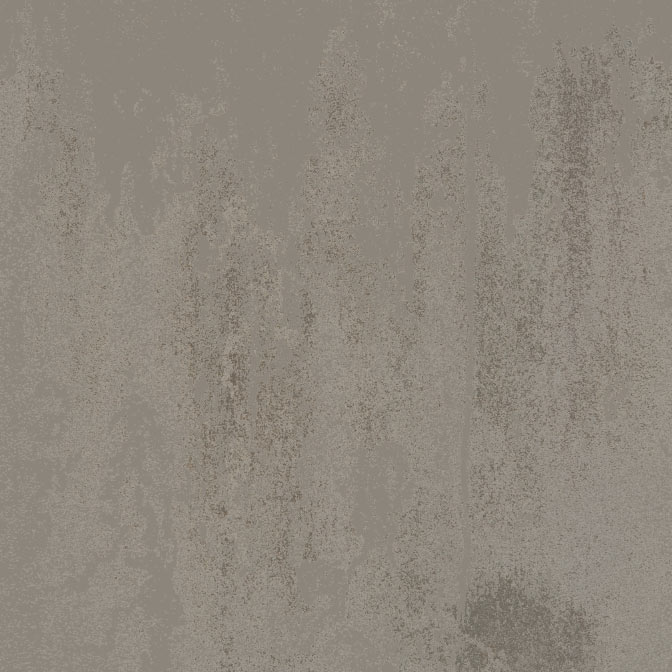
- Dirt Example: In this example I'm isolating the Dirt from the texture to be on its own layer with the background layer filled with a solid color that matches the dirt color. This blend setup will help to prevent or reduce texture color bleed when Alpha is used for opacity.
- Wand Tool: the way I did this is the same way I did it for PNG, using the Wand Tool (W) and selecting what I want to copy, then pasting it into a new layer. I then created a new background layer and filled it with color matching the dirt color.
Step 2: Create Alpha Channel
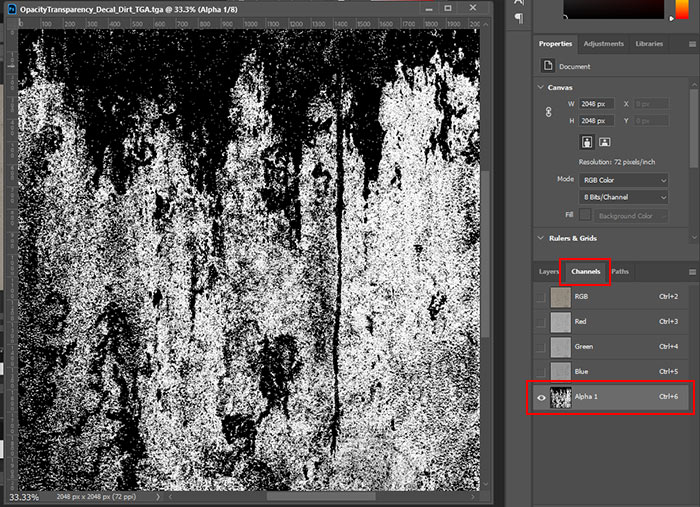
- Channels Panel: Create New Channel which creates an Alpha Channel.
- Back to Layers: Ctrl+Left-Click on layer icon to loads information from it as a selection.
- Back in Alpha Channel: Fill the selection with White and background as Black. You now have your Alpha channel which will control the opacity or visibility what will be visible and what will be invisible.
Important to Remember Alpha Color Values:
- White= Opaque/Visible
- Black = Transparent/Invisible
- Grays = Various Degrees of Visibility In-Between
Step 3: Export TGA
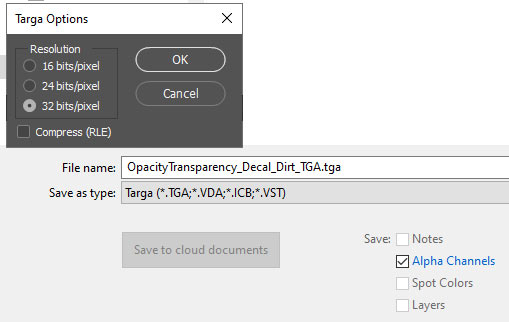
- File > Save A Copy and choose TGA from drop down menu
- Name it and Save it
- Choose 32 Bits to save the Alpha Channel with your texture
Step 4: Import and Test in UE5
- Import the TGA into UE5
- Because you have an Alpha channel, this imports the texture as DXT5
- Also remember, because of the Alpha channel this doubles the size of the texture
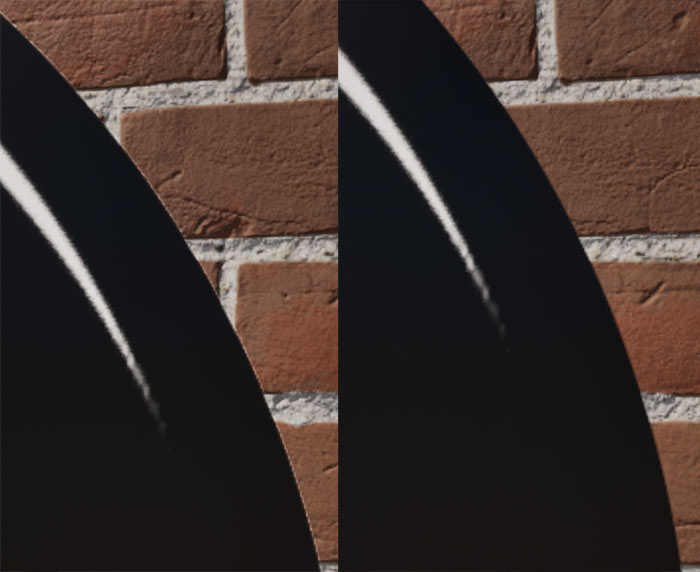
Here is a comparison of PNG vs TGA:
- Left: PNG (slight color bleed around the edges).
- Right: TGA with Alpha and changed background to match the Base Color (no color bleed around the edges).
Advanced: Packed Mask Textures (Optimal Memory)
The following technique will allow separating Base Color from having an Alpha channel by creating a packed texture that will contain Opacity Masks packed into its individual Color Channels.
This will reduce the texture size in half for Base Color, from DXT5 to DXT1.
- Create the Base Color with custom background to minimize the bleed transition with Opacity Mask.
- Instead of creating a transparency with PNG or Alpha with TGA, pack the Opacity texture into a separate file into individual Color Channel, into R, G or B channel.
- Do this by creating the Black and White visibility texture or by copying an existing Alpha Opacity Mask and pasting it into the new texture file, into specific Color Channel (R, G or B).
- You can have 3 different Opacity Masks in one texture to use.
- Important: always disable sRGB in UE5 for any packed texture you are importing and using, you do this in the Texture Editor.
Here is an example from the video where I have 2 Opacity Masks being used, one in Red, one in Green and nothing in Blue:
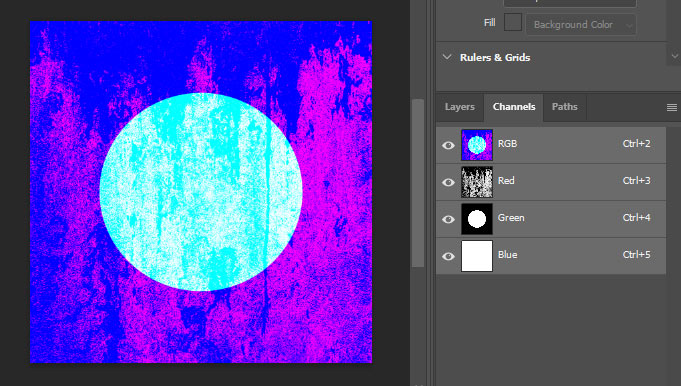
Then in UE5, use the packed Opacity Mask Texture and either Red, Green or Blue channel plugged into Opacity of the main texture node. You can also use a Component Mask converted to a Parameter to control which channel you want to use through the Material Instance. I've covered how to use UE5 Material Editor in this tutorial course.
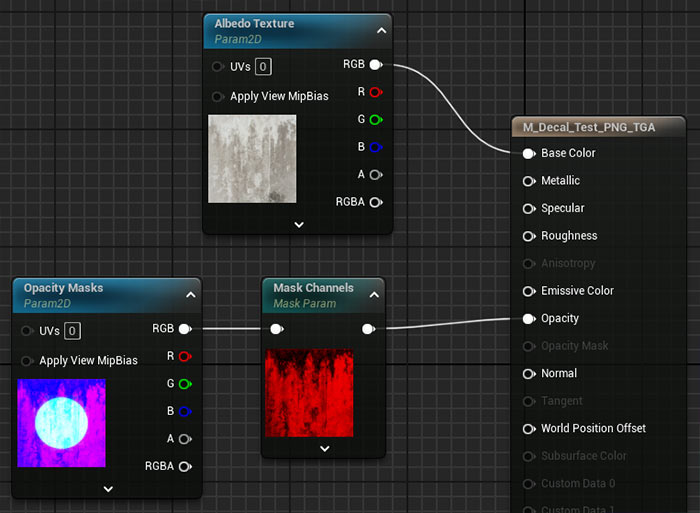
Tutorial on RGB Texture Packing
See this tutorial for more on how to pack multiple black and white textures into single RGB texture with Photoshop (w/UE5 Example).
Home Terms of Use/Trademarks/Disclaimers Privacy Policy Donate About Contact
All content on this website is copyrighted ©2008-2024 World of Level Design LLC. All rights reserved.
Duplication and distribution is illegal and strictly prohibited.
World of Level Design LLC is an independent company. World of Level Design website, its tutorials and products are not endorsed, sponsored or approved by any mentioned companies on this website in any way. All content is based on my own personal experimentation, experience and opinion. World of Level Design™ and 11 Day Level Design™ are trademarks of AlexG.
Template powered by w3.css

 Modular Environment Design Masterclass Tutorial Course
 Maya Foundation: Home-Study Course - Model and UV Environments
 Substance 3D Painter Essentials - Master Texturing
 UE5: Fundamentals Vol.1 - Create with Unreal Engine 5
 UE5: Retro Office Project - Create Beautiful Interior Env
 UE5: Master Material Creation - Create Master Materials in UE5
 Preproduction Blueprint: Plan Environments and Level Designs


