World of Level Design™
Tutorials to Becoming the Best Level Designer and Game Environment Artist (since 2008)
Maya: How to Share One Single Texture Across Multiple, Separate Objects
Category: Maya
October 24, 2025
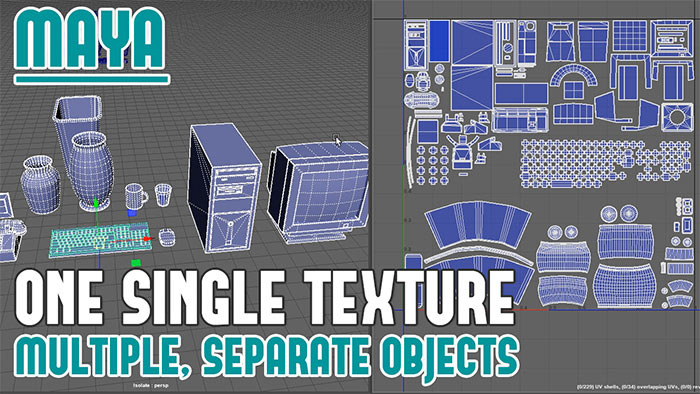
One powerful technique to help you minimize the amount of textures and materials you use is to share a single texture across multiple separate objects.
This approach minimizes the number of textures and materials used, reducing memory usage.
In this post and video breakdown I'll show you how to implement this technique using Maya, UE5 and Substance Painter.
Video Tutorial
Why Share a Single Texture?
When working with multiple objects in a scene such as props, each object typically requires its own texture and material. This could eventually lead to a large number of textures and materials, increasing memory usage and draw calls.
But by sharing a single, larger texture across multiple objects, you can:
- Reduce texture and material counts: Streamline asset management and improve performance.
- Optimize for real-time rendering: Ensure objects in the same environment or level use fewer resources.
- Maintain visual consistency: Apply a cohesive texture across multiple assets for a unified look.
This technique is particularly useful for props that appear together in a scene.
Step-by-Step Guide to Sharing a Texture
Here's how to share a single texture across multiple objects while keeping each mesh separate:
1. Select Objects to Share the Texture
Start by identifying which objects will share the same texture.

2. UV Mapping in Maya
To share a single texture, all selected objects must be UV mapped into the 0-1 UV space without overlapping. Here's how to do it:
- Open the UV Editor: In Maya, select all the objects you want to share the texture.
- UV Map Each Object: Treat the 0-1 UV space as a single texture sheet. Select each object individually, scale and move its UV shells to ensure no overlap with other objects UVs.
This process involves:
- Selecting an object's UVs.
- Scaling and moving them to a unique position within the 0 to 1 space.
- Repeating for each object, ensuring all UV shells are neatly arranged without overlap.

3. Maintain Texel Density
Texel density must be consistent across all objects to avoid different texture resolutions between props (e.g. some objects appearing sharper or blurrier than others).
In Maya:
- Get Texel Density: Select a UV shell and under Transform click Get its texel density. This assigns a numerical value representing the UV shell's size relative to the texture resolution.
- Set Texel Density: Apply this value to the other objects UV shells using Set option. This resizes each UV shell to match the chosen texel density, ensuring uniform texture resolution.

4. Create and Apply the Texture
Once the UVs are laid out, create a single texture to be applied across all objects. Here's what I do using Substance Painter:
- Combine Meshes for Texturing: Temporarily combine all objects into a single mesh and export it as an FBX file. This simplifies texturing in Substance Painter.
- Texture in Substance Painter: Import the combined FBX into Substance Painter. Use the Polygon Fill tool to texture individual meshes, UV shells or polygons. This allows you to apply materials, effects and details to each object while working on a single texture sheet.
- Export the Texture: Once texturing is complete, export the textures to be applied to all objects.

5. Export Meshes for the Game Engine
While the objects are combined for texturing in Substance Painter, you must keep them separate when exporting for UE5 or any other game engine.

- Export Individual Meshes: Export each object as a separate mesh out of Maya.
- Import into Unreal Engine 5: In UE5, import individual meshes, create a material to use and assign this one single material onto all the Static Meshes.
See this tutorial on how to export assets out of Maya and import them into UE5.
Additional Tips
- Plan Texture Resolution: Decide on the texture size early to ensure proper texel density across all objects.
- Use Polygon Fill Strategically: In Substance Painter, use Polygon Fill tool to texture individual objects or UV shells.
- Test in the Game Engine: After importing into UE5, test that the texture displays correctly on all objects and that texel density is consistent.
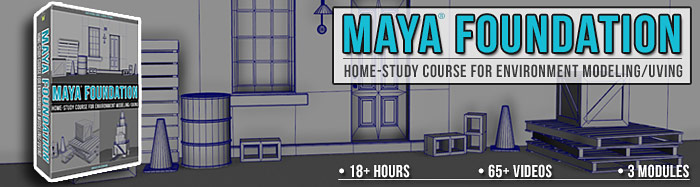
Learn Maya Modeling, UVing and Texture in Substance Painter
Learn environment modeling and UVing using Maya with "Maya Foundation" tutorial course and then also learn how to texture your assets with "Substance Painter Essentials" tutorial course. The complete tutorial set of modeling, UVing and texturing.
SUBSCRIBE & GET FREE, UPDATED PDF GUIDE
Subscribe to receive FREE & Updated "Maya 3D Primer" PDF Guide (200+ pages).

See more about this Free PDF Guides and what you are subscribing to.
TOP 7 TUTORIAL COURSES FOR 2026
 Modular Environment Design Masterclass Tutorial Course
 Maya Foundation: Home-Study Course - Model and UV Environments
 Substance 3D Painter Essentials - Master Texturing
 UE5: Fundamentals Vol.1 - Create with Unreal Engine 5
 UE5: Retro Office Project - Create Beautiful Interior Env
 UE5: Master Material Creation - Create Master Materials in UE5
 Preproduction Blueprint: Plan Environments and Level Designs
TUTORIAL CATEGORIES
MAYA FOUNDATION COURSE

SUBSTANCE PAINTER ESSENTIALS

MODULAR ENVIRONMENTS MASTERCLASS

UE5: RETRO OFFICE PROJECT

LEARN THE PREPRODUCTION PROCESS

ABOUT WoLD & ALEXG

My name is AlexG. I am self-taught level designer, game environment artist and the creator of World of Level Design.com. I've learned everything I know from personal experimentation and decades of being around various online communities of fellow environment artist and level designers. On World of Level Design you will find tutorials to make you become the best level designer and game environment artist.
Home Terms of Use/Trademarks/Disclaimers Privacy Policy Donate About Contact
All content on this website is copyrighted ©2008-2024 World of Level Design LLC. All rights reserved.
Duplication and distribution is illegal and strictly prohibited.
World of Level Design LLC is an independent company. World of Level Design website, its tutorials and products are not endorsed, sponsored or approved by any mentioned companies on this website in any way. All content is based on my own personal experimentation, experience and opinion. World of Level Design™ and 11 Day Level Design™ are trademarks of AlexG.
Template powered by w3.css